How to repair a bathroom faucet with shower. Do-it-yourself faucet repair - examples of some common breakdowns and their repairs Lever tap
Single-lever taps are rapidly replacing traditional valve devices in apartments and houses. But no matter how convenient such modern plumbing may be, it periodically fails for a variety of reasons.
In order not to spend money on buying a new faucet every time, it makes sense to understand the causes of breakdowns and master the independent repair of a single-lever mixer.
Ball, single-lever, joystick, articulated - all these are names for a mixer that is controlled by only one lever. Using such a faucet is simple and convenient: moving the lever vertically regulates the amount of water flow, and turning it horizontally sets the appropriate temperature.
This diagram allows you to understand the principle of operation of a single-lever mixer: changing the size of the hole for hot, cold and mixed water allows you to adjust its temperature and pressure with just a couple of movements
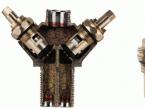
The internal structure of single-lever faucets usually comes in two types: a ball mechanism or a ceramic cartridge. The center of the ball mechanism design is the circular mixing chamber. It looks like a hollow metal ball with three holes in it.
Cold water flows into one of the holes, and hot water flows into the other hole. Inside the chamber, the flows are mixed and then flow to the third hole, which is connected to the mixer spout. The control lever moves the ball in such a way as to adjust the clearances in these holes, i.e. change the amount of hot and cold water entering the mixing chamber and the size of the outgoing flow.
The ceramic cartridge consists of two or three plates. At the bottom, as in the ball mixer, there are three holes with exactly the same functions: hot water, cold water, mixed flow. But mixing hot and cold water is done at the top of the device.
Both types of mixers operate approximately the same, but they react differently to operating conditions. For example, limestone deposits almost never accumulate in a ceramic cartridge. The fact is that the plates in such a device are ground to each other very tightly, the size of the gap is comparable to the parameters of the molecule.

This diagram shows in detail the structure of a single-lever ball valve. Information about the individual elements of the device helps to understand the procedure for disassembling and assembling it
But ceramics are not friendly with sand and other mechanical contaminants. A small grain of sand that gets into the faucet cavity can lead to chipping of the ceramic elements, and the entire cartridge will have to be replaced. Sand is practically not dangerous for a metal ball, but there are almost no obstacles for a raid.
The weak point of single-lever faucets is the rubber gaskets. In any case, these elements will have to be replaced at least every two years. Some buyers complain not about problems with the accuracy of temperature settings. This is a characteristic feature of inexpensive models with a small adjustment angle. Such devices break down much more often.
How to disassemble a single lever faucet?
Very often, problems with such faucets arise due to a breakdown of their internal mechanism. The algorithm of actions in this case is quite simple: the faucet must be disassembled, the damaged mechanism must be removed, replaced with a new, serviceable element, and the device must be reassembled in the reverse order.

This diagram details the disassembly procedure for a single-lever faucet with a ceramic cartridge. To carry out the work you only need a screwdriver and an adjustable wrench.
This is not a very complicated procedure, but all operations should be performed very carefully and accurately. First, of course, you need to shut off the cold and hot water pipes leading to the mixer. To disassemble the ball valve, you must:
- Use a screwdriver to remove the decorative plug.
- Unscrew and remove the fixing screw.
- Unscrew and remove the decorative nut, which serves as the cover of the mixer body.
- Unscrew the nut holding the mixer mechanism in the correct position.
- Remove the cartridge or ball mechanism from the valve body.
To remove the decorative plug, use a regular screwdriver. You should act carefully so as not to damage the element. To unscrew the fixing screw of the faucet handle, you can use a hexagon. In some models the handle fits quite tightly. It can be pryed off with the end of a screwdriver.

The mixer cover with the lever sometimes fits very tightly; you can use a screwdriver to remove it. Work should be carried out carefully so as not to scratch the body
It is not difficult to remove the mixer body cover by hand without the help of special tools. But it is more convenient to unscrew the fixing nut inside the mixer with an adjustable wrench. After this, removing the internal mechanism of the faucet will not be difficult.
It should be remembered that the sizes of these elements vary over a fairly wide range. The height of the rod can vary significantly, as can the diameter of the cartridge. There are also various options for the landing part of the mechanism. Therefore, experienced craftsmen rarely purchase a new cartridge in advance.

The nut that secures the position of the ceramic cartridge inside the mixer should be carefully unscrewed using a regular or adjustable wrench
It would be much more effective to suspend repair work at this stage, take the damaged “filling” of a single-lever faucet and go with it to a plumbing store to buy an element of exactly the same size and design.
Due to the design features of the mechanism, it cannot be adjusted or adjusted in any way; an exact match of all parameters is required.

Not all ceramic cartridges are the same size and configuration. To choose the right device, you need to take the damaged cartridge to a plumbing store
After purchasing a new cartridge, all work is performed in the reverse order: install the cartridge, put the adjusting rod on top, secure it with a screw and close it with a decorative plug. The direction of rotation for cold and hot water is usually indicated on the plug; this point must be taken into account during installation.

If the ceramic cartridge of a single-lever mixer is clogged or damaged, it should simply be replaced with a new element; washing usually does not help
When installing a ball mechanism, inexperienced plumbers sometimes confuse the location of the holes and install the mechanism incorrectly. As a result, such a mechanism will not work correctly after installation. Therefore, after disassembling the tap, you should carefully inspect the ball and remember its correct position in order to act correctly in the future.
Upon completion of the repair of the single-lever mixer tap, cold and hot water are reconnected and the quality of operation of the repaired device is checked. If you still experience problems, the cartridge may be installed incorrectly or there may be some additional damage to the faucet. The repair process for devices of this type is discussed in detail in the following video:
Overview of common breakdowns
Replacing the cartridge or ball mechanism is only one way to repair a single lever faucet. There are other failures of devices of this type, to eliminate which you will need different means and methods. The most common problems associated with joystick mixers are:
- cracked device body;
- clogged aerator;
- problems with supply pipes or flexible hose;
- incorrect position or wear of rubber gaskets;
- water leaking through the shower head;
- Problems with the flow switch on the shower hose.
Typically, diagnosing the problem is relatively easy, since each situation has characteristic symptoms. Sometimes you have to fix several breakdowns at the same time. This usually happens when using low-quality plumbing or non-compliance with the operating conditions of the mixer, which leads to increased loads.
Crack in the device body
If water is leaking from under the faucet, there is a high probability that its body is cracked or leaking somewhere. This situation can arise suddenly, for example, if a heavy object is accidentally dropped on the faucet. Sometimes gaps appear gradually, under the influence of exposure to water over a long period of time.
In any case, it is almost impossible to completely eliminate such a breakdown. The most reliable method of repair is to completely replace the body of the device, but usually the old mixer is simply dismantled and a new model is installed. A sealant is used as a temporary measure.
Usually the crack is simply covered with a suitable composition on top, for example, “cold welding”. Before starting work, you should study the instructions for using the sealant and strictly follow the manufacturer's recommendations. But a faucet repaired using such methods will look very unpresentable. Over time, the sealant will crumble and the repair will have to be repeated again and again. Therefore, after repairing the crack, you should immediately plan to purchase and install a new faucet.
Replacing a worn gasket
If the faucet is leaking from the bottom and its body is not cracked, the gaskets between the faucet and the flexible water hoses may have worn out. This problem is relatively easy to fix. First you need to shut off the flow of hot and cold water to the mixer.

If the rubber gaskets under the faucet ball mechanism are worn out or installed incorrectly, the faucet may make a lot of noise and even leak.
However, there will still be some water left in the mixer itself. You need to open the tap and drain this water. Now you should disconnect the hoses through which water enters the mixer. There are also residual waters here, so you should put a bucket below, and a rag won’t hurt to catch any accidentally spilled water.
When the flexible connections are disconnected, you need to unscrew the fixing nut, which is located under the sink and holds the faucet in the correct position. Under the nut there is a gasket. If it looks worn, cracked or warped, this is most likely the cause of the leak.
Such gaskets are sold at any plumbing store, or you can cut a suitable element from a piece of rubber. Before installing the gasket, it is recommended to clear the installation site of accumulated dirt. Then you need to reassemble the system in the reverse order: tighten the fixing nut, connect the flexible leads, restore the water supply. After this, you need to open the tap to check the operation of the device.
Problems with the aerator
A small nozzle placed on the faucet spout cuts the water flow into separate streams and artificially increases its volume. The holes in this nozzle are small; if the tap water contains contaminants, they can easily become clogged. Sometimes problems arise because the aerator is simply rusty.

The aerator - the nozzle on the faucet spout - can become clogged, which leads to a decrease in water flow. Flushing the aerator or replacing it helps solve the problem.
A characteristic sign of this problem is a decrease in water pressure at one point, for example, in the kitchen. At the same time, water flows from other taps in the same quantity. If the aerator was removed, and after that the flow of water from the mixer increased noticeably, then the cause of the breakdown can be considered precisely established.
Solving this problem is very simple. The aerator is usually easy to unscrew from the spout. After this, it needs to be washed or dirt removed in another way. You can even install a new aerator, if possible. After this, the previous water pressure will be restored. Some people refuse to use an aerator, but in this case, using the mixer will not be as comfortable.
If the pipes are clogged
Is the aerator in order, but the flow pressure has noticeably weakened? The pipes or flexible connections through which hot and cold water flows to the mixer are almost certainly clogged. This problem is especially common in older plumbing systems with metal pipes. During the corrosion process, metal particles accumulate inside, reducing or completely blocking the lumen.

If the flexible hoses through which cold and hot water are supplied to the mixer are clogged, they must be removed and cleaned or replaced with new ones.
First you should turn off the water, and then begin to repair the breakdown. With flexible hoses everything is very simple. They need to be removed, washed, cleaned and reinstalled. If the contamination is too serious, you can simply install new hoses. With pipes everything is a little more complicated. To clean them, use a “snake” cable.
In this case, the part of the pipe in which contaminants have accumulated should be disconnected from the water supply system, and after cleaning, installed in place. Sometimes such a section of the water supply is replaced and new structures are installed. If the pipes are old and get dirty often, it makes sense to think about upgrading the plumbing system and installing plastic pipes, which are much less susceptible to corrosion than metal structures.
Faucet in the bathroom
A faucet that is more complex in design than in the kitchen is usually installed on the side of the bathroom, since here, in addition to the usual spout, a shower head is used. In addition to the problems described above, there are breakdowns associated with the mechanism for switching the flow of water from the spout to the shower head and back.

The single-lever mixer, designed for installation on the side of the bathtub, is complemented by a mechanism for switching the flow to the shower head. If the gaskets of this mechanism are worn out, they must be replaced
It happens that water gradually leaks through the shower head. This indicates wear on the top gasket of the device. Fixing the problem is relatively easy. You need to remove the retaining nut and the shower hose that it holds in place. This will provide access to the top gasket.
This element is removed and replaced with a new one, which can be purchased or even cut from a rubber sheet, the thickness of which is about three to four millimeters. Of course, the installation site for the new gasket should be cleared of accumulated dirt. After repairing the faucet in the bathroom, the shower hose is put back in place and the operation of the faucet is checked.
But if problems arise with the gasket, which is located at the bottom of the faucet, it will be a little more difficult to fix the damage. Externally, this problem is expressed in the fact that the shower head control lever is not held in the correct position and falls down, preventing the water from switching.
First you need to turn off the supply of hot and cold water to the bathroom faucet, then unscrew the nut and remove the shower head. Then the adapter and the mixer spout are sequentially dismantled. To get to the gasket located below, you will have to remove the entire “stuffing” of the mixer. After this, the gasket is replaced and the device is reassembled in the reverse order.
It happens that the gaskets are not worn out, but they do not fit or are installed incorrectly. This is not uncommon when the gaskets are cut by hand. If, when opening the water, the mixer starts to make a lot of noise, it makes sense to check the condition of the gaskets. Usually it is enough to trim them or just change their position a little. If the gaskets are not at fault, the additional noise effect can usually be eliminated by installing filters.
How to prevent malfunctions?
The condition of the mixer and its service life depend on several factors:
- quality of tap water;
- proper installation of the water supply system;
- quality of a specific mixer model.
Inexpensive faucets may look attractive, but they don't last long. The case and internal mechanism, made of low-quality materials, fail quickly and often. Water quality and the design of the water supply system are interdependent factors. As soon as flaws in pipe installation become obvious, they must be corrected immediately.
The presence of coarse filters can significantly increase the service life of a single-lever mixer. Don't neglect this useful device. Water hardness must be taken into account at the stage of purchasing the device. The packaging and/or the mixer data sheet indicates what water hardness the product is designed for. These data should be correlated with information about the quality of water in your own home.
The aerator is another useful factor that can positively affect the condition of the mixer. The device cuts the water flow into separate jets, which visually increases the flow volume. This allows you to reduce the amount of water flowing through the mixer, which leads to saving water and the resource of the device.
If a faucet is leaking, you don’t have to call a plumber and pay for his work. In our article we will figure out how to disassemble a single-lever mixer and carry out repairs yourself. To carry out the work, you need to familiarize yourself with the structure of this sanitary fixture and prepare the necessary tools.
If it leaks from under the lever
Experts attribute the appearance of water from under the faucet lever to a broken cartridge. In this regard, we will need to disassemble the device and replace the cartridge.
Analysis of the mixer
At the initial stage of work, you need to remove the small rounded decorative cover. Usually on this plate there are two different colored dots (red and blue) indicating how to turn the faucet lever to add hot or cold water. If the direction of liquid supply does not match, the lid is turned over to the opposite side.

Single lever mixer device
When the decorative cover is removed, a screw will be exposed inside the hole that holds the lever in position. This lock can be unscrewed using a regular or Phillips screwdriver. There are times when you will need a hex wrench to remove the faucet.

After removing the decorative cover
After removing the lever in one way or another, remove the decorative cover. It happens that this part also cannot be removed in the usual way. The insert can be loosened by hand; to improve the effect, place a soft, dry cloth at the place where the force is applied. If you cannot remove the cap by hand, you can use the following to pull it out:
To protect the surface, the working part of the tool must be in contact with the part through the fabric. After several rotations in different directions, you can quickly remove the decorative cup.
Tightening or replacing the cartridge
After removing the protective cover, we see the cartridge in front of us. Now you need to unscrew the ring nut and you can remove the mechanism for supplying and mixing water. After pulling out this part, you can see the landing grooves on the bottom, which are used to install the device in its working position.

Grooves for cartridge installation
If, after removing the cartridge, wear and tear from metal corrosion is noticed, the mixer can be replaced with a new one. In some cases, water leakage from under the lever can be eliminated by tightening the nut.
Reassembly
Assembling the mixer begins with installing a new cartridge. After this, tighten the circular nut and install the decorative cup. Next, install the lever or flag and secure its position with a screw. If the fastener was rusty or had damaged threads, then the lever must be pressed tightly onto the cartridge holder.

Cartridge for single lever faucet
If it leaks after replacing the cartridge
The main reason for this fairly common phenomenon is considered to be corrosion of the metal in the seat. We have already said that you can try to cover such areas with silicone, but if this does not help, then you will need to change the entire mixer.
If the lever goes down on its own
Spontaneous lowering of the mixer lever usually tells us that it is broken. When you press the flag, water may flow in a thin stream or not at all. Many people believe that the main reason for this lever behavior is a cartridge failure, but this is not always the case.
All residents of a city apartment or country house use plumbing differently. Some open the taps carefully, others, for example, children, jerk the flag sharply. In the latter case, damage to the inner part of the lever, which fits onto the head of the cartridge, may occur. If damaged, the walls of the square insert diverge to the sides, which leads to a certain amount of free movement of the part; when lifted up, the crane begins to fall.
If it's leaking from under your shirt
In some cases, water may leak from under the faucet jacket. The main reason for this phenomenon is considered to be damage to the sealing gaskets, and liquid can leak both in the upper and lower parts in the area where the circular nut is located.

Water from under a gander's shirt
In this regard, when installing a single-lever mixer, you need to firmly tighten the circular nut. This part often gets unscrewed or loosened while the product is being transported, resulting in a small gap. Such a gap is quite enough for water leakage.
If the nut is tightened well, then the cause of the leak will be a faulty gasket. . To eliminate the problem, unscrew the nut and remove the nylon washer (serves to create a working gap between adjacent rotating parts of the housing). Next, remove the faucet spout along with the jacket and carefully check the installation locations of the gaskets.
There should be no traces of corrosion, sinks, etc. The only solution to the problem in this case is to replace the gander from the old faucet; in the worst case, you will have to replace the mixer completely.
The second reason for water leakage from the jacket is considered to be wear of the sealing gaskets.. Such parts are made in the form of a horseshoe, with their working part facing the water chamber. It is quite difficult to buy a new gasket for a faucet, but it is possible to repair a faucet.

Disassembling the mixer to eliminate leakage from under the jacket
To do this, several layers of fum tape are laid in the seats, which will increase the diameter of the seals and improve their tightness. Next, put on the gaskets, install nylon washers, and assemble the remaining parts of the mixer.
Before installing the tap in a permanent place, check its tightness. If the repair work is done correctly, the water does not flow, then the mixer can be fixed to the sink.
How to disassemble a single-lever mixer and make repairs yourself
How to disassemble a single-lever mixer and repair it yourself. What to do if water flows from under the lever or from under the shirt and if the lever lowers itself.
We repair a single-lever mixer ourselves
Single-lever faucets attract with their laconic design and ease of control of water flow. Turning on the water, changing its temperature and pressure - all this with one turn of the handle. These devices are reliable and have a long service life—some branded ones come with a 5-year warranty. However, repair of a single-lever faucet is periodically necessary.
Types of single-lever mixers and their design
Despite the external similarity, there are two types of rotary or single-lever faucets - with a cartridge (cartridge) and ball - with a ball inside. You can repair any of them, but to do this you must first disassemble them. And so that you can not only disassemble, but also assemble, it is advisable to become familiar with the internal structure of each.

The design may be different, the structure remains the same
Cartridge mixer: structure
Cartridge mixers are so named because their shut-off and control mechanism is hidden in a special cartridge flask. In more expensive faucet models, the cartridge body is made of ceramic, in cheaper ones - from plastic. The good thing about these models is that they are easy to repair, but it is not always easy to achieve the required pressure with them - you need tighter control of the handle. But changing the water temperature is very easy - with a slight movement of the hand.
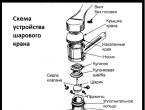
The structure of a single-lever faucet with a cartridge is simple. If you go from top to bottom:
- Switch with fixing screw.
- Locking (clamping) nut.
- Cartridge. The water flows are mixed in it, and the same device shuts off the water.
- The mixer body, which has a “seat” for the cartridge.
- Fasteners, studs and gaskets to ensure tightness.
- Spout (gander). It can be a separate part - in rotary models for the kitchen or part of the body - for sinks in the bathroom.
- If the spout is separate, gaskets are also installed below and there is also part of the body.

What does a single lever mixer with cartridge consist of?
The cartridge itself contains several (usually 4) ceramic or metal disks of a special shape. A rod is welded to the upper disk. By changing the position of the rod, we change the position of the plates relative to each other, changing the amount of water passing through the holes in the plates.
In order for the faucet/mixer to work normally, the plates are ground very tightly. For this reason, cartridge single-lever faucets are very demanding on water quality. Foreign fragments getting between the plates causes the faucet to leak or stop working altogether. To avoid this, some manufacturers install filters on the incoming pipes. But, it is better to install filters on the water supply and get clean water that can be safely supplied to household appliances.
Single lever ball mixer
It got its name from the element in which the water is mixed - a ball with cavities. The ball is usually metal, hollow inside. Its outer part is polished to a shine. The ball has three holes - two for the entry of cold and hot water, one for the exit of already mixed water. A rod is attached to the ball, which fits into a cavity in the handle. This rod with a rigidly attached ball changes the temperature of the water and its pressure.

The structure of a single-lever mixer with a ball water mixing mechanism
It is easier to adjust the parameters with such a device - the parts are well lapped, the handle moves easily. Mixers with a ball mechanism are less critical to the presence of mechanical impurities, but do not respond very well to the presence of hardness salts and excess iron. So for normal operation, pre-filtration is required here too.
How to disassemble and repair a faucet with a cartridge
Repairing a single-lever cartridge faucet often involves reassembling and cleaning the O-rings. Salts are deposited on them, debris and dirt accumulate, which is why the faucet begins to leak. To eliminate this nuisance, the mixer is disassembled, all parts are wiped of dirt (with soapy warm water), rinsed, dried, and put back in place.

Sequence of installation of parts in a cartridge single-lever mixer
Let's figure out how to disassemble a faucet with a cartridge. First, turn off the water, and then the procedure is as follows:
- Remove the decorative plug located on the handle. Just pry it out with a screwdriver.
- The mounting screw is hidden behind it. We unscrew it with a hex key and take it out.

First, unscrew the fixing screw
That's all. The single lever mixer with cartridge was disassembled. As you can see, there are not many details. The main working part is the cartridge. It is in it, inside, that mixing occurs.
Replacing the cartridge
The cartridge itself has a sealing gasket - a rubber seat at the bottom, which ensures a tight fit to the body. Over time, the rubber loses its elasticity and water begins to leak out. If this is the problem, you can first try to clean this ring from the salts and deposits that have formed on it. Place the cleaned part in place and check the work. If the leak does not stop, you will have to replace the cartridge.

Cartridges for “one-arm” faucets
Cartridges for mixers have different diameters, and the inlets and outlets in the lower part are located differently. Therefore, if you need to replace it, first you disassemble the mixer, get the treasured part and go to the store or market with it. You must choose exactly the same model without any deviations. At home, install the cartridge into the housing, turn it slightly until you feel that it “sits” in place. Next is assembly, it goes in reverse order.
First install the clamp nut. Actually, at this stage you can check how the new cartridge works. Turn on the water, adjust the temperature and pressure with the rod. To make it more convenient, you can put a handle on the rod. If everything is fine, continue assembly.
We disassemble and repair a single-lever ball mixer
The single-lever ball mixer was invented a little over 40 years ago. Its design is simple and reliable - there is nothing to break. If problems arise, it is only due to poor quality water - dirt particles settle on the rubber saddles on which the ball rests. The contact deteriorates, water leaks out and the faucet begins to leak.

How to disassemble a single lever ball mixer
Some ball valves are also available with a cartridge. Only inside the cartridge there are not plates, but a ball. Disassembly of this type is no different from that described above. All the difference is hidden inside the flask. There are also other types of taps. In them, the locking ball is installed directly into the rubber seat. There are some minor differences here.
The faucet lever is removed in the same way - first remove the plug, then unscrew the screw with a hexagon. Pull the lever up and remove it. Afterwards the steps are very simple and
Repair of single lever mixer for bathroom, kitchen
Self-repair of a single-lever faucet in a bathroom or kitchen is possible. You just need to know how to take them apart. Description with photos and videos in the article.
Faucet is leaking | Single lever mixer repair
Repair of a single-lever (flag) mixer
The tap is leaking! This is probably the most common expression in the topic of plumbing repairs. In this article we will look at how to repair a single-lever or, as it is also called, flag mixer.
Single-lever faucets have become widespread due to their ease of use, and most likely you use them in both the bathroom and kitchen.
The main control element of such a faucet is the cartridge, and if water is leaking from under the lever of your faucet, then it’s time to change this element. This does not present any difficulty; it is enough to know the operating procedure.
Faucet repair in photo examples

First of all, you need to remove the decorative cap - a plug, which, using colored marks, indicates the position of the lever for supplying cold and hot water

The opened hole provides access to the mounting screw that secures the cartridge and lever


Using a screwdriver (usually a negative one, but not always), unscrew the screw and remove the lever


Then unscrew and remove the decorative cover, which is attached to the external thread of the circular nut


Using a wrench, unscrew and remove the circular nut


We take out the damaged cartridge and replace it with a new one of the same size (common diameters are 35 mm and 40 mm)

There are two conical protrusions on the cartridge that act as guides; they should coincide with where they fit into the mixer body.

We repeat the assembly of the mixer in the reverse order. If the housing is not damaged by corrosion (sometimes) and has no mechanical damage, then the cause of the leak has been eliminated!
Lever faucets for bathtubs and kitchens have a similar structure, so leaks from under the lever can be repaired in the same way by replacing the cartridge.
The mixer has been repaired, that's all, successful repair!
How to disassemble and repair a single lever mixer
Design of single-lever mixers
Single-lever faucets are a relatively young development in the field of plumbing that have gained trust and popularity among consumers. Such cranes are also called “one-arm” or “single-grip”. They are very simple to use: temperature and water pressure can be controlled with one hand. Understanding the features of the mixer will help you easily cope with its disassembly and repair. Single lever mixer elements:
- control lever (handle);
- jet regulator (spout);
- frame;

- clamp (fastening);
- ceramic cartridge or ball mechanism;
- silicone or rubber gaskets;
- circular nut;
- flexible hoses for water supply.
According to the internal structure, single-lever mixers can be:
- Ball. The design of ball lever mixers implies the presence in the design of a hollow steel ball with three holes - a mixing chamber. Two holes receive hot and cold water, which mixes inside. Third, it dispenses warm water. The ball is moved by a handle. By moving, the ball allows you to regulate the water temperature and jet pressure.


In what cases is it possible to repair a mixer?
Not all faucet breakdowns can be repaired. Cartridge replacement or other repairs are carried out in the event of the following breakdowns:
- the cartridge is leaking;
- when turned on at full power, the ball mixer produces a weak water pressure;
- when turned on, water is simultaneously supplied to the spout and shower;
- Push-button switch failure.
More serious breakdowns occur extremely rarely, but require replacement of the entire mixer.

Disassembling the mixer
Almost anyone can disassemble and repair a leaking single-jaw mixer. You don't need professional tools for this.
Attention! Before disassembling the single-lever mixer, it is necessary to block the access of water to it.
For repair you will need:
- screwdriver or knife;
- hex wrench of suitable size;
- pliers.

Procedure
- Use a screwdriver (or knife) to remove the plugs on the lever that indicate the direction of the handle for supplying hot and cold water.
- Unscrew the screw and remove the handle.
- Carefully unscrew the ceramic and circular nut from the housing. This is done using a key or manually.
- Remove the cartridge from the housing.
The entire procedure for disassembling the mixer takes an average of 10 minutes and anyone can do it.

Fixing the leak
Leaks in single-lever faucets are often caused by failed cartridges. This happens due to abrasive particles of debris entering the interdisk space. In this case, the cartridge must be replaced.
When choosing a replacement element, it is worth considering that the holes in the cartridge can be of different diameters (3 or 4 cm). Cartridges may also differ in the latches on the bottom plate. Cartridges with silicone gaskets are recommended for replacement, as they are more durable when exposed to water.
Advice. Disassemble the faucet and remove the cartridge from it before going to the store. Having an old cartridge will help you avoid missing out on purchasing a replacement.
After installing the new cartridge into the housing, the mixer is assembled in the reverse order of disassembly.

Faucet/Shower switch leaking
Often the problem is associated with wear of the internal oil seal. To fix the problem, it (the oil seal) must be replaced. Troubleshooting steps:
- The handle must be in the closed position.
- Remove the flexible shower hose.
- Use pliers to remove the switch button from the faucet.
- Using a pin or screwdriver, unscrew the adapter from the spout.
- Replace the worn o-ring.

Troubleshooting a single-lever ball mixer
Ball mixers are durable, but if a breakdown occurs, they cannot be repaired and require replacement. You can eliminate with your own hands only a weak flow of water being released and leaks associated with wear of the sealing rubber bands. It’s difficult to call a “trouble” with a weak stream a breakdown - the mixer still functions. The reason is a clogged aerator.
Procedure for clearing the blockage
- Remove the aerator from the faucet spout.
- Rinse it thoroughly under running water in the opposite direction to the water flow.
- Install the aerator, securing it with the clamping nut.
Procedure for replacing rubber seals

- Remove the handle.
- Remove the plastic shield two-piece. The black part is a seal that needs to be cleaned or replaced.
- If the leak is not eliminated, remove the ball mechanism.
- Replace the bottom seal.
- Place the ball in place and secure the seals with a plastic nut.
- Install the handle and check the functionality of the mixer.
Advice. When replacing rubber seals, additionally use silicone grease, this will improve the tightness.
Troubleshooting the Bath/Shower Switch
A single-lever bathtub faucet has a switch that controls the flow of water to the bathtub and shower. Possible problems:
- water is supplied simultaneously to the bath and shower. The reason is the unsuitability of the spool gaskets.
- failure to return to the starting position of the switch button. The reason is wear of the switch rod spring.
Replacing the spool gasket rings involves some difficulties, and the main problem is that replacement gaskets are not available for sale. A spare set usually comes with the faucet. If the spare tire is lost, you can independently cut gaskets from dense (3-4 mm thick) rubber. Homemade gaskets can temporarily solve the problem, but they will not last long.

The switch design includes two gaskets - on top and bottom of the spool. If the cause of the leak lies only in the upper gasket, repairs can be made without disassembling the switch. It is enough to remove the decorative cap and carefully pull out the worn out rubber seal. Also carefully install the new gasket. If the problem persists, you will have to disassemble the spool switch and replace the lower rubber band.
The procedure for replacing the spool rubber seals:
- Check that the mixer lever is in the closed position.
- Disconnect the flexible hose of the shower screen.
- Remove the decorative cap, unscrew the screw fastening and remove the switch button.
- Carefully remove the spool from the mixer body.
- Notice the rubber seals by additionally lubricating them with sealing paste.
- Reassemble and install the switch in reverse order.

Replacing the switch spring
Failure of the button to return to the starting position can be corrected by replacing the stretched spring in the switch. Procedure:
- Remove the adapter as described above.
- Remove the rod with the wound spring.
- Remove the old spring.
- Using pliers, screw the new spring onto the rod. The spring should be made of galvanized steel, and slightly smaller in diameter than the previous one.
- Assemble and install the switch.

Preventive actions
Faucet repair cannot always solve malfunction problems. In many cases, and always at the wrong time, the tap must be replaced. To extend the life of the mixer as long as possible without repair, experts recommend taking preventive measures and taking a responsible approach to choosing the product.
- When purchasing, choose heavy-duty brass faucets. They are more durable and will last much longer. But sulimine mixers will not last long.
- To protect your faucet from most repairable breakdowns, install water filters.

Faucet leaks that are not corrected promptly can cause serious problems. It is not difficult to disassemble and repair the mixer yourself. The main thing is to understand the structure of the crane and have the necessary tools and spare parts on hand.
How to disassemble and repair a single-lever ball mixer: video - How to disassemble a single-lever faucet in a bathroom
How to disassemble and repair a single-lever mixer in case of leakage is shown in detail in the presented videos.
The sound of dripping water is not only annoying, but also increases your utility bills. The cause of this sound is a faulty faucet. To repair a kitchen faucet, you don’t always need to invite plumbers to do it. Some breakdowns can be easily fixed with your own hands, saving money and gaining good experience.
Diagram of a kitchen faucet.
Kitchen faucet repair: when is it necessary?
Any faucets can break. This is especially true for kitchen faucets, since they are used more often than bathroom faucets.
Repairing a kitchen faucet is not very difficult; you just need to identify the cause of the breakdown.
Kitchen faucet repair is necessary if:
- leaks from under the flywheel;
- flows through the spout nut;
- flows between the valve head and the male thread.

Mixer assembly diagram.
Most often, kitchen faucets have a high spout. It’s not for nothing that housewives consider this type of kitchen faucet the most convenient of all: it allows you to fill even deep containers with water. Such a mixer can be of a single-lever ball or two-valve type. The convenience of a ball kitchen faucet is that you can turn the water on and off with one hand. These faucets have fewer parts, so doing their own repairs is much easier. Most often, the need to repair a kitchen ball mixer arises due to the fragility of the shut-off valve.
Repairing a kitchen faucet requires the availability of appropriate tools and materials, the list of which may vary depending on the nature of the malfunction. A complete set that will allow you to quickly and efficiently repair the faucet in your kitchen with your own hands includes the following tools:
- Hexagons.
- Gas keys.
- Screwdriver Set.
- Large pliers.
- A regular wrench.
- FUM tape for sealing threaded connections.
- Vinyl tape (it will need to be wrapped around the jaws of the keys in 2-3 layers to prevent scratches on the surface of the faucet).
The procedure for repairing a ball mixer for the kitchen with your own hands
Installation of a kitchen faucet (useful tips).
You can prevent the annoying sound of dripping water from appearing while installing the faucet in the kitchen, or rather, even before installing it. The likelihood of a quick failure of the ball mixer will be significantly reduced if you install filters for cleaning on the cold and hot water pipes. After all, during repair work, as a rule, it is necessary to change the entire ball module, and this work is more expensive and labor-intensive than installing filters. A ball faucet can leak for a variety of reasons. The most common of them are wear of the internal gasket and mechanical damage to the mixer body, which leads to the appearance of a chip or crack.
As already mentioned, you can repair the faucet in the kitchen yourself. Before starting work, you must turn off the water supply and prepare a shallow container to drain the water remaining in the kitchen tap. If the product was purchased in a good store, you should have the manufacturer’s instructions describing the technical characteristics of this model; perhaps this information will be useful to you.
A small chip or crack can be sealed with sealant. If the crack is large enough, it is better to replace the valve completely. If no visible damage is found, but the faucet still leaks, then the reason is most likely a worn gasket. To replace it, you must first remove the faucet.
Disassembling the mixer
DIY faucet repair.
You need to carefully unscrew the nuts on the main body of the product. In many models, the nuts are hidden under an additional housing for a more beautiful appearance. The housing can be moved with little effort, gaining access to the fasteners. It is precisely because of the additional housing that the ball mixer at first glance looks non-separable. However, its handle has a hole for a hex key. This is where dismantling the crane begins. If you don't have a special wrench, gently tap with a hammer through a screwdriver. The top ball seal is located directly under the nut. Inspect the gasket and ball. Particular attention should be paid to its upper part, because... This is where the valve holes are located. The surface of the ball should be shiny and one color.
The ball body has 3 holes with rubber seals. These holes are supported by springs that need to be removed using a screwdriver. Failure of these springs can also cause leakage. In this case, the springs need to be replaced.
Replacing the ball mixer gasket
If you disassemble the product in order to replace the gasket, be sure to first buy a new one. Gaskets are sold in all hardware stores. The faucet gasket is a rubber ring whose main function is to seal the connection. The diameter of the ring should be slightly larger than the diameter of the socket in which you discovered a leak.
After replacing the gasket, you need to tighten the nuts very carefully, because the causes of gasket wear include not only long-term use, but also excessive tightening of the connection. For rubbing parts you need to use a small amount of silicone non-toxic lubricant. With it, the mixer will last 1.5-2 times longer than without it.
For models built into the sink, the cause of the leak may be wear and tear on the ceramic cartridge built into the faucet. The procedure for replacing it is no more complicated than replacing the gasket. You just need to remove the cartridge from the case and install a new one in its place.
Do-it-yourself repair of a two-valve mixer
No less common are two-valve mixers. The weak point of such products is the rubber gasket. This is especially true for hot water taps: due to constant heating, the gasket is destroyed much faster.
Buy a new gasket. Turn off the water supply, then unscrew the handwheel of the valve to be repaired and leave it in the open position to protect the valve parts from excess pressure. Remove the decorative caps (red and blue) from the valves and remove the screw holding the flywheel using a screwdriver. After this, use an adjustable wrench to unscrew the fastening nut. Once the head is removed, you will be able to see the problem - a deformed head on the valve. Remove the contents and install a new gasket. There are models of taps in which the gaskets are secured with special nuts. If there is one on your faucet, then it needs to be removed and after installing a new gasket, returned to its place.
Oil seal leakage is a common problem.
Another fairly common malfunction of valve kitchen mixers is oil seal leakage, which occurs due to wear of the oil seal packing. To understand what repair work needs to be done, you need to disassemble the mixer in the manner described above. Sometimes it is enough to simply seal the stuffing box, and in some cases it has to be completely changed.
After disassembling the product, try to tighten the stuffing box more firmly. If the leak stops after this, you can reassemble the faucet. If the leak continues, you will have to replace the packing. Ordinary twine soaked in machine oil, a piece of rubber tube, or a thread of burlap are suitable as padding. However, this is only if your kitchen has an old Soviet-made mixer installed. If the faucet is new, then simply buy suitable spare parts at a plumbing store.
The packing should be laid clockwise. Compact each subsequent layer with a screwdriver. Here it is necessary to find a middle ground, avoiding gaps and over-compaction. The bushing should be tightened by 2-3 threads. After completing the DIY kitchen faucet repair, check its functionality. Before turning on the main water supply valve, both taps must be returned to the closed position.
It is always useful to know how to repair a bathroom faucet with a shower, do it yourself, without resorting to the services of specialists. After all, sooner or later any faucet in the bathroom stops working properly. The main causes of problems: wear of cartridges, gaskets, seals and fasteners. With simple instructions, anyone can figure out how to repair a bathroom faucet with shower on their own.
Types and mixers and their designs
In order to repair a bathroom faucet with a shower, it is not at all necessary to call a plumber. Any crane can be easily disassembled into parts. If a person understands its structure, then repairing a bathtub and shower mixer will be quick and effective.
To find out how to repair a faucet, you need to understand which parts of a particular design are responsible for the malfunction.
There are three main categories of bathtub and shower faucets:

Bathroom faucets differ from others by the presence of a bath-shower switch, which are also divided into several types.
Types of bath-shower switches
A part whose failure is typical when repairing a bathroom faucet is the shower switch. It is responsible for switching the water supply to the mixer spout or watering can. There are 4 main varieties:

Main causes of failure
Do-it-yourself faucet repair will not take much time if the cause of the malfunction is correctly determined. Every device fails at some point. The mixer is no exception.
It can break due to wear and tear of the components. The lower quality the materials, the shorter the service life of the components and the more often you have to repair the faucet in the bathroom. How to repair a bathroom faucet yourself?
1. Leakage from under the lever
Usually caused by a broken cartridge in a single lever faucet. The following signs will indicate that the cartridge has failed:
- the handle is difficult to rotate;
- the water supply is not completely shut off;
- the water temperature changes randomly;
- Cold water flows from a hot tap, and vice versa.

To replace a ceramic cartridge:
- remove the plug painted blue-red;
- use a Phillips screwdriver or hex key to unscrew the fixing screw;
- by pulling the handle up, disconnect it from the body, and then unscrew the lid;
- use an adjustable wrench to unscrew the nut securing the cartridge in the housing;
- replace the damaged cartridge.
After replacing the faulty element, you need to align the protrusions on the cartridge body with the grooves inside. If you overlook this, the faucet will leak.
2. Valve leakage
In two-valve mixers, the sealing washer often wears out. Sometimes the crane axlebox also becomes unusable. Such breakdowns lead to leakage. To replace the valve axle or rubber ring:
- remove the plug from the faulty valve;
- unscrew the screw securing the valve to the mixer;
- use an adjustable wrench to disconnect the crane axle box;
- replace the valve axle or ring.

3. Leaking shower diverter
Before repairing the bathroom faucet switch, be sure to turn off the water in the room. A leak from under the switch indicates that the seal between the mixer being repaired and the switch has become inoperative. To replace it:
- remove the button by clamping the rod with pliers;
- remove the valve with the stem;
- pull out the damaged oil seal.

4. Broken shower switch button
If after water procedures the button cannot be returned to its original position, then its spring has broken. In this case, disassemble the switch according to the algorithm described above, take out the faulty spring and put a new one in its place.
Sometimes the shower switch does not work and water flows into the shower head and faucet at the same time. This is due to a crack in the oil seal, which is located on the rod. To fix this problem, you need to:
- remove the switch;
- get the rod;
- replace damaged oil seal.

Many apartments still use the old cork switches. Over time, the button moves away from the body, resulting in a leak. To eliminate it you need:
- remove the screw;
- remove the handle;
- unscrew the nut;
- remove the lock washer;
- take out the cork;
- wipe the cork and the inside of the case with kerosene;
- To grind the plug to the body, use abrasive paste, paraffin or petroleum jelly.
In spool switches, the gasket may wear out. To replace it you should:
- disconnect the hose;
- remove the spout;
- unscrew the adapter;
- unscrew the valve;
- get the spool;
- replace rubber rings.
The repaired button will last for several more years.
5. Hose leaking
Over time, the gasket at the point where the hose attaches to the faucet wears out. A leak forms. This kind of damage is easiest to fix: you just need to unscrew the nut of the shower hose, remove the damaged washer and insert a new one in its place.
6. Leak between watering can and hose
To eliminate this malfunction in a faucet that has broken down, it is also not necessary to use tools. You just need to unscrew the nut securing the watering can to the hose and replace the insulating gasket.
7. Clogged watering can
When troubleshooting bathroom faucets, repairs are not limited to replacing gaskets and cartridges. During long-term use, the holes in the shower head become clogged with sand, limestone and other hard deposits.
In order for the shower to work properly again, the screen must be disassembled and washed. In some models, the screw is located under a plastic cap in the center of the watering can. Sometimes in order to disassemble the mesh, it is necessary to turn it counterclockwise.

8. Weak pressure in the mixer
An aerator is screwed onto the end of the spout. It holds solids and increases water pressure. If the water flows in a thin stream, the reason lies in a clogged filter. To clean it, unscrew it with pliers, carefully disassemble it into its component parts and wash them under running water.
Other faults
Specialists also encounter other types of breakdowns:

Repairing a bathroom faucet with your own hands does not require special skills. This craft can be mastered not only by men, but also by women. Regardless of the type of faucet in the bathroom, repairing and replacing parts is not difficult.
Video instruction
Single-lever faucets today confidently hold the position of the most popular kitchen faucets due to their stylish appearance and ease of use. Although a high-quality device of this type usually lasts a long time, over time the owner begins to encounter certain problems.
Let's figure out what the single-handle faucet mechanism is, what operational problems may arise and how to fix them.
Device
There are two types of the plumbing fixture in question, which are designed slightly differently:

Disassembly procedure
In order to completely disassemble a kitchen single-lever mixer, you will need the following tools:
- flat screwdriver,
- pliers,
- hammer,
- hex wrench.
The first thing to do before starting the procedure is to turn off the water in the apartment and put on gloves. Further actions depend on the type of mixer.
Cartridge version
- Using a flathead screwdriver, remove the decorative red and blue plug located on the faucet handle.
- Use a hexagon to unscrew the screw that secures the joystick to the rod.
- Remove the handle, remove the decorative and clamping nuts. If the nut in the mechanism is not hexagonal, then care must be taken when unscrewing it so as not to damage the grooves.
- And finally, it remains to dismantle the mixing disc.
The cartridge is replaced only if it has a problem, for example, due to leakage or significant wear.
Ball version
- Remove the decorative plug, remove the screw and unscrew the lever.
- Dismantle the threaded connection and remove the screw using a flat-head screwdriver. You can clean it of scale using vinegar or specialized products.
- Pull out the ball and the rubber gaskets surrounding it.
- When putting the faucet back together, you need to check it for leaks.
Possible malfunctions and their repair
What can cause problems with the mixer? The most common are the following:
- a puddle regularly forms on the floor under the sink, which can leak and wet the ceiling of the neighbors below;
- when the tap is closed, water still flows from the spout;
- Moisture accumulates around the faucet body in the sink;
- leaks from under the adjustment lever;
- it is difficult to adjust the water pressure or temperature;
- The faucet vibrates and makes noise.
An extremely vulnerable place, with which problems often arise, is the junction of steel pipes with flexible connections. In this case, you need to make sure that the nut is tightly screwed and equipped with gaskets. At the same time, you should not allow too much tightening, this can lead to damage to the threads and even more leakage. It is possible that the eyeliner will need to be replaced - unfortunately, they are often short-lived.
If the problem is not in the liner, but in the mixer itself, then the following breakdowns may occur:
- A crack in the housing caused by over-tightening the nuts. Attempts to seal it by cold welding or another method will not give results, or it will be short-lived, so you will have to replace the mixer.
- Worn seals in a faucet with a swivel spout. Over time, they become unusable, as a result of which the water pressure begins to flow out from under the housing. The problem is solved by replacing the cuffs (gaskets), which cost literally pennies in the store.
- Aerator clogged. To fix the problem, it is enough to replace this small part or blow it out and thoroughly clean the mesh.
Nuances of having a cartridge
Typically, the problem is that the faucet continues to flow even when the handle is fully lowered, water is pouring over the top of the faucet, the lever is moved too hard, or the mixing quality is poor.
Usually these problems can be solved by replacing the cartridge. It's not that difficult to do it yourself:
- First, carefully lift and remove the plug above the retaining screw, then loosen the screw. This must be done carefully, after spraying it with WD40 so as not to tear off the splines.
- Loosen the screw, remove the handle from the cartridge lever and unscrew the decorative cap.
- All you have to do is unscrew the fixing nut counterclockwise and the cartridge itself will open. It is easy to pull out without using any tools. It's better to take it with you to the store to buy exactly the same one.