How to make a tesla transistor at home. Do-it-yourself free energy generator: diagram. Everything from nothing
Free energy today is used not only in industry, but also in everyday life. The topic of obtaining it has become in demand due to the fact that natural resources are not eternal, and the use of old technologies is not always economical.
[ Hide ]
What is free energy?
The term "free energy" in theory is associated with several figures:
- Helmholtz. The Helmholtz free energy is a thermodynamic quantity. Its decrease in the isothermal process corresponds to the work that was performed by the system on external bodies.
- Gibbs. The Gibbs energy is a parameter that measures the change in energy as a result of a chemical reaction.
In fact, another concept is embedded in this term. This is electricity that appears out of nowhere or additional energy on top of that which flows from one state to another. This means that there will be no more energy than it should be. Also, free energy includes the energy of the Sun, wind and other sources in relation to the use of fuel. Petroleum products can be used as fuel, as well as coal, firewood and any other materials that are subject to combustion.
Scheme and design of the Tesla generator
The essence of the operation of the generator device lies in the external processes that surround a person - in the influence of wind, water and vibrations. The design of a simple current generator includes a coil in which two windings are located. The secondary element operates under conditions of vibration, as a result of which, in the process, ethereal vortices cross in the direction of the cross section. As a result, a voltage is formed in the system, which leads to air ionization. This occurs at the tip of the winding, which contributes to the formation of discharges.
Oscillogram of electricity fluctuations maps curves. The use of transformer metal in the construction provides amplification of the inductive coupling. This contributes to the appearance of a dense plexus, as well as oscillations between the winding elements.
A simple drawing of a Tesla electric generator
As a result of extraction, the situation changes in the opposite direction. The signal in the system is attenuated, but the operating power parameter that can be obtained increases by passing through the zero point. After that, when the power reaches its maximum value, it will break despite the weak connection and the absence of current in the primary winding. According to Tesla, these vibrations can be obtained from the ether. In such an environment, electricity generation is possible.
Fuelless devices operate on power generated directly by the equipment. To start the devices, you need one impulse from the battery. But this invention of Tesla has not yet found application in everyday life.
The operation of a fuel-free electric generator depends on its design features.
The design includes:
- Two metal plates. One element rises, and the second is mounted in the ground.
- capacitor device. Two electrical circuits are connected to this component, which come from ground and from above.
A constant discharge is applied to a metal plate, as a result of which special particles are released. The surface of the Earth itself is a reservoir with minus particles, so one of the plates must be installed in the ground. The installation operates in conditions of increased charge, which leads to the flow of current into the capacitor device. The latter is powered by this current.
The channel "Just about the complicated" told and clearly showed the principle of operation of the Tesla generator.
Tesla Followers
After the advent of Tesla's device, after some time, other scientists began to work on the creation of generating units.
Carl Ferdinand Brown
Physicist Brown worked on the invention of unsupported traction due to the action of electricity. The scientist accurately described the process of generating power through work with an energy source. The next invention after the development of Brown was the Hubbard generator device. Signals were activated in the coil of this unit, which led to the rotation of the magnetic field. The power that the mechanism produced was high, this allowed the entire system to do useful work.
Lester Nidershot
The next follower was Niedershot. He created a device that included a radio receiver as well as a non-inductive coil. Physicist Cooper equipped his development with similar components. The principle of operation of the equipment device was to apply the phenomenon of induction without the use of a magnetic field. To compensate for it, coils equipped with a special winding spiral or two cables were introduced into the structure. The principle of operation of the device lies in the formation of power in the secondary circuit of the winding, and the primary coil is not needed to create a value.
As described, the concept indicates an unsupported driving force in space. According to the scientist, gravity allows you to polarize atoms. In his opinion, coils that are designed specifically, allow you to create a field and at the same time do not shield. Such elements have similar technical properties and parameters with the gravitational field.
Edward Gray
One of Tesla's followers was the scientist E. Gray. He was engaged in the development of generator devices based on the recommendations and works of Tesla.
Gray generator circuit diagram
It should be noted that from the point of view of physics, the concept of free energy as such does not exist. But practice has shown that energy has constancy. If we consider this issue in detail, then the generator device allocates power, which, after generation, is returned back. This results in the influx of energy through gravity and time not being visible to the user. If a process of more than three dimensions is formed, then free movement of particles appears.
One of the most famous scientists who was interested in such developments was Joule. In order to generate power, the use of generator device circuits will lead to serious losses. This is due to the fact that the distribution in the system is centralized and controlled.
Of the latest new developments, the simple Adams engine should be highlighted, and the scientist Floyd was able to calculate the state of the material in an unstable form.
Scientists have created many designs and inventions for generating energy, but not a single device that can be used in everyday life has yet appeared on the market.
Andrei Tirtha spoke about getting free energy at home.
How to get free energy with your own hands?
To make a free energy generator that can be used in the home, consider these practical guidelines:
- No need to "improve" other people's schemes. Drawings can be found online. Most of the above diagrams have already been checked and adjustments have been made to them that will ensure the correct operation of the device.
- Transistor elements and other components are used, taking into account power, we recommend buying parts with a margin.
- All devices and parts that will be used in the assembly at home must be checked before use.
- To create a device, you need an oscilloscope. With this equipment, you can perform pulse diagnostics. By adjusting the generator equipment, it is necessary to ensure the formation of fronts.
How to assemble a Tesla generator?
To assemble a generator that would receive free energy, you will need the following parts:
- electrolytic capacitor devices;
- diode capacitor elements made of ceramics;
- antenna module;
- grounding;
- a piece of cardboard measuring 30 * 30 cm.
Algorithm of actions during assembly:
- Take the prepared piece of cardboard and wrap it in food foil. Its dimensions must correspond to the dimensions of the cardboard.
- Using special brackets, fix diode and capacitor devices on the working surface of the board; they must be soldered together in advance.
- Connect the circuit to ground and connect it to the generating set.
- The antenna module must be equipped with a special pole made of insulating material. Alternatively, you can use PVC. The antenna itself is installed at a height of at least three meters.
- The output circuit is connected to a light source - a light bulb.
The assembled device can be used in private households, its installation will not cause problems in the presence of household generator equipment. If the system will perform the function of regularly providing the building with electricity, then a toroidal transformer or TVS is additionally mounted at the input of the wiring. This will make it possible to stabilize the incoming pulses and ensure the formation of constant waves, which will make it possible to increase the safety of power lines.
The layout of the Tesla generator device after assembly
Independent production of free energy from a transformer
Elements that will be required to assemble a transformer generator:
- locksmith tools - a drill, a set of drills, pliers, two screwdrivers, wrenches, a soldering iron with consumables, as well as a ruler and a clerical knife;
- epoxy resin or glue;
- electrical tape and double-sided tape;
- wooden or plastic panel, will be used as the basis for the board, dimensions are 100 * 60 cm;
- magnet, the dimensions of the device should be about 10 * 2 * 1 cm;
- a metal rod, its size will be 8 cm, and its diameter will be 2 cm;
- metal profile 100*5*20 cm;
- two transformer devices, the voltage value should be in the range from 110 to 220 volts, and the transformation parameter should be 1:5;
- two capacitor devices of 500 microfarads and four of 1000 microfarads, all elements are designed to operate at 500 V;
- socket for connecting external electrical circuits;
- a set of wires PV-3 10 meters long with a cross section of 1.5 * 2 mm, as well as two wires of 18 meters each of different colors with a cross section of 2.5 * 2 mm;
- enameled cable, its length will be 50 meters, and the cross section should be 1.5 * 2 mm;
- 150 special wood rods with a diameter of 3 mm.
The main stage in the assembly of the generator is the winding of the coils, the number of turns for each of them must be the same.
Nikola Tesla talked about getting free energy from a transformer device.
Assembly procedure:
- Draw two circles on the main panel, each should have a diameter of 10 cm, while the distance between their centers will be no more than 50 cm. Equal distances are marked on the circle, after which all points are drilled with a drill in accordance with the diagram. The drill diameter should be 3 mm. Wood rods are installed in the holes obtained. Their length from the surface will be 7 cm, the rest on each rod is cut off, after cutting, the elements must be carefully straightened.
- A cable with a cross section of 1.5 * 2 mm is laid between the rods, 12 turns are required for each coil. After winding the first layer, it is necessary to wind the second one, its cross section will be 2.5 * 2 mm, only now 6 windings are required for each element. Then a cable of a different color with a cross section of 2.5 * 2 mm is wound, six turns are required for each component. When winding, about 6 cm of each wire is left for connection to the next electrical circuit.
- Coils of cables can be pressed with a ruler from above, this must be done carefully. Electrical tape is wound on the top of the reel. Its presence will provide reliable protection of electrical circuits from external influences and damage, as well as the necessary strength of the device.
- The next step will be the creation of coils that will be used to control the magnetic resonator device. Take the prepared cylindrical twigs and wrap them with a layer of wax paper, a cable with a cross section of 1.5 mm is wound on top. Each coil will require forty turns.
- Using furniture fittings, as well as a piece of plastic, you need to build a movable mechanism and fix the coils that you made earlier on it. For fixing, epoxy resin or glue is used, the latter option is more preferable. It is important that the coils move without great effort, distortions are not allowed. Components with a length of no more than 25 cm are used as guides.
- Then the design must be fixed on the panel. An assembled assembly is installed between the coils and fixed by means of self-tapping screws. A magnet is attached to the device. It is fixed with glue.
- Take the prepared 500 microfarad capacitor devices and glue a piece of double-sided tape to the bottom of the elements. Capacitor components are mounted in the center of the coils made. These actions are performed with all devices. On the main panel, two capacitor elements are installed on the outside of the coil.
- The installation of the remaining components of the generator set is in progress. Transformer elements are fixed on the main panel. All parts are connected to each other by soldering. When connecting electrical circuits of coils and capacitor devices, it is necessary to monitor the correct assembly, as shown in the diagram. You can not confuse the end of the winding with its beginning. After soldering, the strength of the joints is diagnosed.
- Connect the outlet, its panel mounting is done in the most convenient place. Open cores of electrical circuits are wrapped with electrical tape, in its absence it is allowed to use heat shrink tubing. This completes the assembly procedure.
Adjustment of the magnetic resonator module is required before operation. A load must be connected to the outlet, which can be used as one or more light sources. They are connected in parallel to each other. The resulting load is connected to the generator device, after which the coils move towards the magnet. This will ensure the most efficient functioning of the equipment. You can determine the efficiency parameter by the incandescence of the light sources, when the desired effect is achieved, the adjustment is completed. 3. Installation of capacitor elements on the board
Instructions for assembling a magnetic generator
There are two options for generating electricity when assembling a magnetic generator device:
- Coils of an electric motor can be used as the basis of a magnetic internal combustion engine. This option is simpler in terms of design, but the engine itself must be rather big in size. It should have free space for mounting magnets, as well as windings.
- Connect an electrical generating device to the magnetic motor. This will create a direct connection between the shafts through the gears. This option will provide more energy production, but it is more complex in terms of assembly.
Power supply circuit for a generator device from magnets
Assembly algorithm:
- As a prototype of a magnetic device, a computer processor cooling fan can be used.
- Coils are used to form a magnetic field. Instead, the use of neodymium magnetic devices is allowed. They are installed in the directions in which the coils are mounted. This will ensure that the magnetic field required for the operation of the motor remains unchanged. The unit itself is equipped with four coils, so four magnets are required for assembly.
- Magnetic elements are installed in the direction of the coils. The operation of the power unit is ensured by the appearance of a magnetic field; the motor does not need electricity to start. As a result of changing the direction of the magnetic elements, a change in the speed of rotation of the motor is provided. The amount of electricity that the device generates will also vary.
Such a generator device is eternal, since the motor will function until one of the magnets is removed from its circuit. If a powerful radiator is used as the basis, then the energy it generates will be enough to power lighting sources or household appliances. The main thing is that they consume no more than 3 kW per hour.
Free energy is the process of releasing a large amount of this element. Moreover, in this case, humanity does not participate in such development. The force of the wind contributes to the rotation of electric generators. The greater the pressure drop, the higher the atmospheric condition. As for humanity, this factor is considered to be bestowed from above. Therefore, as such, there is no free energy generator circuit, such theories are put forward by modern experimenters.
However, due to scientific research, scientists point to the opposite information. The great electrical engineers Tesla, Faraday and Volt forced mankind to take a different look at physics and electrification, today the consumption of energy resources has increased. Most specialists try to get sources from the external environment. Such actions are easily feasible, given the fact that Nikola Tesla has already done similar experiments using generators.
Practical schemes of free energy generators
There are several ways to get the minimum power:
- through magnets;
- using the heat of water;
- from ferrimagnetic alloys;
- from atmospheric condensate.
However, in order to receive electricity in huge quantities, it is necessary to learn how to manage this energy. Thanks to the practical scheme of free energy generators, the light should reach every person, regardless of the local location. This is confirmed by historical facts. For such an experiment, a huge radiation power is required, which could not have existed in those days.
Even today, existing stations are not capable of delivering such a charge. To create a free energy generator circuit, certain tools and elements are required. So, in order to get the required amount of charged power, you need a coil, which was used by Tesla at the time. Electricity is received in the amount that is needed.

Free energy generator: diagram and description
The essence lies in the fact that humanity is surrounded by air, water, vibrations. So, there are two windings in the coil: primary and secondary, which falls under the vibrations, which in the process the ethereal vortices cross in the direction of the cross section. The result induces voltage, in fact, air ionization occurs. It occurs at the tip of the winding, giving out discharges.
The current fluctuation waveform maps the curves. The inductive coupling is strong due to the transformer iron, as a result of which there is a dense plexus and vibrations between the windings. When extracting, the situation will change. The pulse will die out, but the power will expand, passing the zero point, and break off when it reaches the maximum voltage, although the connection is weak, and there is no current in the primary winding. Tesla argued that such fluctuations continue due to the ether. The existing environment is designed to generate electricity. In practice, the working circuit of a free energy generator consists of a coil, windings. Moreover, the simplest way to obtain current looks like this (photo below):

Features of the development of the generator
Tesla's practical experiments show that electricity can be obtained using a generator, two coils and one additional coil without a primary coil, two windings. If you move a working and empty coil side by side at a distance of half a meter, and then simply move it away, the crown will die out. In this case, the current that is powered will not change the value of the position in space of the one that is not being charged from the network. The explanation for the generation and maintenance of such energy in an empty secondary winding is easily explained.
When electrical engineering developed, stations were built on alternating current. These buildings were low-power, they covered one network of enterprises that were equipped with different equipment. Despite this, there were situations in which the generators ran idle due to voltage drops. The steam made the turbines rotate, the engines ran faster, the load on the current decreased, as a result, the automation cut off the pressure supply. As a result, the load disappeared, the enterprises ceased to function due to the buildup of current, and they had to be turned off. In the process of development, the situation was stabilized by connecting a parallel network.
Further development of electricity
After a certain time, the power systems began to improve, and partially such voltage failures decreased. However, a clear and fundamental theory has emerged. As a result, current surges and similar additional energy are called reactive power. Similar jumps arose from the radio engineering of the EMF of self-induction. Essentially, the coils and capacitors worked both with and against the station. In addition, it was assumed that the current has a swinging direction, and the wires heat up on their own.
It was also determined that such failures occur due to resonance. But how a coil and induction condensate can increase the capacity of the energy system of hundreds of enterprises - many academicians thought about this. Some have found answers in the practical basis of Tesla's free energy generator circuit, and most have pushed this question into the background. As a result, not only engineers could not cope with their duties and tried to deal with reactive power, but in the process they were joined by scientists who created a variety of equipment to eliminate
Characteristics of the Tesla generator

A decade after receiving a patent for alternating current, Tesla created a self-powered free energy generator circuit. The fuelless model consumes the power of the installation itself. To start it, it takes a single pulse from the battery. However, this invention is still not used in the economy. The operation of the device directly depends on the design, which included the components:
- Two special iron plates, one rises up and the other is set in the ground.
- Two wires are connected to the capacitor, coming from ground and from above.
A constant electric charge is transferred to a metal plate, due to the fact that the sources emit radiant particles of microscopic size. The earth is a reservoir of negative particles, so the terminal of the instrument is connected to it. The charge is high, so current is constantly flowing into the capacitor, and thanks to this, it is powered.
Development of a fuel-free apparatus
The self-feeding scheme of the free energy generator, due to its design, corresponds to the status of a fuelless mechanism, because it uses cosmic radiation as an energy source. This device is able to activate itself, while extracting electricity from the earth's atmosphere. According to Tesla, a bunch of wires pointing up, out of the atmosphere, will give a current that will come from the earth, because there is more heat in it than outside it.
In the process of passing the voltage, it is possible to power the electric motor, and it will operate until the temperature drops in the ground. As a result, Nikola Tesla was able to deduce a scheme for a fuel-free free energy generator. Moreover, this installation produces electricity without additional power sources - only the atmosphere is involved. In the process, the energy of the aether was used in order to extract the charge of the particles. After some time, the scientist argued that an ordinary machine is not capable of doing the transformation.

Further developments of the mechanism
As a result, the scientist began to develop a turbine. The basis of this unit was a water pump, which was accelerated thanks to flat iron disks. A similar basis can be included in others no less. As a result of the working process, the scheme of the fuel-free free energy generator was improved, electricity was transmitted in the required amount. To assemble the device, you must perform three steps:
- collect the secondary winding, which is filled with a high content of volts;
- install primary coils with low voltage;
- build a control mechanism.
To create a working circuit of a free energy generator, it is necessary to make a base where the secondary winding will be assembled. This will require an object in the form of a cylinder, a copper wire that will be wound around it. The main material should not pass electricity, so it is better to use a PVC pipe. The winding is 800 turns. The primary wire must be thicker than the secondary wire. As a result, the fuel-free device looks like this.

General Descriptions of Mechanisms
The fuelless free energy generator circuit works on the principle of recirculating electricity back to the coil. Conventional devices work with the help of a carburetor, pistons, diodes, etc. That is, an engine is not required in this device. This element is replaced and converts energy constantly. The design of the device is built in such a way that the output power is less.
Modern scientists Barbos, Leal built a unique energy generator, which has an efficiency of 5000%. Today, this design, description, operation and process characteristics are not known due to the fact that the device is not patented. The free energy generator circuit of Barbosa and Leal is designed in such a way that the work gives a small coil of power. When the apparatus is started, the output energy exceeds the input level. A small prototype generates 12 kW using 21 watts.

The most famous ways to generate free power
The most popular are the works of Nikola Tesla. It was one of the first scientists who worked on free energy generator circuits. He was involved in the development of wireless communications. It was based on flat coils with a magnetic field inside. As a result, the transformer has an asymmetric mutual inductance. If a load is connected to the output circuit, this will not affect the power that is consumed by the primary winding.
In the process of work, Tesla began to pay attention to the transformer operating at resonance. Converted power into efficiency, which should have been more than one. To create such a circuit, I used single-wire designs. It was Tesla who created the term "free vibrations", in his studies he pointed to sinusoidal oscillations in an electric circuit. Tesla's work is still famous today. There are many followers of free energy.
Tesla Followers
Some time after the famous scientist, other researchers and inventors began to create and develop free generators. In the last century, in the 20-30s, researcher Brown developed unsupported traction due to electric forces. He quite clearly and structuredly described the process of obtaining driving power using
After Brown, Hubbard's inventions gained popularity. In his device, pulses fired in the coil, thanks to which the magnetic field rotated. The power generated was so strong that the entire system could do useful work. Later Niedershot created an electricity generator consisting of a radio receiver and a non-inductive coil.
A little later, Cooper worked with similar elements. The scheme of the free energy generator of this researcher was to use the phenomenon of induction without a magnetic field. To compensate for the last element, coils were used that had a specific winding with a spiral or two wires. The principle of the device was to create power in the secondary circuit, while bypassing the primary winding. In addition, the description of the device indicated an unsupported driving power in space. From Cooper's point of view, gravity is the polarization of atoms. He also argued that coils, which will be specifically designed, will be able to produce a field, will not shield and have a number of similar parameters and characteristics with a gravitational field.
Modern view of free energy
From the point of view of physical science, the concept of free energy cannot exist. This question is more philosophical or religious. However, as the practice of some well-known scientists shows, the energy of the system has constancy. A closer look shows that power is released and returned back. Thus, the influx of energy through gravity and time is not visible to outside observers. That is, if a process is created above three spatial dimensions, then free movement occurs.
Joule was interested in such inventions. The practicality of this device is obvious to the consumer. For energy production, the existence of working free energy generator circuits can result in large losses, due to the fact that the distribution is centralized and controlled.
Later, the concepts of free generators and similar theories were put forward by the scientists Adams, who built the motor, Floyd, the scientist who calculated the state of matter in an unstable form. These scientists had many inventions, designs and theories. Many successful devices could work for the benefit of mankind.
However, not all scientists and inventors have succeeded in science and similar designs. Many novice researchers conduct their experiments, but few succeed. True, recently one Internet user had the idea to repeat Tesla's invention. As a result, the user "Shark" had a free energy generator circuit recreated. Moreover, it also functioned correctly. In addition, many engineers claim that it is possible to create a free energy generator circuit using a cooler. This proves that the great minds of the past could get electricity even without specific appliances.
Electricity is getting more expensive every day. And many owners sooner or later begin to think about alternative energy sources. We offer as samples fuel-free generators of Tesla, Hendershot, Romanov, Tariel Kanapadze, Smith, Bedini, the principle of operation of the units, their scheme and how to make a device with your own hands.How to make a fuel-free generator with your own hands
Many owners sooner or later begin to think about alternative energy sources. We propose to consider what an autonomous fuel-free generator of Tesla, Hendershot, Romanov, Tariel Kanapadze, Smith, Bedini is, the principle of operation of the unit, its scheme and how to make a device with your own hands.
Overview of generators
When using a fuelless generator, an internal combustion engine is not required because the device does not have to convert the chemical energy of the fuel into mechanical energy to generate electricity. This electromagnetic device works in such a way that the electricity generated by the generator is recirculated back to the system through the coil.
Photo - Generator Kapanadze
Conventional electric generators work on the basis of:
1. Internal combustion engine, with piston and rings, connecting rod, spark plugs, fuel tank, carburetor, ... and
2. Using amateur motors, coils, diodes, AVRs, capacitors, etc.
The internal combustion engine in fuel-free generators has been replaced by an electromechanical device that receives power from the generator and, using the same, converts it into mechanical energy with an efficiency of more than 98%. The cycle repeats over and over. So the concept here is to replace an internal combustion engine that depends on fuel with an electromechanical device.

Photo - Generator diagram
The mechanical energy will be used to drive the generator and receive the current generated by the generator to power the electromechanical instrument. A fuelless generator that is used to replace an internal combustion engine is designed to use less energy in the generator output.
Video: homemade fuel-free generator:
Download video
Tesla generator
The Tesla linear electric generator is the main prototype of the working device. A patent for it was registered in the 19th century. The main advantage of the device is that it can be built even at home using solar energy. An iron or steel plate is insulated with external conductors, after which it is placed as high in the air as possible. We place the second plate in sand, earth or other grounded surface. The wire starts from a metal plate, the connection is made with the capacitor on one side of the plate and the second cable goes from the base of the plate to the other side of the capacitor.

Photo - Tesla fuelless generator
Such a self-made fuel-free mechanical generator of free energy of electricity is fully functional in theory, but for the actual implementation of the plan it is better to use more common models, for example, inventors Adams, Sobolev, Alekseenko, Gromov, Donald, Kondrashov, Motovilov, Melnichenko and others. It is possible to assemble a working device even when redevelopment of any of the listed devices, it will come out cheaper than connecting everything yourself.
In addition to solar energy, you can use turbine generators that operate without fuel on water energy. Magnets completely cover the rotating metal discs, and a flange and a self-powered wire are added to the device, which significantly reduces losses, thanks to which this heat generator works more efficiently than solar. Due to the high asynchronous oscillations, this wadded fuelless generator suffers from eddy electricity, so it cannot be used in a car or to power a house, because. motors can burn out on impulse.

Photo - Adams Fuelless Generator
But Faraday's hydrodynamic law also suggests using a simple perpetual generator. Its magnetic disk is divided into spiral curves that radiate energy from the center to the outer edge, reducing resonance.
In a given high voltage electrical system, if there are two turns side by side, as current travels through the wire, the current through the loop will create a magnetic field that will radiate against the current through the second loop, creating resistance.
How to make a generator
Exists two options work execution:
- dry way;
- Wet or oily;
wet method uses a battery, while the dry method does without a battery.
Step-by-step instruction how to assemble an electric fuelless generator. To make a fuel-free type wet generator, you will need several components:
- battery,
- charger of a suitable caliber,
- AC transformer
- Amplifier.
Connect the ac to dc transformer to your battery and power amp, and then connect the charger and expansion sensor to the circuit, then connect it back to the battery. Why are these components needed:
- The battery is used to store and store energy;
- A transformer is used to create constant current signals;
- The amplifier will help increase the current supply because the power from the battery is only 12V or 24V, depending on the battery.
- The charger is necessary for the smooth operation of the generator.

Photo - Alternative generator
dry generator works on capacitors. To assemble such a device you need to prepare:
- generator prototype
- Transformer.
This production is the most perfect way to make a generator, because it can last for years, at least 3 years without recharging. These two components must be combined using undamped special conductors. We recommend using welding to create the strongest connection. To control the work, a dynatron is used, watch the video on how to connect the conductors correctly.
Transformer-based devices are more expensive, but are much more efficient than battery-powered ones. As a prototype, you can take the model free energy, kapanadze, torrent, brand Khmilnik. Such devices can be used as a motor for an electric vehicle.
Price overview
On the domestic market, generators manufactured by Odessa inventors, BTGi BTGR, are considered the most affordable. You can buy such fuel-free generators in a specialized electrical engineering store, online stores, from the manufacturer (the price depends on the brand of the device and the point where the sale is made).
Fuel-free new generators on the Vega magnet for 10 kW will cost an average of 30,000 rubles.
Odessa plant - 20,000 rubles.
Very popular Andrus will cost the owners at least 25,000 rubles.
Imported devices of the Ferrite brand (an analogue of the Stephen Mark device) are the most expensive in the domestic market and cost from 35,000 rubles, depending on the power.
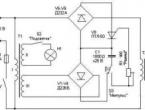
Today I'm going to show you how I build a simple Tesla coil! You may have seen such a coil in some magic show or TV movie. If we ignore the mystical component around the Tesla coil, it's just a high voltage resonant transformer that works without a core. So, in order not to get bored from the jump in theory, let's move on to practice.
The scheme of this device is very simple - shown in the figure.
To create we need the following components:
Power supply, 9-21V, it can be any power supply
small radiator
Transistor 13009 or 13007, or almost any NPN transistor with similar parameters
Variable resistor 50kohm
180ohm resistor
Coil with wire 0.1-0.3, I used 0.19mm, about 200 meters.
For winding, you need a frame, it can be any dielectric material - a cylinder of about 5 cm and a length of 20 cm. In my case, this is a piece of 1-1 / 2 inch PVC pipe from a hardware store.
Let's start with the most difficult part - the secondary winding. It has 500-1500 coils, mine is about 1000 turns. Fix the beginning of the wire with the lead and start winding the main layer - to speed up the process, you can do this with a screwdriver. It is also advisable to spray the already wound coil with varnish.
The primary coil is much simpler, I put the paper tape sticky side out in case to keep the ability to move the position and wind it around 10 turns of wire.
The whole circuit is assembled on a breadboard. Be careful when soldering the variable resistor! 9/10 coil not working due to incorrectly soldered resistor. Connecting the primary and secondary windings is also not an easy process, because the insulation of the latter has a special coating that must be cleaned before soldering.
Thus, we made a Tesla coil. Before turning on the power for the first time, place the variable resistor in the middle position and place a light bulb near the coil, and then you can see the effect of wireless power transmission. Turn on the power, and slowly turn the variable resistor. This is a rather weak coil, but in any way be careful not to place electronic devices nearby such as cell phones, computers, etc. with the working area of the coil.
Thank you for your attention
Also, do not forget about savings when buying goods on Aliexpress using cashback
For web administrators and public owners ePN main page
For users who buy on Aliexpress with a quick withdrawal% ePN Cashback homepage
Convenient cashback plugin ePN Cashback browser plugin

1. We control small motors
Controlling a small motor can be quite easy. If the motor is small enough, it can be directly connected to the Arduino pin, and simply changing the control signal level from logic one to zero will control the motor. This project will reveal to you the basic logic in controlling an electric motor; however, this is not the standard way to connect motors to an Arduino. We recommend that you study this method, and then move on to the next step - to control motors using transistors.
Let's connect a miniature vibration motor to our Arduino.
The Arduino IDE development tool has the ability to connect various libraries through the library manager, as well as downloaded from the Internet in the form of a ZIP archive or file directories. We will look at various ways to add/download Arduino libraries that make life easier for software developers. You can take advantage of some of the built-in features for adding libraries:
This machine is designed to do laser engraving on wood and opaque plastic, with Arduino and GRBL as the basis for automating machine code. The machine has 2 axes of movement, and this is enough for our tasks. It's only the X and Y axes that move the 1W 445nm laser. In this article you will find all the necessary materials and links to create such a laser monster)
DS18B20 is a digital temperature sensor. The sensor is very easy to use. Firstly, it is digital, and secondly, it has only one contact, from which we receive a useful signal. That is, you can connect a huge number of these sensors to one Arduino at the same time. Pins will be more than enough. Not only that, you can even connect multiple sensors to a single pin on the Arduino! But first things first.
You can make a generator that is powered by daylight. This is an excellent analogue of a solar panel, but the main advantage of such a generator is a minimum of materials, low cost and ease of assembly. Of course, such a generator will produce much less energy than a solar panel, but you can make a lot of them and thus get a good influx of free energy.
Nikola Tesla believed that the whole world is energy, thus, to receive and use it, it is enough just to assemble a device that could capture this free energy. He had many different designs for "fuelless" generators. One of them, which today everyone can do with their own hands, will be discussed below.


The principle of operation of the device is that it uses the energy of the earth as a source of negative electrons, and the energy of the sun (or any other light source) as a source of positive electrons. As a result, there is a potential difference, which forms an electric current.
In total, the system has two electrodes, one is grounded, and the other is placed on the surface and captures energy sources (light sources). A large capacitor acts as a storage element. However, nowadays the capacitor can also be replaced with a lithium-ion battery by connecting it through a diode so that the opposite effect does not occur.
Materials and tools for the manufacture of the generator:
- foil;
- a sheet of cardboard or plywood;
- wires;
- high-capacity capacitor with high operating voltage (160-400 V);
- resistor (presence is optional).

Manufacturing process:
Step one. We make grounding
First you need to make a good ground. If the homemade product will be used in a country house or village, then you can drive a metal pin deeper into the ground, this will be grounding. You can also connect to existing metal structures that go into the ground.
If you use such a generator in an apartment, then here you can use water and gas pipes as grounding. All modern sockets are also grounded; you can also connect to this contact.

Step two. Making a receiver of positive electrons
Now we need to make a receiver that could capture those free, positively charged particles that are produced along with the light source. Such a source can be not only the sun, but also already working lamps, various lamps, and the like. According to the author, the generator generates energy even in daylight in cloudy weather.
The receiver consists of a piece of foil that is attached to a piece of plywood or cardboard. When light particles "bombard" an aluminum sheet, currents are formed in it. The larger the foil area, the more energy the generator will produce. To increase the power of the generator, several such receivers can be built and then all of them connected in parallel.

Step three. Connecting the circuit
At the next stage, you need to connect both contacts to each other, this is done through a capacitor. If we take an electrolytic capacitor, then it is polar and has a designation on the case. To the negative contact, you need to connect the ground, and to the positive, the wire going to the foil. Immediately after that, the capacitor will begin to charge and you can then remove electricity from it. If the generator turns out to be too powerful, then the capacitor may explode from an excess of energy, in connection with this, a limiting resistor is included in the circuit. The more charged the capacitor, the more it will resist further charging.
As for the conventional ceramic capacitor, their polarity does not matter.


Among other things, you can try to connect such a system not through a capacitor, but through a lithium battery, then it will be possible to accumulate much more energy.

That's all, the generator is ready. You can take a multimeter and check what voltage is already in the capacitor. If it is high enough, you can try connecting a small LED. Such a generator can be used for various projects, for example, for autonomous LED night lighting lamps.
In principle, other materials, such as copper or aluminum sheets, can be used instead of foil. If someone in a private house has a roof made of aluminum (and there are many of them), then you can try to connect to it and see how much energy will be generated. It will also be a good idea to check whether such a generator can generate energy if the roof is metal. Unfortunately, there were no figures that would show the current strength in relation to the area of the receiving contact.