How to make a strip foundation with your own hands: step-by-step instructions, a diagram of a strip foundation for a private house. Guide to self-pouring the foundation of a house Strip foundation from the very beginning
Economically justified strip foundation for heavy buildings on difficult soils. This is due to the high budget for reducing heaving forces. Only monolithic structures have the maximum resource, the step-by-step technology of which will be discussed below.
Strip foundation technology step by step
For projects without an underground / basement level, shallow, shallow strip foundations, ground monolithic belts are preferable. Buried tape is effective only at a laying depth within 3 m.
If the soils at this depth do not meet the characteristics of the building (settlement from prefabricated loads), it is necessary to reinforce the tape with piles or revise the project in favor of a slab, pile grillage.
For the convenience of private developers without specialized education, regular practice is given below step-by-step instruction construction of a strip foundation.
Axle marking
The main problems of any reinforced concrete structure operating in underground aggressive environments are corrosion of internal reinforcement, cracking of the concrete structure, swelling of adjacent soils during freezing. Therefore, the main tasks of the designer, then the builder are operations that allow you to protect strip foundation from moisture, freezing. Bearing capacity is built into any project by default.
Thus, for a shallow MZLF tape, marking trenches is preferable, for a buried GZLF foundation - a foundation pit. In any case, it is necessary for workers to have access to the outer edges of the foundation (waterproofing, stripping), making drainage sewers. Therefore, the marking width increases by 1.2 m outward (pit), 0.8 m inward (trenches). 
The best option for marking the axle is cast-offs of two pegs with a horizontal bar of 60 - 80 cm. Two cast-offs will be required for each internal / external load-bearing wall. The markup technology looks like this:
- installation of cast-offs one and a half meters from the pit
- alignment in a single horizontal plane 5 cm above the design mark
- tensioning strings, cords for the side edges of the tape, the axis of the wall (the line along which the floor slabs will be laid)
For ease of markup, the following scheme is used:
- the first wall (front facade) is parallel to the street, 5 m away from the axis of the carriageway (the red line in the land surveying project) (3 m from the axis of the alley / driveway), located more than 3 m from the borders of neighboring properties
- two walls adjacent to it depart at right angles, laid out in a triangle way (legs 4, 3 m, hypotenuse 5 m)
- reconciliation of the diagonals should show the same result, the permissible error should be within 1 cm, ideally absent
It is enough to outline the edges of the pit, trenches with chalk, lime mortar on the ground.
Important: If the project includes MZLF with floors on the ground, the fertile layer inside the perimeter of the trenches will have to be completely removed. The slab cannot be concreted on this soil; it is guaranteed to sag after 2 to 6 months of operation.
Excavation
For MZLF, it is enough to remove the arable layer in the trenches (roofing along the beams) or from the entire perimeter (ground floor). If needed strip foundation deep laying, it is easier to rent special equipment, make a pit with a depth of 2 - 2.5 m with an excavator. In the latter case, additional soil will have to be removed. The side walls have an outward slope, which protects against rock collapse during further work.
foundation pit
When using with an excavator, it is recommended to dig just above the design level in order to trim the bottom manually. If the bucket sinks in some areas, later you will have to remove the entire layer to this mark - it is strictly forbidden to level the pits with the same soil, even rammed. 
trenches
The minimum construction budget provides strip foundation MZLF. The arable layer is removed from the trenches to a depth of 60–80 cm. Then a trench-in-trench is made for drainage sewage with a section of 50 x 50 cm. 
Underlayment
The purpose of backfilling from inert materials is to replace heaving soils, level the perimeter, and ensure drainage of the sole of the tape. Step-by-step instruction work of this stage is as follows:
- bedding layer - thickness 10 cm, material sand at low groundwater level, crushed stone at high groundwater, twice the width of the tape
- compaction - with hand rammers, vibrating plates, so that there is no trace on the sand
The operation is repeated until reaching 40 - 80 cm, depending on the nature of the soil. Then, strip foundation it is necessary to protect from moisture, the concrete laid in the formwork from dehydration, the reinforcement from corrosion. All these problems are solved by the footing with the fusing of a waterproofing carpet:

Drains should be located outside the perimeter of the footing, otherwise the efficiency of groundwater drainage is reduced.
Reinforcement
Unlike concrete, reinforced concrete composite material, reinforced at two levels with bars of variable cross section, withstands both compressive and tensile forces. Fabrication of frames with which to reinforce strip foundation, is produced according to the scheme:

Longitudinal rods are cut from 8 - 16 mm A400 reinforcement of a periodic profile. Anchors, clamps are made of smooth 6 - 8 mm A240 reinforcement. L-shaped, U-shaped anchors reinforce the corners, T-shaped interfaces of the walls. Structural reinforcement is used in deep-laying tapes - additional bars in intermediate chords, necessary for the rigidity of spatial frames, ensuring a minimum percentage of foundation reinforcement.
It is better to connect frame elements with wire twists with a special tool - a hook. The overlap when increasing the length is 40 - 60 cm, the run-up in adjacent rows of adjacent joints is 60 - 80 cm. Welded frames from special reinforcement are allowed, in the marking of which there is a letter C after all the numbers.
formwork
Concreted strip foundation usually in removable formwork, the panels of which are made of oriented strand board, multi-layer plywood, edged board 4 cm minimum. This sheet, lumber can be useful in the future, therefore, the inner plane of the shields is covered with polyethylene, which additionally prevents dehydration and leakage in the cracks of the formwork.
The shields are installed close to each other, fixed in a vertical position by internal ties, external supports. It is mandatory to control the alignment with the walls of the building. The upper board is set along the cords, that is, 5 cm above the design level. This will prevent splashing of concrete during the work. 
At a depth of 1.5 - 2 m, it is necessary to install sleeves for the nodes for entering communications into the cottage. At the level of 40 cm from the blind area, it is necessary to provide for the installation of void formers (only for projects with ceiling beams). These holes are underground ventilation products, prevent rotting, corrosion of the elements of the load-bearing frame, remove harmful radon. Their total area should be approximately equal to 1/400 of the size of the basement of the foundation.
fill
Strip foundation they are concreted according to standard technology, laying a layer of 60 cm along the perimeter, compacting it with the tip of a deep vibrator. It is difficult to pour deep foundations at one time, to withstand a technological break of less than 2 hours. Therefore, phased concreting is often used:

In the first three days, side stripping is prohibited, a moisturizing compress is applied to the upper edge of the tape from regularly wetted sawdust, rags, and sand. This allows the hydration of the cement inside the mixture to be completed, to ensure the branded strength of concrete, to prevent the opening of cracks, the formation of shrinkage funnels.
Additional protective measures
Strip foundation must be protected from heaving forces, soil / ground water, freezing. Comprehensive protection is provided in the following ways:

Pasting the outer edges of the deep-lying tape to bring the dew point outward, eliminating fogging of the inner walls of the basement. Installation of extruded polystyrene foam on the surface of the tape of any level of penetration allows to reduce the tangential heaving forces. This method is called sliding-crumple protection, has the following scheme:
- high-density XPS expanded polystyrene is glued onto the waterproofing film
- its surface is covered with two layers of polyethylene, fixed only in the basement of the foundation
- PSB 25 low-density polystyrene sheets, not fixed to the foundation, are pressed vertically to the polyethylene with backfill material (sand)
The resulting heaving forces crush the PSB, displace it on a smooth film top in winter, without destroying the main contour of the insulation. After thawing, the structure, together with the reduced volume of soil, returns to its original position.
The classical strip foundation technology, regardless of the depth of the foundation, has the indicated form. For an individual developer, all the secrets of manufacturing on their own are given. This will reduce the construction budget, avoid mistakes, and ensure the maximum possible operational resource.
One of the most reliable, durable and simple foundation options for a capital building of any type is a strip foundation. It is widely used in low-rise buildings, as it is suitable for any buildings: baths, houses, and even under fences with gates.
The technology of its construction is as simple as possible, so building it with your own hands is not so difficult, and not only a small option, for example, under a fence, but also under a two-story residential building.
The strip foundation has several design options, but all of them can be divided into two large groups:
- buried
- and shallow
Strip foundation options
Shallow version of the strip foundation
The simplest and most inexpensive option, the construction of which does not require a large amount of resources, both material and human.
It is used for houses of small mass and area made of light building materials, as well as on hard ground: on rocky and close to it.
Basically, such a foundation is built for the following types of buildings:
- Any wooden houses of a small area, especially panel and combined ones. They do not weigh so much that they need a full-fledged massive base, and if the soil on the site is dense enough, and also has a low level of heaving or construction is taking place in a warm region, you can get by with a shallow version of the strip foundation.
- Small buildings made of sibit (aerated concrete) or foam concrete blocks. The reasons are basically the same as with wooden houses: buildings of one or two floors made of such materials have a low mass, so they do not need a deep and powerful foundation.
- Brick and stone buildings of a small area - for one car, a family bath, some outbuildings and other building options. The brick itself is a heavy material, but if the building is small and the soil is dense enough, then there will also be no serious load on the base and the simplest can be built.
Usually, a shallow foundation does not exceed 80 cm in height, and another 15-20 can be spent on creating a pillow and sole, on which the foundation stands in the trench.
The only drawback of such a foundation is the lack of a basement.
Since in the recessed version the foundation simultaneously plays the role of the walls of the basement, cellar or basement, this will not work in the shallow version.
For heavily heaving or moving soils with a high level of groundwater, you can use a combined version - pile-tape. In this case, the tape also remains shallow and is further built up with piles or "legs" to harder and more stable soil layers.
Recessed version of the strip foundation
A full-fledged version of the strip foundation is buried below the freezing level of the soil, reaching the hard ground. It is used as a base for large, massive buildings that need a stable and heavy support so that the building does not begin to sag and warp.
Therefore, the foundation itself must be deep, wide and heavy, standing firmly in the soil and not moving along with its freezing, with an increase in groundwater and in any other climatic and geological changes.
Typically, the depth of such a foundation falls 30-50 cm below the freezing horizon, due to which it turns out that the foundation and the building itself stand on solid ground, and the upper soft layer acts as a pillow.
Such a foundation is always built if the soil on the site freezes deeply, is wet and soft. A deep foundation requires a large amount of materials for its construction, therefore, in order to save money, it is possible to erect options in which the array of the foundation tape expands to the bottom or is a stepped structure. T
Which options are more difficult to build and design, but allow you to spend significantly less building materials, since the strip foundation is the most expensive foundation of all in terms of the amount of concrete, reinforcement and related consumables such as sand and steel wire for dressing the reinforcing belt.
The recessed strip foundation according to the design of the tape can be monolithic or prefabricated.
Prefabricated strip foundation
The prefabricated strip foundation is a strip of prefabricated reinforced concrete blocks connected into a single array using concrete and reinforcement. In this case, the formwork is filled with ready-made blocks produced in the factory, and as a result, a solid array is obtained.
The advantages of this design include short construction times and the possibility of construction in any season and in any weather.
But there are a number of disadvantages: finished blocks are more expensive, and moisture penetrates into their joints. Therefore, the construction of this option requires the creation of additional insulation, and a drainage system that will remove excess moisture.
Monolithic foundation tape
The monolithic foundation tape is a reinforced trench filled with concrete. The result is a single concrete mass, that is, a monolith. This option is the most reliable and versatile, so its design can be any.
The advantages of a monolithic foundation: no need to involve equipment, the ability to carry out all the work on our own, as well as a wide selection of designs and options for the tape.
There is only one drawback - the high price and high consumption of materials, especially fittings.
Stages of work on the construction of a strip foundation
Step 1 - Material for the construction of the strip foundation
The construction of the strip foundation is carried out using cement grade 200. This is a rather laborious process. If it is not poured at the same time, the foundation structure will not be strong. It is better to use coarse sand, cement and crushed stone for the construction of such a foundation. At the same time, while starting the solution, strictly observe the proportion. 2:1:2:5
In addition, for the construction of the foundation, you still need:
- River sand. They put a pillow under the foundation.
- Several pieces of shovels, bayonet and shovels.
- Levels, small and large.
- A large number of ribbed reinforcement 10-12 mm for creating belts and smooth, with a diameter of 6-8 mm, for bandaging. You will also need steel wire to connect the reinforcement overlaps.
- Formwork boards. You can use slab, it is the cheapest and most available of all this type of lumber.
- Nails, hammers, a hacksaw, a grinder and preferably a vibrator for tamping concrete.
- Concrete mixer for half a cube or a cube.
- Materials for the manufacture of concrete.
Step 2 - Preparing to build the foundation
The first step in any construction is the preparatory work, and they begin with the design. Therefore, you first need to find out the depth of freezing by digging a test hole and looking at the cut of the soil layers, or look at the average value for the region in the corresponding SNiP.
Based on these data, the depth of the tape is planned. It is also important to consider that the foundation should be slightly wider than the wall, and if the soil is soft, an empty space should be left along the outer walls, which in the future will be covered with sand to create a cushion between the tape and the moving soil.
A ditch is being dug, clearly according to the markings for the foundation.
Step 6 - Formwork Installation
It is installed from wooden boards, in accordance with the size of the foundation.
For formwork, any boards are taken, in which at least one side is planed. You can use the old ones, the main thing is that they are strong enough and as long as possible.
The inner side of the formwork should be a flat surface without strong drops and cracks into which the mortar can begin to pour.
In doing so, be sure to:
- Installation of corner supports with wooden beams;
- With the help of edged boards, a formwork structure is assembled, which is fastened with metal corners and self-tapping screws. At the same time, the heads of the self-tapping screws remain inside the formwork, and the bars and corners are outside;
- The outer side of the formwork is fixed with supports. This will prevent deformation of the structure under the weight of the poured solution;
- The height of the formwork cannot be less than 30 centimeters from the ground level.
- Inside the formwork, a level is drawn for the level of pouring concrete.
According to all the rules, the formwork for a deep foundation is built from the bottom of the trench, but in some cases it is allowed to erect it only on the surface of the soil.
In these cases, the walls of the trench must also be even and dense enough not to deform under the mass of liquid concrete when it begins to fill.
If there are no boards, any durable panel material will do, even slate.
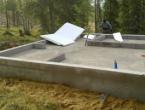
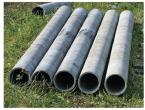
Above the ground surface, the foundation should rise at least 30 cm, so it is better to make the formwork 50 cm high just in case. You also need to remember to lay all the necessary pipes if communications enter the house through the floor. For this, large-diameter asbestos-cement pipes are used, into which water and sewer pipes will then be laid.
Step 7 - Reinforcing strip foundation diameter
After the construction of the formwork is completed, a reinforcing belt is knitted along the entire length and height of the trench. For longitudinal belts, reinforcement of maximum length is required, preferably six meters, if the length of the side of the foundation is not less, 10-12 mm thick with a ribbed surface.
Vertical rods and cross bows can be made from smooth, 6-8 mm in diameter. Between themselves, the longitudinal elements should overlap with the ends of at least 30-40 cm, and each of the rows is knitted from two rods together.
Such requirements are due to the fact that it is on this part of the foundation that the main load falls, and if you save on it, it will not be as reliable as it should be. All ends are tied with steel wire, it is undesirable to use welding, since it does not give the necessary strength inside the concrete block.
The step with which the vertical rods are installed and the internal and external horizontal ones are tied together is determined by the design calculations, but it is not advisable to make it less than 50 cm.
Metal rods are not less than 8-12 mm in diameter, cut into pieces up to two meters, but not less than 45 centimeters, which are laid out in no more than 40 centimeters.
At the same time, steel rods are attached to each other by tying with a wire. Some use welding for this. But you shouldn't do that.
Step 8 - Filling the formwork with concrete
It is desirable to carry out work on pouring the formwork with concrete in one day, since at the junction of the seized and fresh parts, the strength of the foundation will be lower, and it is here that large through cracks may appear.
For concrete, it is better to take crushed stone of medium or small formation, this option is stronger than large stones.
If the crushed stone is very small, you need to reduce the amount of sand, since it is present in the crushed stone initially. Concrete is poured in layers, 20-30 cm each, and after pouring each layer it needs to be compacted. It is best to do this with a construction vibrator to eliminate small air cavities.
If there is no vibrator, you can make a rammer from the boards, the main thing is that the concrete be rammed. In cases where he buys ready-made concrete and pours it from an industrial mixer, it must be turned when pouring with crowbar or thick reinforcement so that cavities do not form in it. The formwork walls must be tapped with a wooden mallet for better shrinkage.
The upper part is leveled in the same way as when pouring the screed.
Upon completion of concrete work, the foundation must be covered with roofing felt or plastic wrap from precipitation and left to set. In normal weather with a small amount of rain, the foundation for the house sets in about a month. In the case of a fence, a couple of weeks or less is usually enough, depending on its volume.
Before choosing concrete for construction, you need to pay attention to the following important factors:
- What will be the mass of the building
- What will be the type of reinforcement
- What soil
Very often, a concrete pad is made under the strip foundation, which has a thickness of 10 cm. In this case, concrete M100 and above is suitable.
If the future structure will have more weight, for example, a prefabricated panel house, then in this case concrete M200 will be enough.
During the construction of a small one, M250 concrete is suitable if the groundwater does not lie deep.
If the future house is large - massive, then in this case it is worth using M350 concrete. It is this type of concrete that is classified as a particularly durable class, since it contains granite.
The most reliable is the M450, which is considered durable.
Remember! If construction takes place in a region where the climate is harsh, then give your preference to a higher grade of concrete.
To prepare concrete, you will need the following materials:
- A concrete mixer, since it is very difficult to knead with your hands, especially if a lot of concrete may be needed
- Shovel
- Capacity
- Cement
- Sand
- rubble
- And water
Any concrete consists of the following components:
- cement
- Fillers - it can be crushed stone, sand, gravel, other bulk materials
As a result of mixing these components, concrete is obtained. The quality will depend on the content of various fillers in the cement.
Concrete markings:
- M - brand of concrete - this parameter shows how the frozen foundation will transfer loads after 30 days
- B - class of concrete - this parameter carries information about the degree of compression
- F - resistance to frost - this indicator shows how much frost and defrosting concrete can withstand
- W - water resistance - this parameter characterizes the water permeability coefficient of concrete. Usually the values range from 2 to 12.
- P - mobility - this parameter characterizes the liquid of a homogeneous concrete mixture and the flow coefficient.
For example:
- Concrete M100 B7.5 - it is of very low quality and is used only in preparatory work during construction
- Concrete M150 B12.5 - this type of concrete is not of very good quality. It is mainly used in the construction of concrete paths.
- Concrete M200 B15 - this type of concrete is used in construction with low load. It could be stairs.
- M300 B22.5 concrete - this brand of concrete is considered the most popular in Russia. It is used for pouring foundations and in the construction of high-quality houses.
- Concrete M350 B25 - this brand of concrete is considered very good. It is used in the construction of buildings and structures that require extremely high strength.
Filling formwork with cement mortar
- To do this, you need to: prepare a concrete solution, bring it with continuous stirring to a creamy consistency, then add gravel to it and mix everything again;
- The pouring of the formwork with a solution takes place with a systematic tamping and flow over its area with a rod made of metal. Thus, air is removed from the foundation. It is better to use a construction mixer for this;
- The solution is poured to the designated level in the formwork;
- The top layer of concrete mortar is leveled with a special tool, that is, a rule. It is better not to do this with a trowel;
- The top layer of poured concrete must be crushed with dry cement. It is better to do this with a sieve. This will speed up the drying process of the top ball of concrete mortar.
- The finished foundation in the formwork must be covered until completely dry. Usually 3-4 weeks is enough for this.
- If it is very hot, the foundation should be systematically watered. This will keep the top ball of the foundation from drying out.
And when the foundation is ready, the formwork is removed, you can start building the walls. Just before doing this, you need to complete. This will extend the life of the foundation, protect the walls from moisture and keep the heat in the house.
Is it possible to fill the strip foundation in parts
Answer: yes. You can fill in parts. This method is perfect for a strip foundation, where the largest amount of grout is spent. At the same time, the quality of work will not decrease, as modern technologies and skilled craftsmen make it possible to carry out such work perfectly.
What should be considered in this case?
One of the main parameters is time, since incorrectly adjusted work intervals can reduce the quality of the structure as a whole. Therefore, it is worth knowing that before the foundation becomes strong and reliable, concrete goes through stages. It is these two processes that have certain time intervals that you need to know and take into account in your work.
Minimum setting time– 3 hours if the temperature outside is 15 degrees. The maximum time is a day if the temperature is lower than prescribed. This is considered the most important process, since it binds all the components that enter the solution.
Therefore, remember! If it is necessary to fill in parts with an interval of 8 hours, then the layers themselves must be thick. Otherwise, the desired effect will not work.
solidification process it takes up to a month and only after the expiration of this period the foundation will be able to withstand the necessary loads.
If you need to fill the foundation in parts, then the next layer can be laid only after three days. If these time intervals are not observed, the foundation may eventually crack.
- Filling subsequent layers can be done after 8 - 10 hours in cold winter time and at least 5 hours in autumn and summer periods
- Before proceeding to the next layer, it is necessary to work on the previous one - to clean it of dust.
The requirements for the foundation are very high.
The strength and reliability of the foundation are among the main, but not the only tasks assigned to the supporting structures.
- Unburied. It is created on absolutely immovable soils - rocks, strong stable soils. It is extremely rare.
- Shallow. It is used for construction on solid soils that are not subject to frost heaving. The depth of laying is less than the level of winter freezing of the soil.
- Buried. The depth of such a tape is slightly below the level of soil freezing. It is used for the most massive and heavy buildings, suitable for most types of soil and hydrogeological conditions.
The choice of a suitable type is determined by the analysis of all the conditions of the site - the composition of the soil, the number and properties of layers, the depth of soil water, etc.
What building is it suitable for?
Tape bases are a reliable support for buildings made of various materials:
- Tree.
- Foam and aerated concrete.
- Brick.
- Concrete plates.
The material and the number of floors determine the weight of the building, on which the design parameters of the tape depend - the degree of penetration and thickness. Along with the characteristics of the soil, the parameters of the building are the main material for performing engineering calculations in the design.
How to calculate depth
strip foundation depends on the type of foundation. E if construction is planned option, it is necessary to rely on the tabular data of SNiP, showing the depth of soil freezing in a given region.During the construction of a shallow type of tape, the composition of the soil, the presence and depth of groundwater are taken into account. It is customary to refer to the optimal depth of 0.75-1 m, but on stable and dry soils, the depth can be slightly reduced.
NOTE!
The most common immersion depth for shallow tape is considered to be 0.7 m.
How does a shallow strip foundation work
almost completely repeats the in-depth version, only with a lower level of immersion.There is a trench in which a drainage layer of backfill is created and a concrete tape is poured.
The design of the base has fewer possibilities than a full-fledged tape, but, for relatively small low-rise buildings, its bearing capacity is quite enough.
Do-it-yourself step-by-step installation instructions
Consider the procedure for creating a strip foundation:
- Preparation.
- Site marking.
- Digging a trench.
- Laying and arrangement of the drainage system.
- Creation of sandy.
- Formwork manufacturing.
- Reinforcing cage installation.
- Pouring concrete.
- Exposure for hardening.
- Stripping.
- Waterproofing and insulation tape.
- Further work.
The order of actions does not change under almost any circumstances, since all stages are the result of previous operations.
Surface marking
The beginning of work consists in removing the top layer of soil and marking the site. For this, wooden stakes are used, which are installed at the intersection points or corner points of the future trench.
The width is selected based on the design parameters of the base, but not less than 20 cm more than that of the tape. This is important, since it will be necessary to install the formwork inside the trench, and subsequently to ensure a sufficient thickness of the backfill layer of the sinuses.
trench preparation
Digging a trench is done with an excavator or manually. The second option is difficult, but if there are difficulties with the delivery or approach of construction equipment to the site, it is quite possible. Excavated soil is stored on the sides of the trench or immediately removed from the site.
It is necessary to ensure the same depth, but there is no need to try too hard and level the bottom to centimeters. Trench corners are manually leveled regardless of digging method.
Drainage device
The drainage system makes it possible to remove groundwater from the sand cushion layer, eliminating the possibility of heaving loads in winter.
There are different types of systems:
- Open. It is created on the day surface and is designed to drain rain or melt water. Used on dry soils with deep groundwater.
- Closed. Consists of a system of pipelines placed in a trench near the tape. It serves to remove groundwater from a layer of sandy backfill (cushion), it is used on soils with the presence or seasonal change in the level of groundwater.
In practice, the closed type is most often used, since there is a danger of water in most cases. A system of pipelines for special purposes is installed, receiving and discharging moisture into the drainage well.
For high-quality drainage, the installation of a filtration piping and a slope for the natural movement of water are required. The filtration layer cuts off small organic particles, preventing the inner surface of the drainage pipes from silting up.
This contributes to extending the life of the system and reduces the risk of failures.
Pillow
The sand cushion is an important and indispensable element of the foundation design. Its thickness is different, on average it is 20 cm.. Usually clean river sand is used or alternately a layer of sand 10 cm, fine gravel 10 cm and again a 5 cm leveling sand layer.
After backfilling of each layer, a thorough compaction is carried out using construction vibrators or hand tools. It is recommended to shed the layers with water, this contributes to a better sealing of the pillow.
NOTE!
Experts recommend to be guided by the following quality criteria for the compaction of the backfill layer: there should be no footprints on the surface when walking. This is important as cushion settlement is not acceptable as it will cause the belt to deform with unpredictable consequences.
Formwork installation
To create the formwork, edged boards with a thickness of 25-40 mm are used (depending on the size of the tape). First, next to the trench, shields are assembled with a width slightly greater than the height of the tape.. As the assembly progresses, the shields are lowered into the trench and fixed outside with inclined stops and vertical support bars.
From the inside, crossbars are installed that determine the distance between the shields, equal to the width of the tape. The formwork must be strong, ready to receive loads during pouring and solidification of concrete. There should not be any gaps, all gaps over 3 mm must be filled with tow or clogged with slats.
This will eliminate the unproductive consumption of concrete when flowing into the cracks.
Reinforcement
The reinforcement is designed to compensate for tensile axial loads that concrete cannot withstand. It freely accepts a lot of pressure, but the tape is unstable in bending and immediately breaks.
For reinforcement, a reinforcing belt is created, the main element of which is horizontal working rods made of metal or fiberglass ribbed reinforcement.
To support the rods in the required position, smooth rods of smaller diameter are used, from which vertical elements (clamps) are made, which, in combination with the working rods, form a spatial lattice.
Its dimensions are such that the horizontal rods are immersed in concrete to a depth of 2-5 cm.
Working rods are selected based on the width of the tape. Their diameter for a shallow base is in the range of 12-14 mm (with a width of 30-40 cm) or 16 mm with a larger width.
Rebar knitting
The reinforcement cage elements are connected in two ways:
- Electric welding.
- Knitting with soft steel annealed wire.
The first option is used for thick rods and is practically not used in the construction of shallow foundations. The assembly of the armored belt most often occurs by knitting.
A soft wire is used, which quite reliably holds the elements of the frame, but has a certain degree of freedom, which makes it possible to maintain the integrity of the frame when loads occur during pouring.
For knitting, a special tool in the form of a hook is used. A piece of wire about 25-30 cm long is folded in half. The resulting half-loop wraps around both connected rods in a diagonal direction, the ends rise up.
Then they grab the fold loop with a hook and, leaning on the second free end, make 3-5 rotational movements, due to which both rods are tightly and firmly connected to each other.
The operation is simple, usually the skill is developed on the first day.
The choice of concrete for pouring
There are quite a few grades of concrete designed for different conditions and loads. Since a shallow strip foundation is mainly used in low-rise private construction, concrete grade M200 will be the best choice.
It is able to provide the necessary strength and load-bearing capacity of the tape with a relatively low dead weight.
For those who wish to approach the issue more carefully, we can recommend using an online calculator to calculate the grade and amount of concrete. The result obtained should be duplicated on another resource in order to protect yourself from possible errors.
fill
Filling must be done as quickly as possible, ideally at once. Breaks in pouring for more than a day are unacceptable, in such cases it is necessary to withstand concrete until it is completely hardened and only then continue work. The quality and degree of strength of such a tape is much lower than that of a simultaneous casting.
This condition is most easily met using ready-mixed concrete, which is delivered directly to the site in a mixer. It turns out significant time savings, and the quality of concrete in any case will be better than that of a home-made mortar.
It is necessary to pour from several points, trying to distribute them as evenly as possible along the length of the tape. This will allow you to get a casting with the same parameters around the entire perimeter, which will ensure high strength of the base.
Features of waterproofing
The effect of moisture is extremely detrimental to a shallow tape. Penetrating into concrete, water sooner or later freezes and breaks the material from the inside. Under no circumstances should this be allowed.
There are two types of waterproofing that you can do:
- Horizontal. Protects the lower and upper plane of the tape against the penetration of moisture from the lower layers of the soil and from rain or melt water flowing from the walls. The lower waterproofing is laid before the installation of the formwork and the reinforcing belt, and the upper one is made after the concrete has completely hardened in parallel with the vertical waterproofing. Both layers consist of roofing material, laid in two layers with bituminous mastic.
- vertical. It is applied to the outer and inner surface of the tape after stripping and complete drying. Materials of different types of action are used - impregnation, coating or pasting. Impregnations are the most effective, but they appeared relatively recently and are little known to builders.
Warming issues
Tape insulation prevents the formation of condensate. There are two options - external and internal insulation. In the first case, the insulation is mounted outside, in the second - from the inside.
Experts recommend performing both types of insulation at the same time, since it is not possible to achieve the expected result separately. Considering the specifics of placement, it is necessary to use moisture-proof types of heat insulators - foundation foam, liquid polyurethane foam, polyethylene foam, etc.
Mineral wool should not be used in this case, since it is able to absorb water with a complete loss of performance.
Proper care of concrete after pouring
After pouring for 10 days, it is necessary to regularly water the surface of the tape with water.:
- The first 3 days - every 4 hours.
- The next 7 days - 3 times a day.
The tape must be hidden from the scorching rays of the sun under a layer of polyethylene. Sprinkling with water makes it possible to somewhat equalize the moisture content of the outer and inner layers of the tape, reducing loads and the risk of cracks.
The final hardening of concrete takes a very long time, but you can continue working with the tape after 28 days.
Stripping
Demoulding is the process of dismantling the formwork. It can be produced no earlier than 10 days after pouring.
You should not try to speed up the process, the foundation is too important an element of the building to take risks and rely on chance.
Basic Mistakes
Most often, a sediment of a sand cushion occurs due to poor-quality compaction of the backfill layer. In addition, the use of unsuitable materials is often encountered, in particular, concrete of the wrong grade.
Some unscrupulous suppliers ship low quality material to save money. Experienced experts recommend ordering heavier concrete - instead of M200, take M250. The difference in cost and weight is small, but there is hope that the material will be more durable.
In addition, they often try to reduce the cost of money and labor by refusing and. These procedures require some time, but compared to the service life of the base, they are carried out very quickly and cannot be neglected.
Useful video
In this video you will learn how to install a strip foundation:
Conclusion
Creating a strip foundation is not so much a difficult task as it requires a complete understanding of the meaning of all stages and the high-quality implementation of the necessary actions.
For an unprepared person with no experience, it is recommended not to deviate from the technology and strictly comply with the requirements of SNiP.
This will help build a solid and high-quality shallow strip foundation.
In contact with
One of the traditional, time-tested types of foundations is a monolithic, tape version.DIY strip foundationit is easy to build if you know the whole algorithm of actions. By design, it is a reinforced concrete strip passing under the load-bearing walls of the future building.
Construction stages
A tape monolithic foundation can be shallow, with a depth of 50 to 70 cm (for foam concrete, wooden, frame light houses) and buried - from 70 to 150 cm (for significant design loads from walls). The buried option is more stable, as it is below the freezing level of the soil.
Stage 1: design
Aiming to makedo-it-yourself foundationcompetently, one cannot rely on chance and ignore the phase of engineering and geological surveys. It is performed by specialists of the design organization, and at this stage they determine:
type and main characteristics of the soil;
its bearing capacity;
freezing depth;
occurrence of groundwater.
This analysis will make it possible to develop a detailed project with calculations of the effect of all loads from the future structure, the selection of material corresponding to the obtained values and the determination of the required safety margin. The project will detail the conditions for the safest location of the future structure for the surrounding landscape.
If the work is planned without developing a project, in any case, you need to know the composition of the soil (sand, sandy loam, loam or clay), the presence of groundwater and the approximate depth of freezing of the soil layer. It should be borne in mind that the buried foundation receives resistance from frost heaving, which is characterized by the fact that water, expanding upon freezing, squeezes it out with force. This phenomenon is most pronounced on clayey and heavy loamy soils.
Stage 2: preparation
At the preparation stage, the entire construction site is cleared. It will be necessary to level the relief with pronounced elevation differences.The necessary building material is being prepared. It is necessary to provide for the arrangement of a canopy as a temporary warehouse.
Marking is carried out in strict accordance with the drawings, for which a rope or wire is used (the latter is preferable, since it stretches less) and stakes. For pegs, it is advisable to take reinforcement. First, the central axes are marked along the perimeter of the future structure. A peg is driven into the first point of the corner of the house and a wire is pulled from it strictly at a right angle in two perpendicular directions. Having noted the desired length, two fixing pegs are driven in, having received two more vertices of the rectangle, from which two more wires are also pulled at a right angle, which is calibrated with a square. At their intersection, a fourth vertex is formed. Subject to all markings, the angle at the fourth vertex is automatically straight (a control measurement is required).
It is necessary to check the correctness of the geometric figure by measuring the two diagonals, which should be equal. Errors are not allowed. If they are detected, an additional refinement of the entire markup is performed.
Then the axes of the internal load-bearing walls are marked in compliance with all the requirements for perpendicularity at the intersection.
When all the center lines are accurately marked on the surface, mark the contour of the future trench, setting aside half of its estimated width on both sides of the axis, equal to the width of the foundation, taking into account the laying of the formwork.
The calculated width of the foundation is equal to the width of the walls. At the same time, the subsequent exterior finish is added, if it is included in the project, with insulation, which also rests on the foundation.
Stage 3: markup
This type of work is necessary in areas with slopes. A cast-off in the form of dug-in columns 1.0–1.3 m high with boards nailed from the outside is installed at a distance of about two meters from the marking of the building. The upper even cut of the boards should be in the same horizontal plane, which will serve as a guide when marking the bottomtrenches. Such control will ensure that the sole of the foundation will be in the same plane without distortions.
Stage 4: digging a trench
can be erected faster if this laborious process for manual digging is carried out using an excavator. After it, the bottom and slopes must be manually leveled. The depth of the trench varies depending on the soil: sandy - 1 m, sandy loamy and light loamy - 1.25 m, heavy loamy and clayey - 1.5 m.The walls of the moat are made vertical by controlling these areas with a plumb line. To ensure cushioning during seasonal swelling of the soil, a sand and gravel cushion is arranged on a leveled bottom (about 10 cm of sand, which is moistened and compacted, and 10 cm of gravel or crushed stone) of the same thickness throughout. It is unacceptable to mask the uneven bottom of the trench with a pillow.
Stage 5: formwork installation
Formwork scheme
For formwork, a collapsible metal shield structure is used or edged boards in cm are used with a minimum thickness having a standardized width and a smooth edge. The assembly of shields from such boards, which are planed for the inner surface on one side, is carried out on the ground. After that, supports are installed along the edges of the trench, to which the downed shields are attached.
The formwork walls are made higher than the level of the future foundation so that the mixture does not spill over the top. The entire installation process is constantly controlled by a plumb line to achieve a strict vertical wall. Holes are immediately made for future sewer and engineering networks. The wooden structure is pressed against the walls of the trench with spacers and is abundantly wetted with water.
To mark the fill level, a cord is pulled inside, expecting that it rises at least 30 cm above the ground, subsequently forming the basement of the building.
Stage 6: reinforcement
The strength and reliability of the foundation depends on the reinforcement, which determines the necessary fixation of concrete. The smallest cross-sectional area of the reinforcement is 8 mm. The installation of the reinforcing cage in accordance with the project is carried out in parallel with the installation of the formwork.The rods are installed in two rows vertically in increments of 10 to 25 cm. Horizontally, reinforcement is attached to them with a wire. Reinforcing meshes with almost square cells rigidly fastened together by transverse horizontal bars are formed. A frame is made to the height of the foundation, a gap is maintained between the formwork wall to the central axis of the rod from 40 to 70 mm, so that it is completely inside the structure.
It is possible to make a frame by welding, performing separate sections outside the trench according to the design parameters. Then they are installed in place and welded into a single structure.Stage 7: installation of basement ventilation
To ensure natural ventilation of the basement and subsequently the house, an asbestos-cement or plastic pipe with a diameter of about 100 mm is attached to the reinforcement with a wire flush with the formwork.Stage 8: foundation drainage
To avoid destructionhandmade foundationfrom closely occurring groundwater, it is advisable to arrange a drainage closed channel with a slope to remove water at a distance of one and a half to three meters along the entire perimeter. Its depth is half a meter greater than that of the foundation, and a perforated drainage pipe is laid along the bottom.
Stage 9: pouring concrete
Before pouring, wax paper is laid along the walls of the formwork, which will greatly facilitate its subsequent dismantling.Concrete (the grade is chosen not less than M200) is poured into the frame in layers. At the same time, each layer is pierced to release air, and rammed until “milk” appears on the surface to eliminate voids and obtain the design strength of the foundation. For this, wooden rammers are used with simultaneous tapping of the formwork walls or, if possible, a more efficient concrete vibrator is used.
At this stage, it is necessary to control the quality of the concrete, which must have a uniform consistency and not be excessively fluid. It is necessary to use additional devices in the form of a gutter when pouring from concrete mixers with a height of more than one and a half meters, since there is a risk of mixture separation when it is poured from such a distance.
With self-preparation of M-200 concrete, you will need cement (M-400 grades), sand and crushed stone (fine grain) in a ratio of 1: 3: 5. The amount of water is determined from the ratio: 0.68 = cement / water, from which water = cement / 0.68.
The topmost layer after tamping is additionally leveled with a construction trowel. After three hours, the entire structure is covered with burlap. For even drying in hot weather, the surface is moistened. If it rains, then it is covered with plastic wrap. After a week, in order to achieve maximum shrinkage, several rows of ordinary brick can be laid on the upper cut.
Stage 10: waterproofing
Foundation and basement waterproofing
Two or three weeks after the completion of pouring concrete, having removed the formwork, waterproofing work begins. To do this, the outer walls are coated with bituminous mastic and roofing material is glued. After a few days, quality control is carried out for the strength of the fit of the material over the entire surface without peeling. Identified shortcomings are eliminated.
Step 11: backfill
Layers of the finished strip foundation
Do-it-yourself tape foundationalmost ready, as this is the last stage of construction. It consists in manually filling the sinuses of the foundation with sand of medium fraction, which is moistened and compacted in layers. A variant of protecting waterproofing from damage during a layer of geotextile is used.Description
Already on the basis of the name, it can be understood that this type of foundation will be somewhat reminiscent of a tape under the contour of the building.
Like other types of foundation, it can be:
- monolithic - poured entirely at once at the construction site;
- prefabricated - consist of individual prefabricated elements (foundation blocks and slabs, for small buildings - bricks, in mining sites -).
Specifications
It is a closed circuit for load-bearing and self-supporting walls of buildings and structures. The width of this tape is slightly larger than the planned wall thickness.
Must be buried in the ground with a sufficiently strong bearing capacity, because. transfers only the vertical load to the underlying soil, unlike, say, hanging piles, which provide the bearing capacity due to lateral friction forces.
Necessary building materials
In the case of a prefabricated type, the foundation elements themselves will be needed - foundation blocks and foundation pillows, as well as cement mortar to connect the fragments into a single object.
For a monolithic version, you will need. It can be removable or remain in the body of the foundation, further strengthening and waterproofing it. Well, actually for the foundation itself, reinforcement and concrete mixture are needed.
Advantages and disadvantages
Advantages:
- Allows you to arrange a basement in the building - the side surface of the foundation in this case will play the role of the basement walls.
- Relatively economical.
- Applicable for a variety of structures that have a complex shape in plan, different number of storeys, large and small loads.
- Allows you to make different depths of laying under walls with different loads, which saves materials.
- Requires less excavation compared to.
Flaws:
- Not suitable for heaving and weak soils.
- Relative pile and columnar are more material-intensive, labor-intensive, and more expensive.
- Unfavorable in conditions of great depth of soil freezing.
Stages of construction of a strip foundation
Step-by-step instruction
- Before proceeding directly to work on the foundation, it is necessary to determine the depth of its foundation. To do this, it is important to clearly understand what will be the loads from the own weight of the building, the people and things located there.
- In addition, it is necessary to analyze the soil at the construction site, because the bearing capacity depends on its type and other characteristics. A detailed laboratory study would be optimal, but if this is not possible, you should at least determine its type, density, and humidity. The methods of these studies are described in detail in regulatory documents; they do not require sophisticated equipment and special knowledge, i.e. under the power of almost everyone.
- Next, earthworks begin - a fragment of a trench or pit is 30-50 cm deeper than the depth of the foundation. These centimeters will be occupied by a sand or sand and gravel cushion. Its role is to level the bottom of the pit, to give the foundation additional hydro and thermal insulation. The pillow should be well sealed.
- Also, in some cases, concrete preparation or the so-called concrete preparation is poured over the pillow. "footing" of lean concrete (usually B -7.5) 10-15 cm thick.
- If a prefabricated foundation is selected, then you can start laying the elements. A brick foundation can be laid out by hand, but heavy blocks and slabs require specialized equipment.
- Between themselves, the components of the foundation are connected with a cement-sand mortar. For strong adhesion, it should not be made too liquid. For the strength of the connection, you can add another thin reinforcing mesh.
- Blocks laid flat may be used instead.
- The prefabricated strip foundation can be loaded after 1-2 days. However, in comparison with the similar one, it will have about a quarter less strength and will cost 30 percent more.
- The device of a monolithic foundation begins with the installation of formwork. Already at this stage, it is necessary to take care of the holes for laying various communications. In the right places, sections of strong pipes of the required diameter are installed, filled with earth or sand, so that the solution does not subsequently flow there.
- Next, the reinforcement cage is installed. Between themselves, individual reinforcement bars are usually connected with a knitting wire. The use of welding in this case is undesirable, because. it significantly reduces the corrosion resistance of steel reinforcement.
- If further construction will also be monolithic, then releases of 5-10 cm are made at the foundation reinforcement. They will subsequently be connected to the reinforcement of walls or columns.
- It is important that the reinforcement is completely inside the concrete stone, nowhere in contact with the external environment, otherwise corrosion will soon render it unusable. The protective layer should be at least 4-5 cm.
- Now fiberglass reinforcement is becoming quite popular. Its advantages include low weight and price. However, there are significantly more disadvantages - fiberglass is combustible, which means that in the event of a fire, a structure with such reinforcement will collapse much faster and stronger than with traditional steel. Moreover, this material is not resistant to concrete components. To protect it from destruction, a special coating is needed, which impairs the adhesion of concrete to reinforcement. Accordingly, the bearing capacity of the structure becomes worse. In addition, the plastic fittings bend slightly.
- After the installation of the reinforcement, the concrete mixture is laid. It can also be made independently directly at the facility under construction. However, the use of prefabricated concrete is preferable. Manufacturers constantly monitor the quality of the components and the resulting mixture, optimize the compositions, and have the opportunity to use various additives. As a result, you can be sure that the concrete used will meet the requirements of strength, frost resistance, water permeability, etc.
- The strength of concrete is ensured by the exact proportions of its components - cement, sand, crushed stone and water. In order not to violate these proportions, in hot and dry weather, the drying structure must be additionally watered. In dampness and rain, the foundation will have to be covered with plastic wrap.
- After the foundation is laid, it should be protected from moisture in the ground. There are various types of coating, roll, sheet and spray waterproofing, which are often combined.
- Along the perimeter of the building under a slight slope, concrete slabs, paving slabs or other suitable materials are required. Its role is to divert atmospheric precipitation from the foundation.
Common Mistakes to Avoid and Their Consequences
too much haste
If the foundation is monolithic, then it is necessary to allow the concrete stone to gain a significant part of the strength. If hardening accelerators were not added to the mixture, then under normal conditions it will gain almost one hundred percent strength on the 28th day.
Ideally, before continuing construction work, it is better to wait this time. If you need to build much faster, then you should wait at least a week. On the 7th day, concrete already has about 75% of its final strength.
Otherwise, the foundation may be deformed, nullifying all the work on its construction. And it’s good if this happens at the construction stage, and not when tenants move into the house.
Ignoring waterproofing
Waterproofing should not be neglected. Even if the construction area has a fairly dry climate, and groundwater does not pass near the construction, some liquid in the soil will be necessary. Through the pores in the concrete stone, it will seep into the room, causing dampness and fungus there.
As you know, when freezing, water expands, so in winter it will literally break concrete from the inside. If chemically aggressive substances are present in it, then the destruction process will even accelerate.
In a destroyed concrete stone, reinforcement will quickly become unusable.
Large breaks in pouring concrete
Do not pour a monolithic foundation at intervals of more than 12 hours. Otherwise, the connection between the previously and later poured parts of the structure will be weak, which means that the strength of the entire foundation will also decrease.