How to make lavender from beads? Master class on beading lavender: a detailed description of the work How to weave lavender from beads
Dear bead lovers, today we will tell you how to make lavender from beads with your own hands. A step-by-step master class with a photo and a weaving pattern will help us with this.
Tools and materials Time: 1-2 hours Difficulty: 3/10
- green and purple beads;
- thin wire and thicker for the rod;
- and floral tape.
Step by step photo tutorial
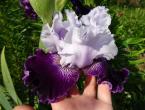
Lavender is an amazing and very beautiful flower, although simple in itself. But whoever has ever seen a lavender field will forever fall in love with this plant. Lavender beading will make you love this flower forever!
We invite you to weave lavender from beads, of course, it will not have such an amazing smell, but who prevents you from placing a bag with aroma mixture next to it?

Well, if you have a whole coil of wire, string a lot of purple beads on it. Weaving in segments is not so pleasant, because it takes too much time. Well, we begin to form inflorescences.
It is also worth thinking in advance about which vase you will place this creation in. It is better to choose with a narrow neck so that the flowers are located as close to each other as possible.
Step 1: weave inflorescences
Starting beading, we carefully look at the photos, although in reality there is nothing complicated. The flowers themselves will be made in a looped way. To do this, we retreat from the edge of the wire by 10, and preferably 12 cm, and form the first loop of 9 beads. The next loops will be slightly smaller, by 7 beads. The tail left will act as the axis to which the loops are attached.

We adjust 7 beads to the very first loop and form a loop, one end of which we fix on the left axis.

We make 10 such small loops, pressing them as tightly as possible to each other.

Now we expand the inflorescence, that is, we make loops of 9 beads in each. They need 20 more.

And the last row of loops, to give the inflorescence a rounded shape, add 3 loops of 11 beads.
Step 2: make the leaves
In general, it remains to prepare the leaves. Five for each inflorescence. It is also not difficult to make them, parallel weaving, which starts with one bead, then one row of 2, 9 rows of three, and again we go down - 2 beads and one.

Step 3: collect the branch
It remains only to collect a branch, using a thicker wire as a stem, and decorate it with floral tape. The number of branches depends on the size of the chosen vase. So keep it up.

We hope that thanks to the master class and the weaving pattern, you managed to weave the same charming lavender from beads. Share examples of your work in the comments!
Tambov Regional State
budget educational institution
"Zherdev boarding school"
Master class "Lavender from beads"
Muravleva I.S.
Zherdevka 2017
Master class "Lavender from beads"
Flowers are the decoration of our planet. Everyone loves them. No celebration is complete without flowers. It is sometimes said that the absence of flowers indicates a lack of flavor.
Everything that is beautiful in nature, a person likes to copy, he tries to imitate nature so much that the aesthetic perception from the contemplation of the living and the artificial is similar. Today, the fashion for artificial flowers from beads has returned again. They are used not only to decorate a dress, suit or hat. Beaded flowers are used for window dressing, scenes, interior decoration.
aim my work is making lavender beads.
I have put the following tasks:
Master the skills and abilities of making flowers.
Develop creativity and aesthetic taste in flower decoration activities.
Cultivate perseverance, accuracy and diligence in the manufacture of flowers.
Workplace organization
Before starting work, you need to properly organize your workplace so that everything is at hand. It is necessary to remember the safety precautions when working with scissors. Working with small beads is tiring for the eyes, so it is best to work at a table in daylight. If the lighting is not enough, turn on both the ceiling chandelier and the table lamp. The table lamp should have a dim matte light bulb with a power of no more than 40 watts. Otherwise, the light will blind the eyes, and we will not reduce the load on the organ of vision, but increase it. The disadvantage of electric lighting is that it gives a lot of glare, because the beads reflect light very well, and with artificial light, the perception of the color range is distorted. You need to position yourself so that the shadow does not fall on the work surface. You need to sit comfortably so that your back does not get tired and your neck does not numb, and the work goes easier and faster.
If the workplace is organized correctly, it will be easy and pleasant to work.
Beading is a process that requires tremendous eye strain. Of course, this fact is unlikely to have a positive effect on the state of the organs of vision without outside help. More often you need to take breaks in work so as not to spoil your eyesight, as well as do gymnastics for the eyes.
Gymnastics for the eyes
Starting position - sitting on a chair. Slowly look from the floor to the ceiling and back (the head is motionless) - 8-12 times;
Starting position - sitting on a chair. Slowly look from right to left and back - 8-10 times.
Starting position - sitting on a chair. Circular eye movements in one and then the other direction - 4-6 times.
Starting position - sitting on a chair. Perform frequent blinking for 15 to 30 seconds.
Looking at needlework with rested eyes, it is easier to see mistakes and appreciate the merits.
Materials:
Wire No. 3, thick wire, beads, scissors, plaster, thread, saucer with a cup.


Progress
The lavender flower is made with loops.
We take wire No. 3 and cut off a piece about 1m. We leave a tail from the beginning of the wire 10-15 cm long, this will be the central axis. We collect 9 beads and bend them into a loop. Under the loop, the wire was spun 1-2 times.


We collect 7 beads on the long end of the wire and make a loop again. We lay them as tightly as possible to the first loop. We twist the wire again under the second loop. We make the second loop immediately on the axis. We make the third and all subsequent loops in the same way as the first two. We try to lay them in a circle, creating a soft, streamlined shape of the inflorescence. In total, we make loops of 7 beads 12-15 pcs.


Now we need to expand the inflorescence. To do this, in the next loops we will take 9 beads and screw them just as tightly in a circle. In total, I made about 25 loops of 9 beads, only about 40 loops turned out on the inflorescence, but you see how you like it best. My lavender inflorescence turned out to be 4 cm in height, but this is not a standard, you can (and should) vary - one inflorescence is larger, the other is shorter. At the very bottom of the inflorescence, I finished with three loops of 11 beads, it helped, as it were, to round the shape. In total, I made 11 inflorescences.


For lavender, you need to weave leaves of 5 pcs. for each branch. I will make them in simple parallel weaving at the rate of 1-2-3-3-3-3-3-3-3-3-3-3-2-1 and also of different lengths.
Lavender is one of the favorite flowers of beading masters. This flower is made by hand using the loop technique. In order to perform it, you do not need to have certain knowledge. It is enough to act according to the description of the master class. Having learned to weave lavender, you can easily reproduce a bouquet of lilacs or roses from beads.
Beaded lavender is easy to make. In order to reproduce it, you need to try to weave a flower from beads once. This flower will be a great decoration for your home.
Lavender from beads: a master class for beginners
To reproduce lavender you will need the following set of materials and our master class:
- wire;
- purple beads;
- floral tape;
- scissors;
- weaving wire.
Firstly, you need to put as many beads on the wire rod as possible.
Secondly, leave a tail of wire (about ten centimeters) from the beginning.
Third, separate nine pieces of beads and bend them into a loop. Scroll through the loop twice.
Fourth, from the bottom, separate seven pieces of beads and fold them tightly to the first loop. Twist again by analogy. It is important to create a second loop on the tail of the first loop.
Fifth, the third bead and all others should also be done by analogy. Lay them in a circle to get a streamlined shape of the future flower. In total, you should have ten loops of seven pieces of material.
At sixth, at this stage you need to expand the inflorescences. To do this, in subsequent loops, you need to take nine units and twist tightly in a circle. You should have twenty loops of nine beads. In total, about thirty loops should come out.
Seventh, the bottom of the product must be finished with three loops of eleven beads each.
Eighth, according to the same pattern, weave sheets of green beads.
Ninth, make a tight trunk. To do this, wrap the wire with green tape and screw branches with leaves to them.
The resulting flower can be wrapped with a gift wrap and presented.
Gallery: beaded lavender (25 photos)


Beaded lavender: a simple diagram and description
In order to reproduce a bouquet from such a beautiful flower as lavender, you will need a lot of material, patience and a little time.
- Purple, green and pale pink beads are required.
- Wire or fishing line for weaving, preferably the same color as the beads.
- Thick wire.
- Green thread and floral ribbon.
- Scissors, cutters.
If you are planning to make a bouquet, then you will need a vase with a narrow neck, as well as plaster in which you will seat the bouquet.

Everyone can make lavender from beads with their own hands, because it is done in just three main steps. It is easy to decorate the interior of the apartment with wonderful decor! Use the master class and you will succeed! You can watch the tutorial on making lavender from beads in the tutorial video.
Lavender is a very beautiful plant with a soothing and mesmerizing scent, loved all over the world. This plant is dedicated to songs, paintings, and also embroidered on canvases. Lavender, woven from beads, is almost impossible to distinguish from a natural flower. Thanks to the beaded lavender patterns presented in this article, you can quickly and easily weave a whole bouquet of this delicate flower.
Popular way of weaving
This method of weaving will provide fluffiness and "voluminous" crafts. It is worth starting the first master class by making a lavender flower. Dial a sufficient amount of beads on a long wire, and then twist it. The first four loops will be the top of the flower and must be made from seven beads. Twisting the loops, leave one end of the wire 10 centimeters so that there are no problems when fastening. After the top is ready, make the remaining loops of 9 beads.
The more loops, the more beautiful the craft will turn out. Then tightly wind them onto the left tail of the wire. At the top, the lavender should be sharp, and expand towards the bottom.


The leaves are made using the parallel weaving technique. For one branch you will need at least five sheets. Their weaving pattern:
- 1 row - one bead;
- 2 rows - two beads;
- 3-11 rows - three beads each;
- 13 row - one bead.
On a note! Each leaf should have a wire tail 4 centimeters long for fastening.
Having finished weaving, you can begin to collect branches. To do this, take a piece of thick wire 20 cm long and fasten a flower and leaves to it. Next, decorate the stem with ribbon or thread. How to do it right, you can see in the photo:


Plant the finished craft in a pot. Beautiful lavender is ready!
Huge lavender bouquet
To weave a whole bouquet of lush lavender you will need:
- 150 g beads (dark blue, purple and green);
- wire (0.3 mm, 0.6 mm and 1.1 mm thick);
- sharp scissors.

First you need to collect on the wire all the purple and blue beads with a diameter of 0.3 mm, while not cutting off from the bobbin. It should come out about five meters bead low. It should be borne in mind that a lot of wires will come in handy. Next, weave three loops. Each should take 9 pieces of beads. In centimeters, this is about one and a half centimeters of beaded low. You should get 300 petals for a lush bouquet. An approximate calculation is 20 petals per average length of lavender.
Using the loop technique, model the leaves from green beads. Sizes may vary, because real leaves cannot be all the same size. Then proceed to assemble the flowers: fasten the triple petals with a green thread to a thick wire with a diameter of 1.1 mm. Continue one at a time in a checkerboard pattern. At the end, cover the trunk with acrylic varnish and put the bouquet in a vase.


The lavender flower is made with loops.
We put a lot of beads on the wire without cutting off from the coil. If the wire is in segments, then this is a more time-consuming work, it is necessary to string beads separately for each loop.
Now we create an inflorescence step by step, as shown in the photographs.
Step 1: Leave a tail from the beginning of the wire 10-12 cm long, this will be the central axis. We separated 9 beads, bent them into a loop. Under the loop they scrolled a wire once or twice.

Step 2: Now we separate 7 beads from the bottom and lay them as tightly as possible to the first loop. Again, we scroll the wire under the finished second loop one or two times.
I warn you in advance, we make the second loop immediately on the axis (on the tail from the first loop). No need to first twist the second loop and then try to attach it to the axis! We just fitted 7 beads to the first finished loop and twisted these beads around the tail.
Step 3. We make the third and all subsequent loops in the same way as the first two. We try to lay them in a circle, creating a soft, streamlined shape of the inflorescence. In total, we make loops of 7 beads 10 pieces.
Step 4. Now we have 11 loops ready: the first of 9 beads and the next 10 loops of 7 beads.
Now we need to expand the inflorescence. To do this, in subsequent loops we will take 9 beads already and screw them just as tightly in a circle.
In total, I made about 20 loops of 9 beads, on the inflorescence it turned out about 30 loops together, but you see how you like it best. My lavender inflorescence turned out to be three centimeters in height, this is not a standard, you can (and should!) Vary - one inflorescence is larger, the other is shorter.
At the very bottom of the inflorescence, I finished with three loops of 11 beads, it helped, as it were, to round the shape.
Step 5. Let's assume that the green leaves for lavender are ready in advance. I will not explain them, this is a simple parallel weaving based on 1-2-3-3-3-3-3-3-3-3-3-2-1 and also of different lengths.
So, for one branch of lavender, we need at least 5 such green leaves, a stable but not very thick wire rod and floral tape.

We fasten our inflorescence and leaves to the rod, wrap it with floral tape and voila, one branch of our future lavender is ready! How many such branches will be on your lavender is the decision of the master.