How to unscrew a soured cold water tap screw. How to unscrew the faucet on a faucet - video. Dismantling a stuck crane axle box
Add site to bookmarks
- Kinds
- Choice
- Installation
- Finishing
- Repair
- Installation
- Device
- Cleaning
Do-it-yourself plumbing repair in the kitchen
Plumbing users often have to deal with the problem of a leaking faucet in the kitchen or bathroom. In fact, there is nothing particularly difficult in solving this problem.
A dripping faucet is not only an irritating factor, but also money leaking out drop by drop if you have water meters installed.
Every man can repair or replace an old faucet with a new one.
A few words about terminology. A valve and a faucet are two different things. The valve has threads at both ends and is installed in a pipe break. Water does not flow out of it, it can simply shut off the water in the pipe. The valve is installed at the end of the pipe, attached to fittings or pipes. If the faucet is installed on a sink or sink, then a special hose is used to connect it to the water supply system. It has a thread at one end and has a spout to drain water from the system to the outside.
Tools for work
To perform work on replacing or repairing a crane, the following tools are needed:
- Screwdriver.
- Hex key.
- Pliers.
- Gas or adjustable wrench.
- A piece of fabric. The chrome parts are unscrewed through it.
- A rag for wiping faucet parts.
- Kit for this model.
Return to contents
How to turn off the tap
The worm-type valve of a relatively outdated design is equipped with a rubber cuff. To close it completely, you need to make 2-4 turns of the handle. Repairing it involves replacing the rubber cuff, which wears out quite quickly.
A more modern, durable, but also more expensive - ceramic faucet. It is very sensitive to the quality of tap water. Sand impurities disable it. It is difficult to find gaskets for it; it is easier to change the entire axle box. Worm and ceramic valves are very easy to disassemble. To do this you need:
- use a screwdriver or knife to pry and remove the plastic plug from the handle;
- Unscrew the screw securing the handle with a screwdriver;
- remove the handle;
- unscrew the valve axle with an adjustable wrench;
- remove the axle box from the housing.

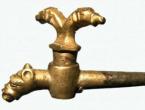
Diagram of a conventional crane.
To install a new faucet, you need to clean the threaded mounting area from dust, sand and rust. After this, perform all steps in reverse order.
Conventional taps are quite rare today. They were replaced by mixers. In faucets, hot water is mixed with cold water. They have different designs. Faucets with separate valves for cold and hot water are very popular. Their main part, which often fails, is a small rubber gasket. It blocks the inlet and wears out quickly. In this case, it must be replaced by disassembling the mixer tap. The sequence of actions is as follows:
- unscrew the valve body with an adjustable wrench;
- change the worn gasket;
- rewind any seal;
- Screw in and tighten the housing tightly.
Sometimes such repairs only last for a few days. In this case, the valve seat needs to be repaired. The resulting grooves and cracks are removed using a special cutter. After this, the gaskets last much longer.
It is better to replace such faucets with more durable ceramic faucet axle boxes. To do this, you need to unscrew the old faucet and screw in a new one in its place.
Most often, ball faucets are installed in the kitchen and bathroom. They last a very long time, but also sometimes require maintenance, repair and replacement. How to unscrew such a mixer tap?
Return to contents
Sequencing
To eliminate a leak from a ball valve or mixer, you must:

Diagram of a ball valve with a single cartridge.
- Shut off the water at the water supply inlet to the apartment or house.
- Prepare a container for water that may drip from a disconnected tap.
- Study the device of the crane.
- Close the sink or sink drain hole.
- Use a screwdriver or knife to remove the plastic plug in the form of a small red-blue circle. It is located under the faucet handle. After removing the plug, a round hole will open. In its depths you need to find a very small screw. It needs to be unscrewed with a narrow (2-3 mm) hexagon. Everything must be done slowly and very carefully so as not to tear off the edges and threads of this fastener.
- Using a little force, remove the faucet's swing arm by pulling it up.
- Unscrew the dome-shaped lid. It can be screwed directly to the valve body or pressed against it with a special ring nut. This cover can be made of chromed metal or plastic. The work requires care, as the lid can easily be scratched and even cracked. The ring nut is usually made of plastic. You can unscrew it with a screwdriver, pliers, or a special wrench.
- Remove the plastic turning mechanism from the valve body. There may be very thin rubber gaskets inside. With these insides, you need to go to a store that sells ball valves, where they will pick up a new similar one. The height and diameter of the plastic structure are important here.
- After acquiring the internals, you need to perform all previous operations in reverse order.
There are ball valves of slightly different designs. They do not remove all the insides at once. After removing the dome cover, the following actions may be performed:

Diagram of the design of a ball valve with individual elements in the design.
- The plastic part in the shape of a shield is removed. It consists of a black-and-white seal and a yellowish “shield” itself. They need to be carefully cleaned of deposited salts, pieces of rust, and other adhering substances, rinsed and wiped.
- Pull the ball upwards with a little force. Its bottom should be clean and smooth. If scratches and abrasions appear on it, then the ball needs to be replaced.
- There are 3 rubber seals inside the mixer body. They are carefully removed, inspected, and replaced if necessary. All components are purchased at retail outlets.
Sometimes it becomes necessary to remove a faucet or mixer from a sink or kitchen sink. Then some more operations are added:
- unscrew the flexible hose going to the mixer (usually there are 2 of them);
- unscrew the screws securing the mixer to the sink or sink;
- remove the gaskets installed between the tap and the sink;
- Clean the area or sink from dirt and salt deposits.
If the cause of the leak is a flexible hose, then it is simply replaced with a new one. This hose is sold complete with a mixer. You can purchase it separately.
Today the children and I decided to take a walk along the Voronezh Reservoir on a river bus and almost became participants in a disaster.…
 The photo that outraged me
I was once an atheist. Despite the fact that I did not believe in God, I had some deep understanding of what not to do. Not because…
I very rarely write negative reviews, but today is THE day. Online store ELITE TEXTILES: DON’T THINK OF ORDERING, they are scammers.…
 My wild imagination
Yesterday I was looking for a film about a father and son who were traveling by train under the dome, escaping from a worldwide cataclysm - eternal winter. And I remember it very well - here...
That is, all the time I was on the verge of the possible and the impossible))) I will write on a sober head when I rest, because I will do this...
I load the news - Ksyusha and elections are everywhere. Damn, I didn’t even take this seriously, what’s there to discuss, what’s all the hype? Comedy and nothing more...
 You really don’t know what might come into children’s minds...
Yasha had just returned from school and was telling him that a student from the lower grades had heard something strange, that an ambulance was coming. Jumpers, almost everyone has them...
Money doesn't smell like conscience
It happens that you start looking for one thing, but end up sitting and reading something else for three hours. That’s what I have, I was looking at repairs and saw an article about...
Is the mixer running? This can be fixed! The water supply communications of many apartments, to put it mildly, leave much to be desired, and this is also compounded by periodic water shutdowns and testing of pipes, as a result of which dirt gets into our mixers and taps. It is this, or rather the sand, that ultimately becomes the root cause of breakdowns. Unfortunately, these are the realities of our lives.
And, as practice shows, neither the quality of the product nor the installation of filters can save you from this, but only slightly delay their failure. What should you do if your faucet suddenly starts to leak or even run? We will repair it.
Now let’s look at just such a case: the kitchen faucet began to leak hot water. It was produced by the famous Bulgarian company Vidima, and it fell victim to sand that got inside.
Most often, it is the grains of quartz that get into the faucet that grind down its ceramic surface, thereby allowing water to pass through!
We have several ways to solve the problem.
Very simple repair
Let's start with the first one, I would call it “Great luck”, and all because you have to do indecently few actions. You just need to turn the valve head from the dripping side to the unscrewing side, i.e. counterclock-wise.If it is not tightened tightly, this entire assembly will unscrew. In this case, further disassembly and replacement of the damaged part will take very little time. Here's what it looks like using cold water as an example (it's on the left).

Easy replacement
In the next case, the situation will be like this: the valve head with the valve and the faucet box does not unscrew. In this case, unscrew the top plug (it is threaded), and use a screwdriver to unscrew the screw.
Next, we try to remove the valve from the slots, if necessary, gently tapping it from below, of course, using a non-metallic object for this.

If everything worked out, great! All that remains is to unscrew the decorative cap and unscrew the valve axle for its further replacement.
Please note that the type and size of the crane axlebox varies from manufacturer to manufacturer, so do not rush to get rid of it: it will be useful for selecting a new one!
Complete disassembly
Yes, this is exactly what you will have to face in most cases. Here, too, things didn’t turn out the way we would like: after six years of faithful service where the hot water runs (that’s what drips), everything became completely stuck. There is only one option left: you need to remove and disassemble in more convenient conditions.Let's start by unscrewing the liner from the pipes. Don't forget to turn off the water before doing this!
To do this we need an adjustable wrench KR-20 or KR-30. It won’t work with a regular wrench, because the nut is 25 mm (although, in principle, such open-end and combination wrenches are found).

After this, we remove the faucet from the sink, here we use a tubular (socket) wrench, in this case 12 mm. After unscrewing the nut from the stud, remove the faucet by threading the hoses through the hole in the sink.

The next step is to unscrew the liner from the faucet. We do this with a 10 mm wrench.

Now that's it, you can start the main work. We remove the plug, unscrew the screw and, tapping lightly (now this is much more convenient to do), remove the valve.

If he doesn’t want to get off, you can wet the area with WD-40, but don’t get carried away: it destroys the gaskets.

Having removed it, we unscrew the cap and gain access to the crane box itself. Most likely, it is seriously stuck, so you will have to try to unscrew it.
We work again with an adjustable wrench; if necessary, you can carefully clamp the mixer, prudently protecting its chrome surface from damage.
After two attempts we succeeded.

Now all that’s left to do is find and buy (it’s better, of course, to do this in advance if the exact model and brand of the device is known) a new crane axle box and put it in place. And then everything is in reverse order.

Yes, I’ll take this opportunity to say: don’t be lazy to clean and wipe the product with some cleaning agent to remove lime deposits in hard-to-reach places.

That's all: the faucet is fixed, you can use it again.
What to do if the faucet is leaking? There is only one way out: to repair the crane axle box yourself. It’s not worth calling a plumber from the housing department because of such nonsense.
In this article we will tell you how to replace the valve axle (or the rubber gasket on it, if we are talking about an old-style product).
Let's say right away: repairing a ceramic crane axle box is impossible. But the procedure for replacing the faucet axlebox in a new type of mixer is quite identical to the preparatory stage of repairing an old faucet axlebox with a rubber gasket.
Unscrewing the valve axle with a sliding wrench
- Shut off the water
- Remove the decorative plug covering the screw that secures the valve to the valve axle rod
- Remove the screw securing the valve to the valve stem.
- Remove valve
- Remove the decorative cap covering the valve axle, if any. Use an adjustable wrench
- Unscrew the valve axle. Use an adjustable wrench. Old Soviet crane axle boxes with a square seat for the valve can be unscrewed with a “seven” wrench, engaging the edges of this “square” with it.
 Unscrewing an old valve box with a square “head” for the valve
 If we are talking about replacing a crane axle box with ceramic liners, then this, in fact, is where the process ends. All that remains is to screw in the new crane axle box and perform the assembly operations in the reverse order.
Crane axle boxes are usually equipped with. Read more about them in the review on our website.
When screwing in a ceramic faucet, do not tighten it too tightly: you may crush the ceramic inserts!
 Replacing the gasket in a worm-mounted valve axle
 If you are repairing a worm-type axle box, then you need to find a rubber gasket at the end of the rod and remove the screw that secures it. Gaskets for the faucet axle box are sold at any plumbing store, but it is easy to cut them yourself from a piece of rubber of suitable thickness - following the example of an old gasket.
Having fixed the gasket on the valve stem, assemble the device in the reverse order described above. In general, that’s the whole story about how to change the crane axle box.
Now about the difficult part: the crane axlebox is stuck
How to remove the crane axle box if it is “stuck”? And you can’t turn it away?
You can follow the path “where a wrench fails, a big wrench will do.” But this is not our method. Even if you unscrew the axle box “swinging” - pressing the key in one direction or the other.
This way you can unscrew the entire mixer. Or simply rip off the thread of the seat of the crane axle box.
How will you install a new one then?
 Removing a stuck faucet axle box 1.
 If Sillit or WD-40 did not help immediately, then build a bath (say, from plasticine) around the threaded joint, pour one or another of these liquids into it and leave it overnight. It will work by morning!
How to unscrew a stuck faucet if Sillit and WD-40 did not help?
 – a review of the types of plumbing gadgets will allow the reader to understand the design and operating specifics of various devices for regulating water flow
Changing an old crane axle box is not difficult even for a beginner. However, what if she got attached? In this case, conventional repair methods may not help. Let's look at four effective methods that will allow you to unscrew a stuck faucet from the mixer.
Features of the crane axlebox - worm and ceramic types
The crane axle box is divided into two types - with a worm gear and ceramic. Let's look at both options, their advantages and disadvantages. Let's start with the worm gear. It has a rod that is adjustable in length, which is closed with a rubber gasket. The gradual wear of the gaskets leads to the fact that when you unscrew the faucet in the kitchen or bathroom, squeaks and leaks appear. The crane axle box with a worm gear has the following advantages:
- low cost;
- ease of replacing worn rubber gaskets;
- availability of fittings in plumbing stores.
Along with the advantages, there are also disadvantages. The rubber gaskets of the faucet axlebox wear out quickly; it is necessary to make 3-4 revolutions of the flywheel to open the water. Gradually the gasket wears off and you have to tighten the tap tighter.
When replacing an old crane axle box, craftsmen give preference to ceramic options. Both types are interchangeable and can be installed on a kitchen faucet or in a bathroom. This type of faucet is made of ceramic and brass. It has two ceramic inserts with the same diameter holes, one is mounted on the rod, the second is stationary. Advantages of ceramic crane axle box:
- long service life;
- high wear resistance;
- silent operation of the crane with a muffler;
- smooth turning of the crane without effort;
- possibility of replacing repair kits with new ceramic and rubber parts.
Among the disadvantages of ceramic fittings are the high price, sensitivity to water with sand impurities compared to the worm type, and the need to install a water purification filter.
Regardless of the type used, over time the crane axlebox fails and must be replaced. If leaks occur, make sure that the source of the problem is hidden in this part of the mixer. A worn oil seal may need to be replaced.
Removing decorative caps and valves - sequence of actions
To unscrew the faucet, decorative caps and nut with screw, you will need a flat-head screwdriver and a sharp knife. Before carrying out work, turn off the water. On the side of the valve, remove the decorative cap by prying it off with a screwdriver or knife. We do this carefully so as not to damage the coating. If the handle is solid, without a plug, just unscrew it. Remove the plastic rings. Next, use a flat screwdriver to unscrew the bolt mount and remove the valve.

If the faucet valve cannot be turned off, lubricate the inside of the valve with a WD-40 solution, which is sold at any auto parts store, or pour in vinegar. Leave for a couple of hours so that the solution penetrates the threaded joint and softens hard deposits. After this, the tap should be easy to remove. In the next step, we’ll figure out how to unscrew a stuck faucet axle box.
The crane axle box is stuck to the body - we select a suitable dismantling method
After removing the valve and plugs, you need to unscrew the valve axle box, but it is stuck and cannot be removed in the usual way using an adjustable wrench. We offer you four methods, from less to more labor-intensive.

Let's start with the chemical method. Here we use the already familiar WD-40 solution, Cellit plumbing fluid or table vinegar. After using any of the above products, especially WD-40, the mixer must be thoroughly rinsed with water. Lubricate the joint generously with liquid and leave overnight. The next morning the thread weakens, the crane axle box is easily removed.
If chemistry does not help, use the thermal dismantling method. Since the mixer body and the faucet axle have different extensions, we heat the joint with a hair dryer at a minimum temperature and at a distance from the threaded part. We ensure that the bolt and the upper part of the crane axlebox can be unscrewed by hand. An open flame, such as a gas torch, will speed up the process, but this method is unsafe due to the high risk of getting burned and melting plastic parts.
The next step is to tap the faucet around the threads. If the crane axlebox is made of light alloy, this method should help you. Armed with a hammer, preferably a mallet, we begin to tap the threaded connection on all sides. This action must be performed at least 15–20 times. The loosened limescale and rust will weaken the connection, pull out the valve axle box.
If the proposed methods do not bring the desired result, we use complete dismantling of the fittings by drilling a hole. Use a hacksaw to cut off the protruding part of the crane box. Use a drill or cutter of the required diameter to drill out the remaining part in the mixer. When you reach the ceramic plates, break them out with a screwdriver so as not to damage the drill tip. Now we take pliers, insert them into the resulting recess and unscrew the edge of the valve axle. To prevent slipping during operation, we use pliers with one hand, and with the other we hold the base of the mixer with a large wrench.
To change the crane axle box, we purchase a new part and screw it into place. Having purchased locking fittings with a worm-type rubber gasket, we first tighten the rod so that it is as short as possible. When installing a ceramic faucet, do not tighten it too tightly so as not to damage the ceramic parts. Simply insert the hardware into the hole and tighten it with a nut.
After tightening the faucet box, we assemble the parts in the reverse order, put on the plastic rings, tighten the handles, and fix the plugs in place.