Making a calla flower from foamiran. Calla master class from foamiran. Step-by-step photo instruction: MK how to make calla from foamiran
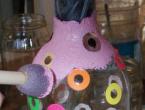
The foamiran callas presented in this master class are not just beautiful flowers, but a functional case for storing knitting needles.
Of course, you can insert wire into the stem if you are not knitting. But for those who lose their knitting needles all the time, a charming bouquet will help keep your needlework tools in order. The lesson is designed for beginners. Follow the step by step description and photo. Happy needlework!
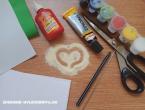
Materials and tools
To make life-like callas with your own hands, prepare:
- foamiran white and dark green 1 mm thick;
- semolina;
- PVA glue and "Moment";
- water-soluble paints (acrylic);
- knitting needles;
- pen;
- paper;
- scissors, cotton sponge;
- iron.

If you are going to work with foamiran for the first time, in our introductory article. Working with this material is not difficult. It is malleable, easily acquires the desired shape, and retains its decorative effect for a long time.
Step by step manufacturing technique
On paper, randomly draw a heart-shaped petal blank 10 cm long and 8 cm wide and one more, slightly larger, for a calla leaf.

Cut out the calla template, attach it to a sheet of white foamiran and circle it with the end of the knitting needle. The pressure should not be too strong, otherwise the material will tear. Repeat as many times as you need flowers in the bouquet.

Draw longitudinal stripes with a knitting needle, emanating from the base and tapering towards the tip, repeating the contour of the flower, at a distance of about 3-4 mm. The finished drawing will resemble an onion in a section. Cut out the details.

Dilute acrylic paints with water until translucent. Use a damp sponge to tone the lower third of the petal in a pale yellow color. Color the base of the sepal green.

Heat the iron on the lowest setting. Attach the cut calla petal to the iron for 3-4 seconds. Stretch the foamiran with your fingers from the base to the tip. Make a hole in the base. Lightly grind the edges of the petal in your fingers to thin the material and straighten. Perform all manipulations carefully so as not to tear.

For the pestle, cut a rectangular triangle from white foamiran with a height of 7 cm and a length of 10 cm. Spread it along the contour with Moment glue. Roll up into a roll, leaving no voids inside.

Dip the finished pestle first in PVA glue, and then in semolina. Paint the dried part yellow with a cotton or foam rubber sponge.

For a cover imitating a calla stalk, cut out a rectangle slightly shorter than a knitting needle, 2 cm wide. Spread its edges along the length with Moment glue, twist it to form a cover. The inside of the stem must be hollow so that the spoke can pass freely.

To decorate the handle, simply wrap a green strip treated with glue around it.

With a strip of green foamiran smeared with Moment glue, connect the stem and pestle. Glue a white petal on top so that one part of it is lower than the other. Give the dried calla flower from foamiran a shape: round the edges, pull out the pointed tip, twist it.

Cut a calla leaf from green foamiran, draw longitudinal stripes with a knitting needle in the same pattern as for a petal. Glue it to the stem "Moment".

Stretch the color with paint from dark green to light green at the junction of the flower with the stem. With a sponge, apply dark green paint to the leaf and stem.


Thus, you can make a case for a brush, pencil, felt-tip pen. And if you want flowers in a pot, then fix the bouquet in a small pot with plaster.
Instructions on how to make calla lilies from foamiran with your own hands were prepared by Natalya Neustroeva, photo by the author. All master classes on this type of needlework.
Flowers such as callas can be made by yourself. Therefore, you should step by step analyze how to make calla lilies with your own hands, and learn several ways to tint the petals. The manufacturing master class will be described below.
For manufacturing, you will need some materials, which are not difficult to find in the store.
Materials:
- Blanks from foamiran (petals of a suitable size, strips of green matter 1 cm x 4 cm, yellow foamiran 2.5 cm x 5 cm;
- Artistic pastels in yellow, light green and dark green, red colors;
- Wet wipes;
- Toothpicks;
- Floral wire;
- Yellow microbead;
- PVA glue;
- Thermal gun;
- Tape tape;
- Iron.

The first step is to choose a suitable stencil for the petals. It is necessary to make a pestle from strips of yellow matter, after bending the floristic wire on one side by 5 cm. The size of the pestle depends on the size of the flower. Next, you need to attach foamiran and cut out a rectangle, leaving a small part to close the top of the pestle. Next, you need to apply glue to the top and to the wire. Then you need to bend the top and smear a little glue on the edge.
The pestle should be completely covered with PVA glue. Top with beads.
Of course, it should ideally be used, but as an alternative, you can crumble dry yellow pastel and mix with semolina, it will turn out no less original. This composition must completely cover the pestle. Next, you need to start giving the petals a realistic shape, they need to be heated, and then stretched in different directions. To tint yellow calla lilies, you need to take a red dry pastel and draw frequent lines at a distance of 2 cm from the edge of the petal.
It is not necessary to crumble the chalk, but it should immediately be applied to the petal. It needs to be tinted on both sides. Next, you need to draw a bright line along the edge of the petal. The red line should be slightly shaded, and the base of the calla should be tinted with green pastel. To do this, mix yellow and light green chalk and first, apply the mixture with a damp cloth, then make the very base of the calla a little darker by using a dark green pastel.
The white petal must be tinted when using crayons of the following colors:
- Yellow;
- light green;
- Dark green.
On the side that will be outside, you need to make the base darker, more saturated greener, just like when tinting the yellow petal. The shape of the petal must be given after heating on the iron. The wire stem is wrapped with green foamiran and the flower is connected with a glue gun.
MK: callas from foamiran
To make callas from foamiran, you need to prepare a set of materials.

Namely:
- Foamiran white, scarlet, green;
- Floral wire;
- PVA glue and brush;
- Manka;
- A piece of foam rubber;
- Glue gun;
- scissors;
- Iron.
The first step is to make a pattern. The petal of a charming flower is one, but large and slightly twisted. You can change them, but the width of the petal is always wider than the height. Next, you need to cut blanks from foamiran. The spread at the stem of the flower should be painted with light green and yellow acrylic paint. The paint must be applied with foam rubber.
Then you need to dry the paint, twist the petal to give a realistic shape. The pestle is made of yellow foamiran and wire. The pestle must be covered with glue and semolina applied to it. Next, you need to make a stem using green foamiran wound on a wire. Calla leaf is cut arbitrarily. Using a toothpick, a relief is applied, and the flower is connected using a glue gun.
How to make calla lilies from foamiran for hairpins
To make a hairpin decorated with callas from foamiran, it is necessary to prepare materials.

- Foamiran of a suitable color;
- Ready stamens;
- Glue gun;
- Scissors.
Next, you need to take foamiran and cut it into small squares. You can use a template. You should circle the workpiece on matter and then cut it out, you get a petal. Next, you need to take the finished stamens and wrap them with a petal, giving the shape of a calla. Then the foamiran must be heated and the petal bent.
The flower is ready, now it remains to make a few more pieces and fasten them to the hairpin. A little time and good mood and you can get an original decoration.
We make callas from foamiran with our own hands
For the manufacture of white calla lilies, it is necessary to prepare materials.
Namely:
- Floral wire;
- Foamiran is white and green, olive can be;
- Oil paints;
- Teip tape;
- Super glue;
- Glue gun;
- Paper;
- Toothpick;
- Lemon plastic;
- Iron.

You have to start with the stems. Several wires must be connected and glued green foamiran on them. The bottom of the stem should be thicker than the top. Wrap with tape 2 times. The first time with just a tape of foam, and the second time with a crumpled tape. For a calla leaf, you need to take a template and transfer it to matter with a toothpick, cut it out. The template is made on paper. Relief stripes must be applied along the entire length of the petal. Next, the petal must be twisted and diluted with oil paint.
With the help of a damp cloth it is necessary to carry out shading. From the back, the petal must be tinted green, inside yellow.
The edge of the petal must be heated and twisted. The principle of assembling a petal resembles the folding of a bag. The stamen is made of yellow plastic, the flower is collected and, if necessary, a large green leaf can be made. The sheet is 2 times larger than the flower itself and it must be tinted with green oil, applied to the surface with a relief. The sheet is attached to a separate wire. Having made 3 callas and 1 leaf, you can get a beautiful bouquet that will decorate the interior.
How callas are made from foamiran (video)
A little time, desire and work and a wonderful composition for yourself or as a gift is ready. Study the master class in detail and start creating. I wish you success!
Callas are wonderful flowers for bouquets, and one flower in a vase looks amazing! We will analyze step by step how to make calla from foamiran, and learn two ways to tint the petals.
Materials used:
- blanks from foamiran (petals of the desired colors and sizes, green stripes 1 cm wide, 4 cm long more than the wire for the stem, yellow 2.5 cm wide, 5 cm long);
- dry pastel (yellow, light green, dark green, red);
- wet wipes;
- toothpick;
- floral wire;
- yellow microbeads (if it is not available, tinted semolina will do);
- PVA glue;
- glue gun (or second);
- teip tape;
- iron;
- good mood:)
Using the stencil, you can choose the flowers of the desired size, I used the second and third largest.

We will make a pestle from strips of yellow foamiran, first bend the floristic wire on one side by 4-5 cm (depending on the size of the flower), apply foamiran and cut out a rectangle, leaving a small part to cover the top of the pestle.

Apply glue to the wire and top.

First, fold the top, then wrap it around, applying a little glue to the edge.

We will completely cover the resulting pestle with PVA glue - for this you can take a piece of foamiran, then you do not have to dirty the brush.

From above we start to sprinkle with microbeads. Of course, it is ideal to use it, but I didn’t have it and I made an alternative - I crumbled yellow dry pastel and mixed it with semolina, it turned out no worse. This mixture should completely cover the pestle.

We take the pestle with our fingers so that the semolina sticks firmly.

Here is such a pestle turned out, let's leave it to dry, but for now let's take care of the petals.

First, stretch the petals a little in different directions.

Take a toothpick and, holding it at an angle so as not to tear the material, draw frequent lines from the center to the edges. Let's do it on both sides.

To tint a yellow flower, take a piece of red dry pastel and draw frequent lines at a distance of 2 cm from the edge. We do not crumble the chalk, but immediately apply it to the material, we do it on both sides.

With a small piece of a damp cloth, lightly blend the lines.

While our petal is still wet after shading, take the pastel again and draw a bright edge line - again we do this on both sides.

We slightly shade the red line, and tint the base of the flower with green tints. To do this, mix yellow and light green pastels and first apply this mixture with a damp cloth, then make the base of the flower itself a little darker using dark green dry pastel.

We will tint the white petal with the same mixture of yellow and light green pastels, we do not add a dark green color from the inside.

And on the side that will be external, you need to darken the base of the flower with a more saturated green color, just like we did with the yellow petal.

Let's give the upper edge of the petal a light greenish tint, we'll do it from both sides.

To give shape to our petal, we apply the very edge to the iron and wait until the foamiran warms up (it starts to wrap itself towards the iron).

With your fingers, slightly bend the edges of the petal, giving them a slight waviness. Here, be careful that the edges of the petal are bent in the right direction, pay attention to the tinting.

Scroll the tail of the petal between the fingers, we will do the same with the second yellow petal.

Let's decorate the stem - take a strip of green foamiran and make a beveled edge.

Put a drop of glue on the edge and start wrapping the stem. Do not stretch the strip too much when wrapping, just make sure that the stem is even.

Cut off the excess and fix the edge with glue.

As a result, we will get such a stem.

Glue the petal - first the middle, then the edges. We do this at an angle to the stem so that the flower is half-open.

We fix the edges with glue.

To make the flower more elegant, we will slightly warm it up on the iron and adjust the shape.

With a white petal, repeat the operation - first glue the pestle to the center of the petal.

Then glue the edges, again, placing them at an angle. Try different options - a more open and closed bud, and choose the one you like.


The legend of the flower is very simple, similar to many others, unless, of course, you realize it, but read it like a fairy tale. But let's get back to the legend, it's still amazing.
In the distant, distant times, when the Gods still appeared in the world of people, and heavenly girls often descended to Earth, one young daughter of a certain deity fell in love with a strong, brave and handsome guy who was the son of the leader of an Indian tribe, and they began to secretly meet.
But in Heaven, what is happening on Earth is not a secret, since everything is visible from above. And when the god, whose daughter was the heavenly beauty, saw this, he forbade her to meet with an earthly guy. Let's not say that love is evil. Let's just say she's relentless. And when the noblest girl again tried to meet her lover, her father was very angry. Because she disobeyed him, he made his daughter invisible.
The unfortunate beauty continued to descend to her beloved in the earthly world, and the young man wept with grief and did not know what to do. He knew that she was somewhere nearby, but he could not see her. Then he collected the most beautiful flowers that he could find and wove a veil from them to throw it over his beloved and thus touch her image.
When the flower veil covered the young beauty, the young man sobbed bitterly, and the girl wept too. Their grief and tears touched the callous heart of the formidable deity. Seeing how they suffer, the father changed his anger to mercy and removed a terrible spell from his daughter.
The thinnest flower veil fell to the ground - and the leader's son took the bride to his tribe, where they played a wedding and lived happily ever after. In the place where the flower cover fell, after some time, amazing white flowers with a barely perceptible delicate aroma began to grow, the only petal of which resembled the same cover made by the caring hands of a sincere young man in love.
13 June 2015
Artificial flowers versatile in their functionality. Such flowers can be used to decorate bags, children's hairpins, headbands and interiors. Today we will make one of the exotic and most delicate flowers from plastic suede (foamiran).
For mk from foma we need:
- floral wire;
- white, yellow and green fom;
- candle;
- scissors;
- glue gun.
Master class from foamiran it is very quick and easy to do, so it can be done even with children.
From white foamiran we cut out a rectangle 8x5 cm in size, from yellow 5x1 cm, from a green square 2.5x2.5 cm in size. We prepare a floristic wire of such length as the flower stem is needed. This must be taken into account when forming a bouquet.

After that, from each rectangle we form blanks for a flower. The petal itself will be in the form of a leaf, the lower end of which is cut off. We also form a leaf from green foma, but already with pointed ends. Cut out a stamen from yellow foamiran.

The edge of the white foma petal needs to be stretched a little, so we heat it over the candle for just a second and immediately stretch it with our thumbs.

Get a voluminous edge.

Then we also heat the yellow stamen over the candle. It will become more voluminous.

Now we attach the stamen to the wire, and glue the wire with the stamen in the middle of the petal. The wire should go over the white fom so the length of the stamen can be adjusted if needed.

We glue the bottom part, thereby forming a bud.

Glue the bud to the leaf in the middle. So that the wire passes through the sharp ends.

We glue the leaf around the wire.

They need to hide the cut of white foamirana, so its width should allow it.

The most delicate calla from foamiran.
It turns out very beautiful calla from foamiran.

Foma calla flower.
flowers from foma delight year-round with their beauty, they are aesthetic and touching, and calla from foma is tender. It is delicate and suitable for making a bouquet, boutonnieres for the groom or boutonnieres for the bridesmaids.
Especially for the site Lessons of Needlework Antonina Mazur.