DIY bottle decor - turning unnecessary containers into decor. Vases from glass bottles: decor, painting and trimming Stylish bottle painting
Beautiful items for decorating the room can be purchased at specialty stores, but some of them are easy to make yourself. For example, there are many options and ways to decorate a bottle with your own hands. This will not require any large cash costs, or special tools for work, or special skills.
At the same time, an elegant glass container, thanks to a variety of styles, can enliven any interior.

In order to get started, you need to select the appropriate material and prepare it.


- A glass container with an unusual shape will look more interesting.
- We rid the vessel of the factory marks. For faster paper removal, the bottle can first be soaked in warm water.
- We wash the object well from the inside.
- Degrease it from the outside with alcohol or acetone.
- Let's dry. The container must be absolutely dry.
- We prepare the necessary materials and tools for work.

Decor styles
Depending on the further location of the vessel and its purpose (a gift for a birthday, wedding, St. Valentine, etc.), you can decide on the style of decoration. Here are the most common ones and their respective methods:
- Style
- Way
- Classical
- Acrylic paints, decoupage, ribbons, beads, threads, paper
- Provence
- Cereals, legumes, salt, dried leaves and flowers
- High tech
- Paint (inside), old keys, buttons, hairpins
- Glamor
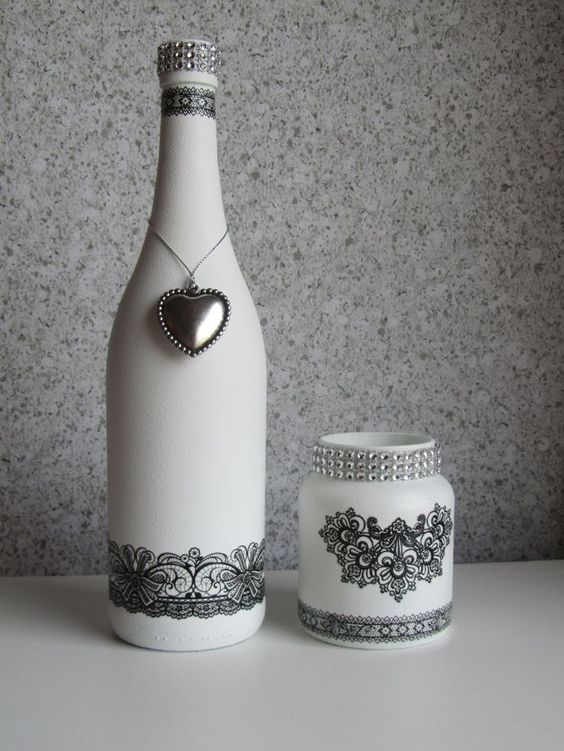
- Paint, lace, bows, rhinestones, pearls, glass beads


Kinds
All decoration methods are initially divided into two large groups:
- internal;
- external.

A variety of materials are suitable for internal filling: beautiful stones and minerals, beads, earth, plants (live or artificial), New Year's garland, etc. In this case, vessels of an unusual shape, as well as with inscriptions that you can make yourself, are perfect. This bottle decor is very simple and easy to perform.

For example, salt decoration is very popular. Pour the substance into a bowl, which can then be placed in the oven. Pour the acrylic paint into the bowl and mix well with a fork.

We place the finished semi-finished product in an oven for an hour (temperature 100 degrees). After the time has elapsed, we take out the salt, knead with a fork and sift through a sieve. Colored "sand" is ready.

In exactly the same way, salt can be painted in different colors, which, among other things, can be mixed with each other to create more interesting tones. Then, using a funnel, pour the salt into the vessel, alternating the "sands" of different shades.

Similarly, you can fill the bottle with cereals, legumes and pasta. Such vessels will be a great decoration in the kitchen.

There are many more ways to change the outside. Sometimes for this it is even possible not to release the container from the contents. For example, it is possible to decorate a bottle for a birthday by opening it after presenting it to a birthday person.


Decor methods
Now we list the easiest ways to do it yourself, demonstrating step-by-step instructions on how to decorate a bottle.

Internal staining
Take the paint and pour it into the container. Rotate the object in different directions so that there are no empty spaces left. Put it upside down. Excess paint will drain, leaving the first layer, which needs to be given time to dry. To be sure, repeat the procedure.

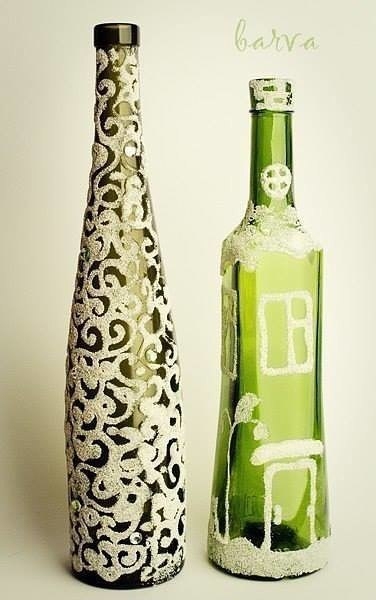
Salt
We fix rubber bands for money (not very much) on a bottle in a chaotic manner or in a spiral. We paint in white. We apply glue to the white areas of the glass. Scatter salt on a sheet of paper. We take the container and carefully roll it bit by bit. We are waiting for the glue to dry. We remove rubber bands.

Cereals and pasta
In this case, everything is very simple. With the help of glue, you can cover the entire vessel with edible material, or you can make applications. Give free rein to your imagination.

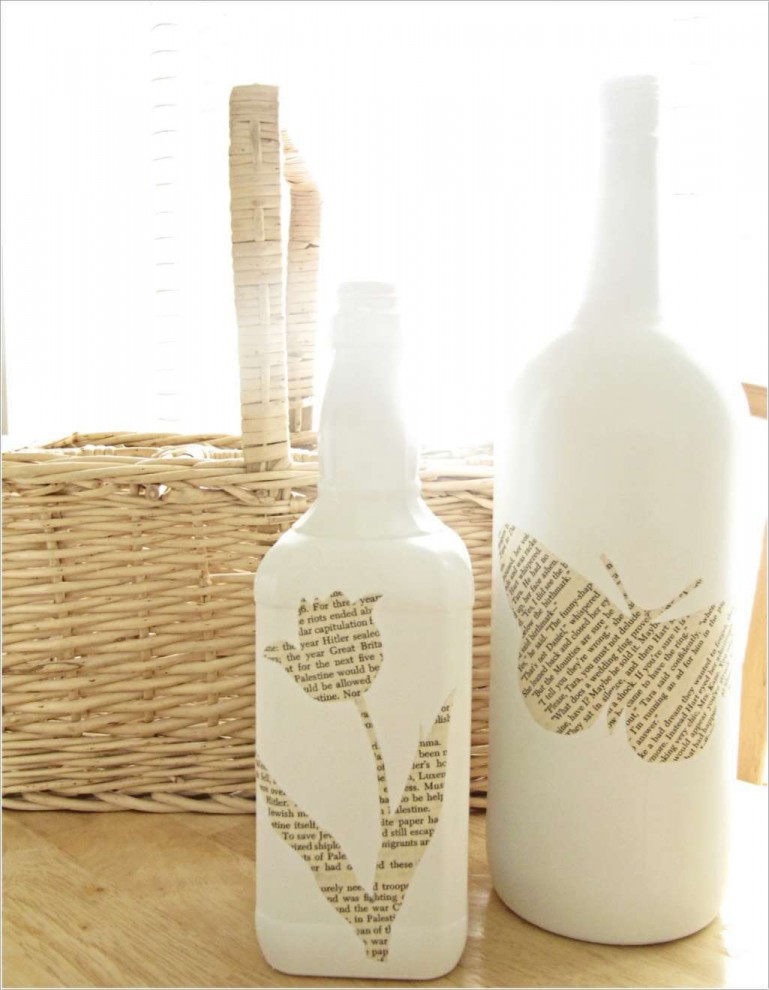
Napkins and decoupage
You will need a piece of fabric (you can use a handkerchief), apply glue to it and fix it on the bottle, creating folds in random order. We wait until the product dries, then paint it with white acrylic paint.


We take a multilayer napkin with a beautiful pattern, cut out the one you like and tear off the top layer. We glue the resulting drawing and paint the vessel with the previously selected paint.


After the time required for drying, we process the folds with acrylic mother-of-pearl. In conclusion, we apply acrylic varnish to the surface of the container.

Toilet or crepe paper
To do this, you need a bottle with dark glass. We apply the drawing with white acrylic paint, wait for it to dry completely. We cut (you can tear) small pieces of paper and use glue to attach them to the painted fragments, giving them volume. After drying, we process the drawing with paint.

Twine and rope
In this case, everything is as simple as possible. We apply glue to the neck of the bottle, to which we attach the tip of the thread. We bind the object in a spiral. Having reached the bottom, we fix the end of the matter with glue. Rope can be used in different colors.

Ribbons
Useful tape, which can have different lengths and thicknesses, as well as glue. Wrap the fabric tightly. It is recommended not to use a lot of glue so that the work comes out neat. A bottle decorated with ribbons is easy to make, the main thing is to follow the rules.

Eggshell
We separate the film from the shell, dry it and grind it into pieces. The vessel must first be pasted over with paper. Then we fix the pieces made with a minimum distance between each other with glue.


We paint them in the desired color, cover the resulting “cracks” with a different tone. Finally, we apply varnish to the product. The shell gives the container the effect of antiquity.

Beads
This material can be used both fragmentarily and completely for the whole thing. In the first case, the bottle needs to be decoupage, fix the beads with glue in accordance with the desired pattern. In the second version, the container is covered with glue and rolled into beads in a uniform layer.

Conclusion
The decoration methods described above are far from the only ones, but one of the easiest to do with your own hands, and also not requiring large cash costs. On the Internet, you can find many tutorials on how to decorate an ordinary bottle so that it becomes a real work of art.

Guided by personal preferences, style and design of the room, you can create beautiful trinkets for the interior. Below are photos of various bottle decorations.


Originally shaped bottles can be turned into chic home decor using one of the techniques or a combination of them.
If your hand does not rise to throw away empty glass bottles, then give them a second life by turning them into a beautiful and fashionable decoration. There are many affordable and inexpensive techniques that make it easy to decorate bottles with your own hands. Ready-made crafts can be used in the interior of the house, for gifts and even for sale, providing yourself with a good additional income. Choose your way of decorating, and even better - try several options!
Filling a bottle with colored salt
The simple decor of salt bottles is perfect for co-creating with children and does not require special artistic talents and skills, so it is worth considering in the first place. The principle of decoration is simple: a beautifully shaped transparent bottle is well washed from the label and dried. Then they prepare multi-colored salt - you can paint it with chalk or gouache.
Gouache is added to dry salt and mixed well and then dried. To speed up the process, a baking sheet with salt can be put in the oven for about an hour. In the case of chalk, small portions of salt are poured onto a sheet of thick paper and rubbed with colored crayons. This method is convenient for small batches. Salt is better to take large, you can sea or Himalayan.

Next comes the most important process - you need to pour colored salt into containers as accurately as possible, using sheets of paper to direct the jet. You can’t shake the dishes, otherwise you will get curved contours. To get beautiful stains, you need to tilt the container in different directions. Beginners can try with parallel strips - let it be not so spectacular, but neat.
Decorative canning - kitchen decoration
This method can not be called simple, but the result is worth the effort. The decoration of bottles with canned vegetables is somewhat similar to winter preparations, but the difference is that stronger substances are used here for canning. Just keep in mind that you can’t eat such canned food - they are only suitable for decorative purposes.
You can preserve red peppers, dwarf fruits of tomatoes and cucumbers, carrots, zucchini, capers. Acetic acid, glycerin or other embalming solutions are used as preservatives. We have already told you more about this do-it-yourself bottle decorating technique - if you are interested.

Garnish with cereals and legumes
This method of decorative filling of bottles is somewhat similar to decorating with salt, but beans, peas, dried corn, colorful cereals, coffee, and dry unground spices are used as decoration. In appearance, such decorations resemble decorative canned food, but making them is much easier, since filling is not needed, and you can store it at any temperature without fear of "explosions".

Separately, it is worth mentioning the filling of containers with semolina - it is glued to the surface, creating elegant patterns that look like delicate lace. To obtain the perfect pattern, stencils are used to help apply glue to the dishes with high accuracy. Beginners can use double-sided adhesive bases.

Decorating with fabric and leather
Out-of-fashion dresses, worn jeans, knitwear, jackets are suitable for decorating bottles with fabric. The fabric is either glued, tightly fitting the container, or beautiful reliefs are created from it. The second method is more popular because it allows you to get original textures. In addition, it does not need beautiful materials - even old pillowcases will do.
A thin fabric is cut into strips, soaked in PVA glue, diluted in different proportions with water, then slightly squeezed and glued to a glass container, giving the desired relief. After the glue dries well, the surface is painted with water-based paint in the desired color.

Burlap is ideal for country style - a rough material that becomes elegant and delicate in the hands of needlewomen. Bottles are wrapped with burlap, and then the crafts are decorated with lace, braid, flowers, which are also made from burlap. Learn more about the possibilities of this material.
A budget solution is to decorate bottles with tights. The lower part is cut off from the tights, moistened with PVA and decorated with wet nylon glass containers, creating volume. First, the bottle is threaded inside the stocking, and then reliefs are created. You can additionally make knots, bows, flowers. The finished vase is painted and varnished for durability.
Leather is a luxurious raw material that turns bottles into interior vases and solid gifts. For work, not only natural, but also artificial leather is used, but natural raw materials are more convenient to use. Sort out things in the closet, most likely, unnecessary jackets and skirts take up space there, which are ideal for creating beautiful ones. See below for links to step by step tutorials.
Twine for reincarnation
It is quite simple to decorate bottles with twine, but such a vessel looks very impressive and is suitable for a gift not only for women, but also for men. This technique pairs perfectly with coffee bean embellishments, so it's worth combining the two hobbies to heighten the excitement of the result. Instead of twine, linen threads or braid are used - this is how ethnic-style decor is obtained.

The easiest way is to wrap the base with a rope, wetting it in PVA glue. You can decorate the resulting vase with burlap, ribbons, as well as buttons, coffee beans, shells. For this technique, you do not need to carefully prepare the surface of the bottle, but it is better to remove the label.
Decoupage - new from old
Coloring for new life
Fans of drawing will love the decor of the bottles in the painting technique, and novice artists will love the transformation of unnecessary containers into an original vase. To begin with, the glass container is well washed, wiped and degreased with acetone, nail polish remover or alcohol. If you want to paint not the entire surface, but create the effect of stripes, then everything that should remain transparent is pasted over with masking tape. The same principle is used for a multi-color pattern.
Next, acrylic paints or spray cans are used - matte ones look spectacular, but there are varnishes for gloss lovers. You can decorate the painted surface with the help of stencils, brushes, three-dimensional elements, glosses. To get spectacular drops of water, the bottle is moistened and spray paint is quickly applied to the surface covered with droplets.

It is difficult to paint dishes with a textured surface with a brush, but there is one secret here - embossed containers must be painted from the inside. It is very simple to do this - pour the paint into the bottle and shake it well. Dry the product with the neck down. Most likely, you will need to repeat the procedure so that the second layer perfectly covers all the gaps.
Unusual eggshell effect
Eggshell is the most valuable material, with which it is easy to get things in an aged style or imitation snakeskin. To decorate the bottle, its surface is first primed with PVA glue, and the shell is crushed into pieces of the desired size, but you should not grind it. It is important to free the inner surface of the shell from the film.
The technique for decorating bottles with eggshells is simple - the glass is smeared with PVA glue, a piece of shell is applied and pressed. At the same time, the material is still cracking and, if desired, these elements can be pushed apart with a needle. After drying, the work is inspected and too large gaps are filled with small details.

The finished product is painted with acrylic interior dyes of the desired tone and varnished. The result is a very beautiful vase with a trendy crackle effect. Read about other possibilities of eggshells on our website "Women's Hobbies".
Macaroni and buttons - budget luxury

Glass and plastic bottles are an excellent material for making various original crafts that can be easily made by hand. Such unique, stylish and very beautiful things can decorate the interior of any apartment or house, making them even more comfortable:
And such crafts will be a wonderful gift for loved ones. To create various original gizmos from glass or plastic bottles, you can leave them in their original form, but they will look much more advantageous if the bottle is pre-painted.
What can be done from these bottles:
When such beautiful bottles come in handy:
- How - see here
Using the same technique, you can paint any glass: glasses, jars and wine glasses
You should be very careful about the choice of paint, because the final result will depend on it.
- Good fit regular waterproof paint, as well as acrylic paints, which are matte and glossy, transparent and dense, they are sold in cans and sprays
- Acrylic paints you can use it as it is sold, or you can dilute it with water, it all depends on what effect you want to achieve.
- Also on sale is universal paints which are perfect for painting glass and plastic bottles.
What paint to choose for a plastic bottle
How to paint a plastic bottle for crafts? For decoration, you can use exactly the same paints as for glass. It is best that they are not aggressive.
- Acrylic paints great for painting plastic bottles, but to protect the surface, you need to cover them on top with a still colorless acrylic varnish.
- Color acrylic lacquer is an ideal way to paint plastic bottles for crafts.
- Paint in cans also suitable for decorating a plastic bottle.
- The most stable and beautiful effect is given car paints, plastic bottles painted with such paint will not change their color for several years.
- Can also be dyed with regular enamel paints.
How to paint: sponge, brush or aerosol
- In order to paint a glass or plastic bottle, you can use nylon brush, but in this case it will be very difficult to achieve a perfectly flat surface.
- Can use a sponge, and dipping it into the paint with dotted movements, apply to the surface. So the traces will not be visible, but you will have to cover the bottle with several layers of paint, each of which must dry, and this will take some time.
- The fastest and easiest way to get smooth painting- this is to use spray paint, which dries very quickly.
But in the apartment you should not spray the paint, because it has a strong smell and disappears for a long time.
5 painting techniques
All types of painting can be conditionally divided into several techniques. Two of them are the main ones: this is the application of paint from the inside of the bottle and from the outside. Each method has its own disadvantages and advantages. For example, painting from the inside makes it possible to achieve a beautiful glow from the inside, but limits the combination of colors and textures. And surface coloring gives full rein to your imagination: here you can use stencils, make gradient color transitions, create textures. Choose the technique that you like.
Teznika No. 1: We paint the bottle from the inside with acrylic

In order to paint a bottle for decoration from the inside with acrylic paint, you will need:
- Syringe.
- Acrylic paint.
- Liquid for dissolving paint.
- Unnecessary capacity.

Using a syringe, we inject the paint into the bottle and evenly distribute it along the walls
- Before proceeding with staining, you need to wash and dry the bottle well. In order for the tone of the paint to turn out to be uniform, and there were no streaks when staining, the paint must be poured into a container and mixed well.
- Then you need to draw paint into the syringe, insert it into the neck of the bottle and squeeze it inward.
- Now you need to slowly rotate the bottle so that the paint covers the walls and bottom over the entire area. In order for the excess paint to drain, you need to put the bottle upside down for a while.

We turn the bottles over and let the excess paint drain
If you paint the outside of the bottle, it can be easily cleaned with a solvent.
Bottles painted with acrylic can be used as original vases, besides, they do not lose the beautiful reflection of the glass, enlightening the bottom.

The original vase for the house is ready
Technique #2: Coating the outside
Coating the paint on the outside gives a lot of possibilities, for example, to create beautiful stripes or other stencil patterns on the surface.

Screen non-painting

Painting with electrical tape
In order to paint the outside of the bottle, you will need:
- Paint (acrylic or water-based).
- Degreaser (any alcohol solution can be used for this).
- Brush or sponge.
- Newspaper.
Process:
- To begin with, the bottle must be washed well, cleaned of paper labels and dried.
- Then we degrease with an alcohol solution, if this is not done, the paint simply will not hold.
- Now you can start painting using a brush or sponge, in any case, you need to start from the bottom.
- We put the bottle upside down and leave to dry. After the paint dries, turn over and finish painting the top of the bottle.

We apply electrical tape to the surface of the bottle

Apply paint using a brush or sponge. After complete drying (1 day), remove the tape

Finished vase for decoration
In order to paint over all the gaps, you need to apply at least two coats of paint.
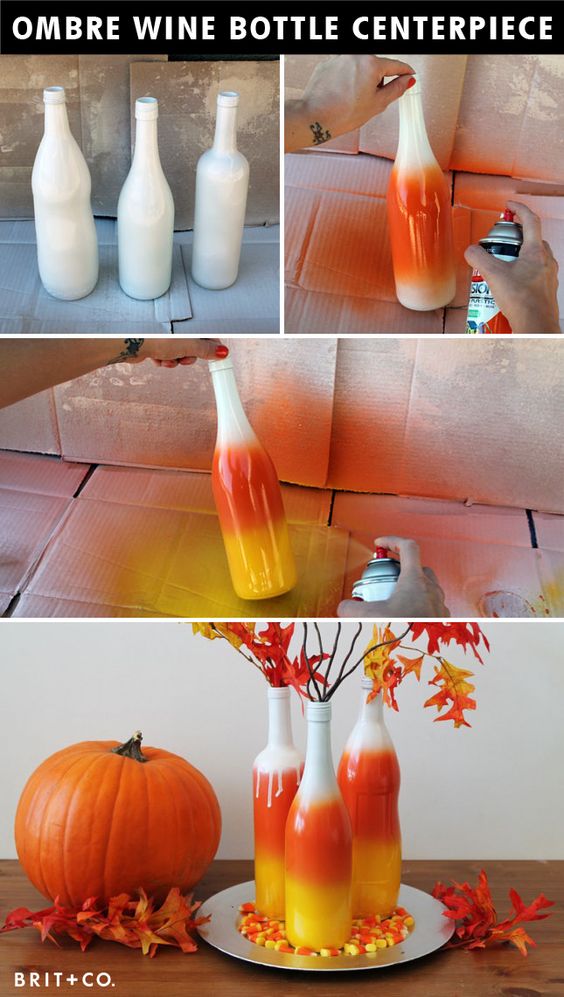
Technique #3: How to spray paint
This method is the easiest and fastest, but it is recommended to use it outdoors.

Gradient spray paint
It will require:
- Paint can.
- Alcohol based solution.
- Newspaper.
Before painting, the bottle must be washed well, labels and traces of glue must be removed from them. Then they need to be dried and treated with a degreaser. The bottle must be placed on the newspaper and at a distance of 30 cm, start spraying paint on it.

The principle of coloring: the darkest tone is applied first, and then lighter shades are applied on top of it.
If one layer is not enough, the procedure must be repeated. When painting bottles with spray paint, you can use various stencils or adhesive tape, resulting in unique, original patterns. Bottles painted in delicate light colors in combination with gold or silver paint look very impressive.

Great fall decor
Technique #4: Glitter Painting
Very pretty it turns out painting with glitter or sparkles. This is especially appropriate for a wedding or other celebration. Champagne bottles painted using this technology look very solemn and impressive.

Painting bottles with glitter and glitter
You will find more information about this decoration technique in the material “Champagne Decor”. Click on the button!
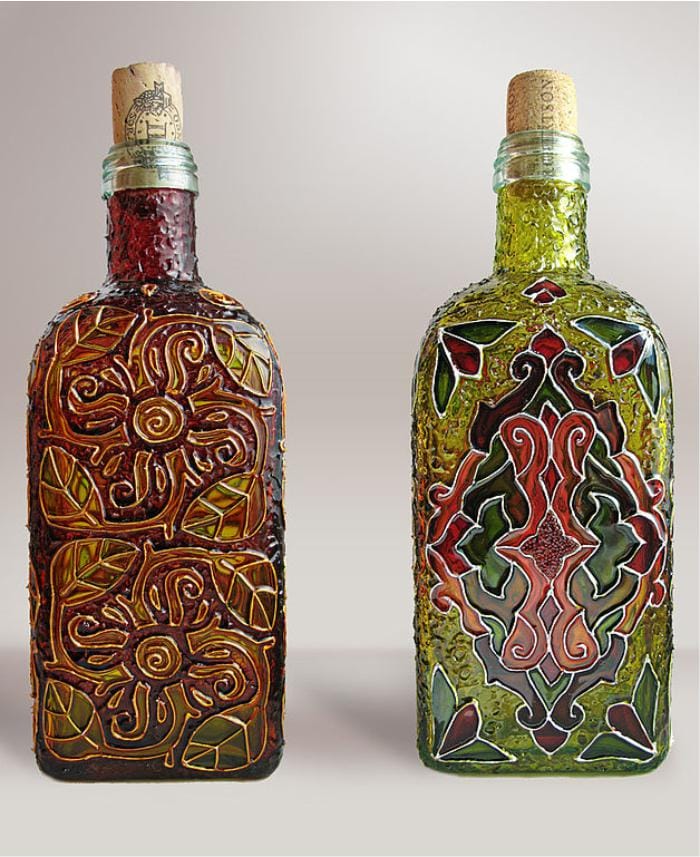
Technique #5: Textured Painting Technique
Everyone knows that, according to tradition, at a wedding, two bottles of champagne are placed on the table for the newlyweds, which the young people take away after the banquet and drink one bottle for the first anniversary, and the second for the birth of their first child. Therefore, the bottles must be beautiful and original. In order to make them such as in the photo, a textured coloring technique is used.

Painting a bottle with acrylic paint and a sponge
Paint application technique:
- Clean the bottles, leaving the foil on the neck from paper labels.
- Wipe with an alcohol solution to degrease.
- Getting to painting, for this you will need white acrylic paint and a sponge.
- Further, everything is simple, we dip the sponge into the paint and paint over the entire bottle with point movements.
- Leave for 15 minutes, and apply the second coat of paint in the same way. After the paint has completely dried, you can start decorating the bottle.
In order to bring a little originality and creativity into the everyday atmosphere of life and your home, a little bit of imagination, free time and a small set of available tools are enough. Any kind of handmade is now at the peak of popularity - on the Internet you can find many master classes for making a wide variety of decor items that you can decorate the interior with. A masterpiece of applied art can literally be born from unnecessary remnants and scraps of various materials. In this publication, we would like to draw your attention to such a type of arts and crafts as bottle decoration. We hope that our selection of 100 different bottle decorating ideas will inspire you to be creative in decorating your home, making a gift or creating a practical yet beautiful household item.

Creativity has no limits
There are many ways to create a decor for a bottle, and the choice of each of them will depend on what kind of end result you need. Whether you want to decorate a bottle for a gift or need decor for a wedding table, maybe you will store spices in a bottle or use it as a vase, maybe you are just looking for an opportunity to decorate your interior, bring bright colors or original ideas to it. In any case, everyone can find their own optimal way to decorate bottles.
So, most often bottles are decorated for the following purposes:
- as a wedding table decoration (usually two bottles of champagne are issued, but options are possible);
- a gift for any kind of celebration;
- decorative element for living room, bedroom, dining room;
- in the kitchen space, a bottle filled with spices carries a functional load and plays the role of a decorative element;
- in the bathroom, a bottle of colored sea salt performs a similar function


Bottle decoration for various celebrations
Wedding table decor
The wedding tradition of decorating the newlyweds' table with two beautiful bottles of champagne has been around for many years. After the wedding, the so-called "bulls" remain with the newlyweds and are kept in a place of honor. The first bottle is opened on the anniversary of the wedding, and the second - after the birth of the first child. Given such a long journey of wedding bottles, special attention is paid to their decoration. Recently, all wedding decoration has its own unique concept, based on which the color palette and decor of literally every piece of furniture, table setting and all kinds of decor are selected.


But there are also universal options for decorating bottles for the newlyweds' table. The best part is that you can do the transformation of simple bottles with your own hands, in a short time and without spending a lot on materials. Most often, bottles are designed similarly to the appearance of the bride and groom - this is what is called a "classic of the genre", time-tested.


bottle as a gift
The best gift is a handmade gift. Such a present not only keeps the warmth of your hands and carries positive energy, but also indicates the exclusivity of the relationship, the special care of the donor in front of the hero of the occasion. A beautifully designed bottle can become a decoration of the festive table, and bring originality to the interior of the home.


New Year holidays
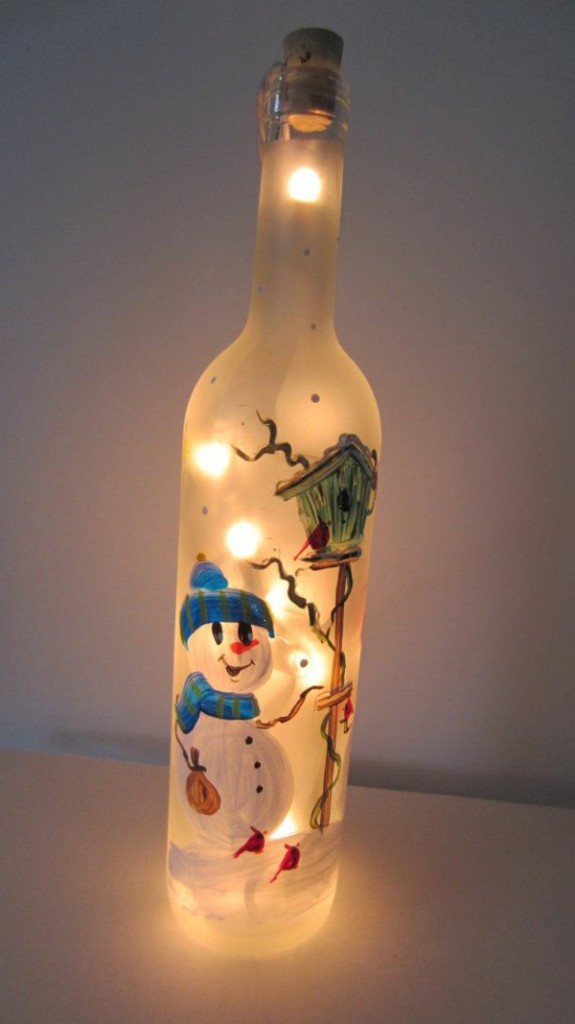
A bottle decorated in a winter, New Year's style can become both a decoration of a festive table and a part of the decor of a room where holidays will be celebrated. This can be as simple as painting the bottle white and coating with coarsely ground salt as an imitation of a snowy surface, or painting the product in the manner of patterns that frost leaves on the windows.


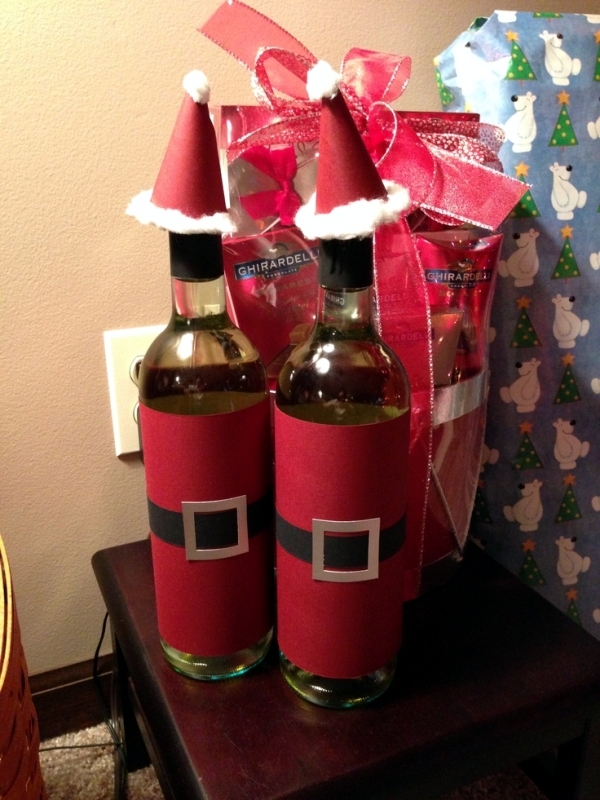


Not only glass, but also plastic bottles can be decorated in the form of a snowman or Santa Claus with a Snow Maiden. Here is an original version of decorating a plastic bottle in the form of a penguin - the most "winter" bird.


Gift for Valentine's Day or Wedding Anniversary
The main theme of the gift for Valentine's Day is the exploitation of images and crafts in the form of hearts, the active use of various shades of red, various ways of declaring love.


Bottles decorated to celebrate a wedding anniversary can be decorated with the first letters of the names of the spouses, the date of the wedding celebration or the number of years lived together. You can create a family coat of arms and use a stencil to apply it on the surface of the bottles.


No one will refuse a whole bottle filled with delicious sweets. Even a child can make such a gift. A funny inscription or a glued flower, beads or sparkles is enough.

Decorating bottles for the interior
Sea style
Decorating bottles in a marine style is one of the most popular options. And the point is not only that you can pour sea salt into a bottle and decorate the bathroom interior or collect a collection of sands brought from trips to various beaches. The marine theme invariably reminds us of relaxation, travel, pleasant emotions and new experiences.


To decorate bottles in a marine theme, you can use twine and pieces of fishing net, shells brought from travels and small pebbles. And, of course, no one canceled the images of waves, marine life, elements of ships and gear, the use of all shades of blue.


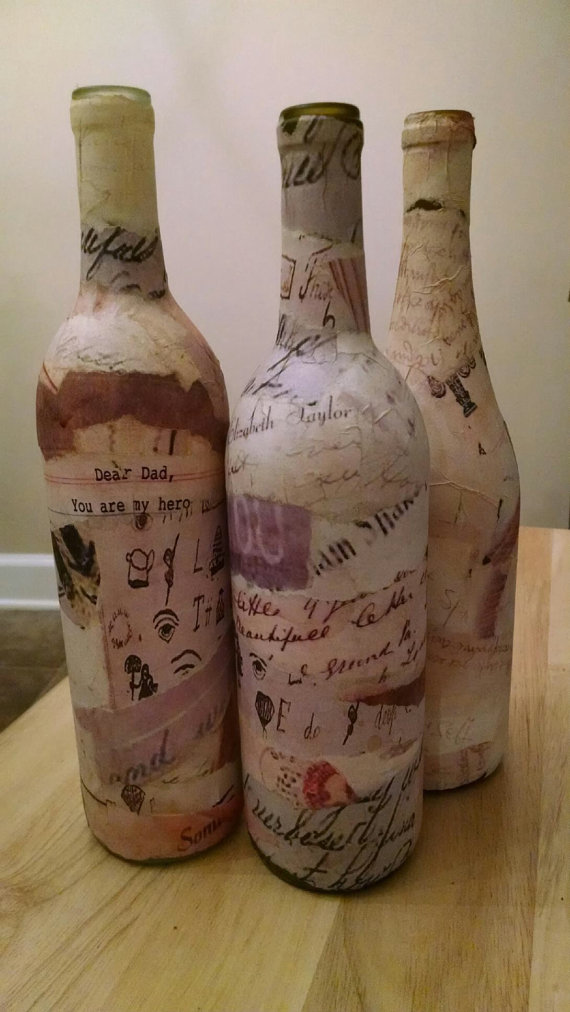
For an interior in the style of Provence and shabby chic
Most often, decoupage and artificial aging are used to decorate rooms decorated in the style of Provence or shabby chic. Not only are various images applied to the bottles (most often flowers and other plants, birds, insects), but also a coating is created that has cracks and even chips.

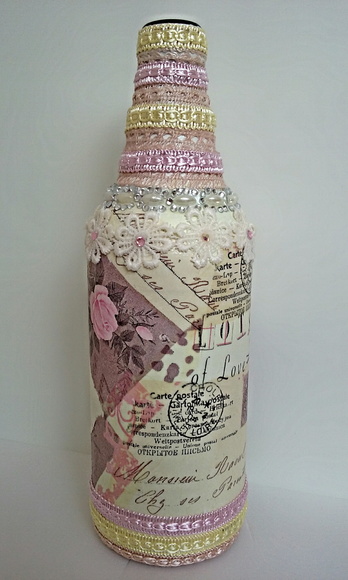


In the interior, decorated in the style of Provence and some other varieties of country style, bottles completely tied with twine or “twine” look great. Most often, such products are decorated with decorative elements - flowers, letters, an impromptu print.
Universal option
One of the easiest ways to decorate bottles is regular staining. You simply choose the shade you need and, after preliminary cleaning and disinfection of the surface of the bottle, paint it. Most often, various pastel shades, silver or golden color are used. A couple of such bottles can serve as a decorative composition or simultaneously play the role of vases.


If art painting is a simple technique for you, then a simple bottle can be turned into a work of applied art:


The composition of bottles painted using the amber technique looks beautiful. It is better to use the layout according to shades of the same color on all bottles (but they can be of different shapes).

On a painted bottle, you can apply a pattern using stencils or simply “freehand”, stick lace, create a texture with glue droplets, stick decorative elements - flowers, beads, rhinestones, pieces of colored glass, sparkles.


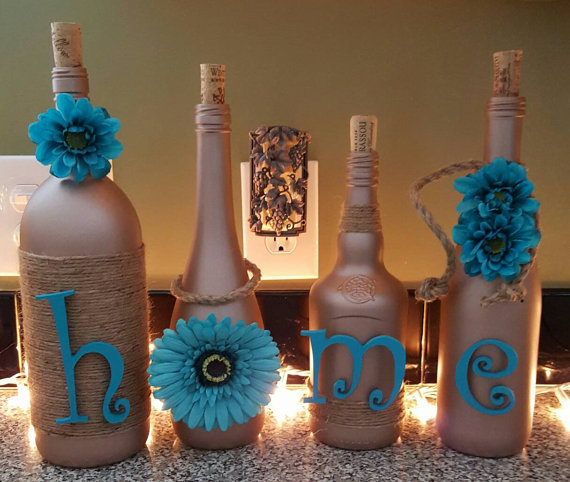
Very often, in combination with dyeing, decoration with twine, burlap and other types of fabrics (lace, hand-knit items, pompons) is used.


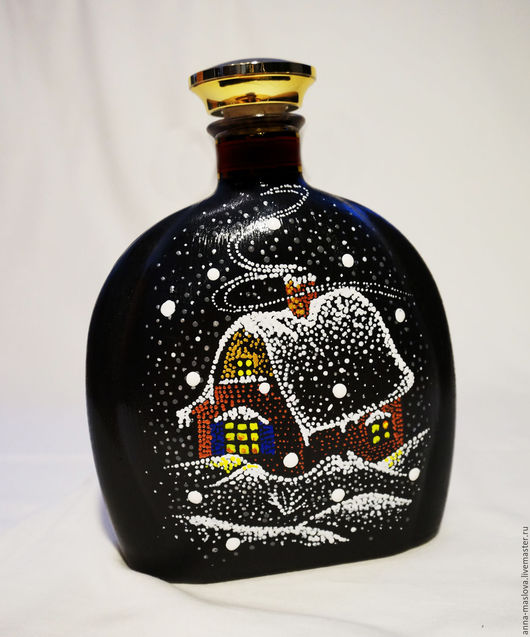
Black bottles are convenient because they do not need to be covered with paint. By itself, black is an excellent background for any decorative elements. A composition of several black bottles, decorated in one way or another, always looks contrasting, accentuated, advantageous.


The metallic glitter on the bottles is great for modern and high-tech interiors.


And finally: some creative and practical ideas
Bottles can perform the functions of not only a vase, but also a flower pot, or rather, a container. By cutting off part of the bottle in the remaining container, you can grow medium-sized plants and decorate both the interior of the home and the landscape design of the site or private courtyard.


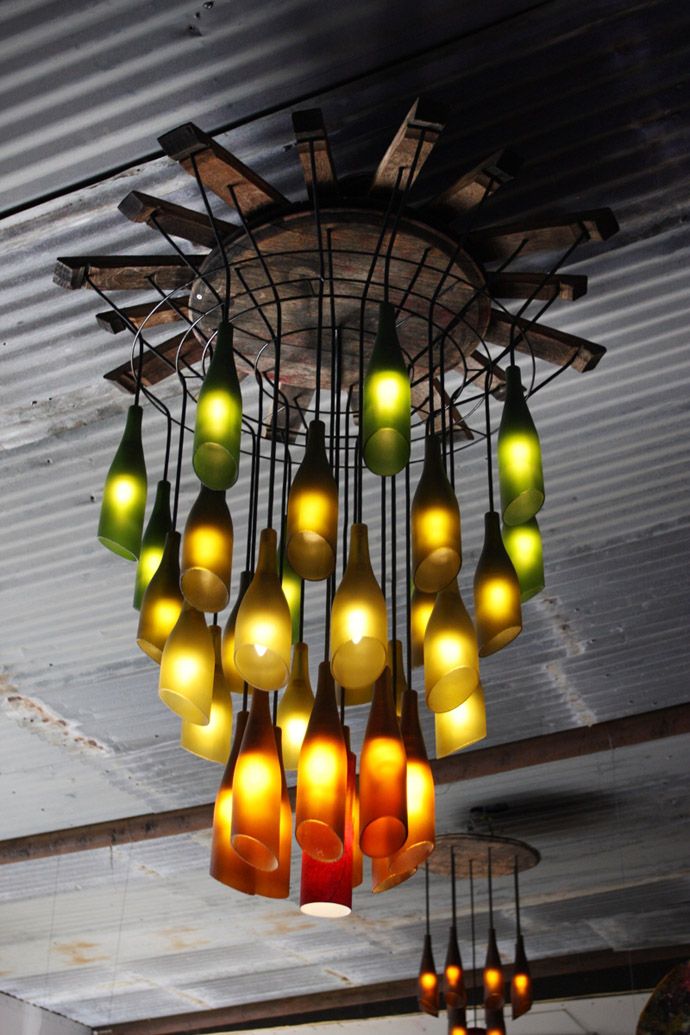
From the glass parts of the bottles, you can make a semblance of bells, a device for the so-called "wind music".


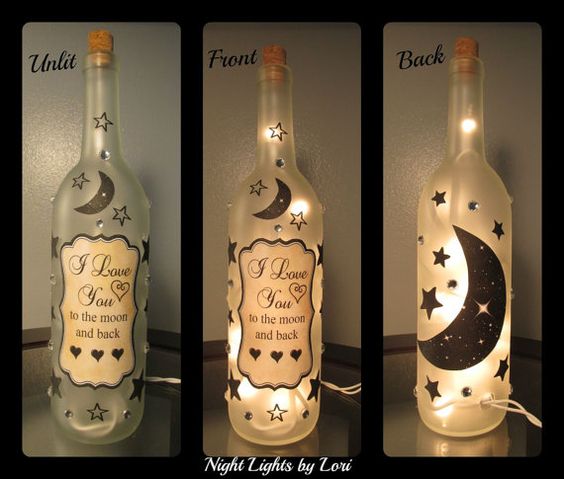
The bottle can be used as a stand for a table lamp if you make it yourself. The bottle can also be an independent decorative element for lighting fixtures in the room. You can lower a garland into a bottle painted in fragments or cut a “window” in the stele and put a small candle inside the bottle.


Bottles filled with rice dyed with food coloring can be a great addition to a kitchen or dining room. The color variety and originality of the design of the room will be provided.

A similar effect can be achieved when creating decor for kitchen and dining rooms. Colored cereals, beans and any other bulk products in transparent bottles look great. without requiring any additional decor.


For serving a festive table (with the obvious saving of countertop space), you can use bottles as a base for high coasters for plates. So on the table you can place more dishes and snacks, not to mention the originality of the approach to traditional serving.

Don't throw away bottle caps - they're a great crafting material. Of these, you can wish for coasters for hot dishes, lay out entire countertops, rugs and make such original decorative elements:


Painting a bottle with acrylic paints is not only a beautiful decoration of the bottle, but also the creation of an unusual piece of furniture.
We offer you an interesting idea for a gift for the winter holidays, painting on glass with acrylic paints of the bottle "Winter House".
Following the suggested description and a little practice on a piece of paper (if you don't have artistic skills), I think you can easily draw this winter drawing. Your family and friends will be pleasantly surprised!
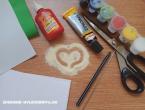
Materials:
- any dark glass bottle;
- liquid soap;
- alcohol for degreasing;
- cotton pad;
- foam sponge;
- art brush Kolonok No. 00;
- flat brush Kolonok No. 5 and Bristle No. 7;
- brushes for painting nails, dots (a tool for applying dots), a palette can also come in handy.
You will also need: clear varnish and silver glitter for nails, acrylic varnish for fixing the painting, water-acrylic paint in the following colors: blue, white, green, brown, yellow and black.
So, after viewing the master class on painting, start making your own.
How to paint a bottle with acrylic paints
Step one
Before painting the bottle, it is necessary to degrease the surface. Soak it in warm water with the addition of a small amount of soap, leave for 15-20 minutes. Then remove any existing labels. Dry the surface.

step two
Degrease the surface with alcohol. Take white water-acrylic paint and brush Bristle No. 7. After that, apply color on the glass with this tool - the first layer, let dry.

Step Three
Apply a second coat of white paint to the bottle glass and neck. To do this, use a foam rubber sponge, making pressing movements, imitate a “snow haze”, as shown in the photo.


Step Four
Now, on the palette, combine blue paint with white and, having obtained a blue color scheme, also with a sponge, give the glass the desired shade. Please note that the light blue paint should not evenly overlap the white layer.

Step Five
Visually determine the location of the landscape on the bottle and, adhering to this size, outline the main drawing with a simple pencil. Initially, you can practice on a piece of paper.

Painting a bottle with acrylic paints
Step Six
Then, with a flat brush number 5, combine blue, green paint and achieve a dark green color. With semicircular strokes, adhering to the center line, draw branches of Christmas trees. And with brown and white paint draw the “Winter House”.

step seven
Then apply the snowdrifts in broad, semi-circular strokes. A brown fence with thin parallel lines, on which small snow caps can be seen. And do not forget about the yellow light in the windows. In the latter case, use a thin brush No. 00.

Step eight
With blue paint with a little water, give depth to the landscape, just circle the house and Christmas trees with a translucent color scheme. In some places of the trees, put dark strokes - shadows, white - snow caps. With a thin brush with black paint, draw small details.

Step nine
Last of all, draw a lot of snowflakes using dots, and apply silver sequins on clear nail polish. Fix the painting with acrylic varnish, so you can easily wipe your designer bottle in the future. Thus, you got an original gift, right?


It is impossible not to notice that the sale of paintings for artists is the main source of income, and if you have no time to visit galleries, do not forget to visit the site http://in.gallerix.ru/, where no one has bought paintings online. About the paintings later, but now study the master class about.