DIY chicken house drawings. Features of various chicken coops for your home or garden. Installation of ventilation and lighting
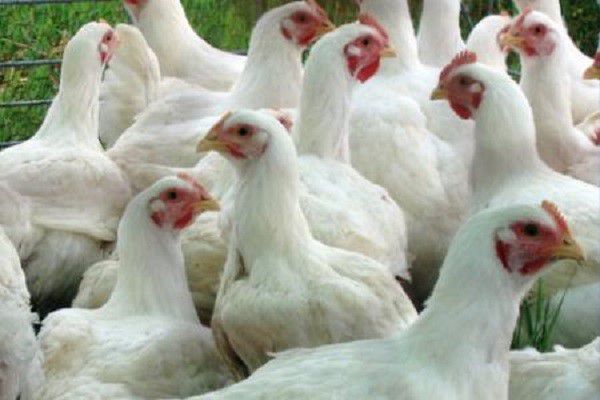
Many owners raise poultry. The best option is chickens. They are undemanding to living conditions, but it is necessary to build a good chicken coop. For a small family, it is enough to have 10 laying hens. To do this, you will need to make a chicken coop with your own hands for 10 chickens. Drawings and detailed instructions will help you build a quality structure.
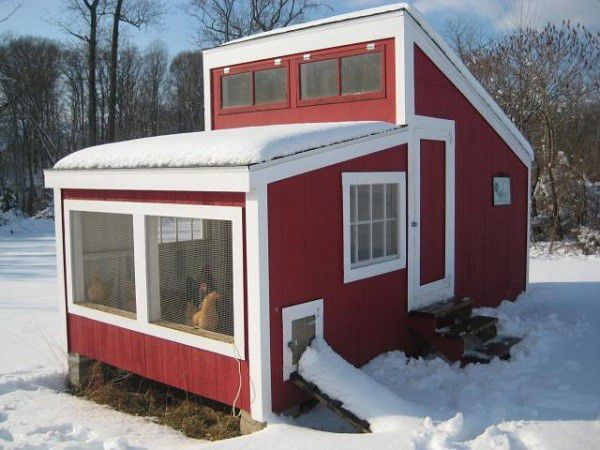
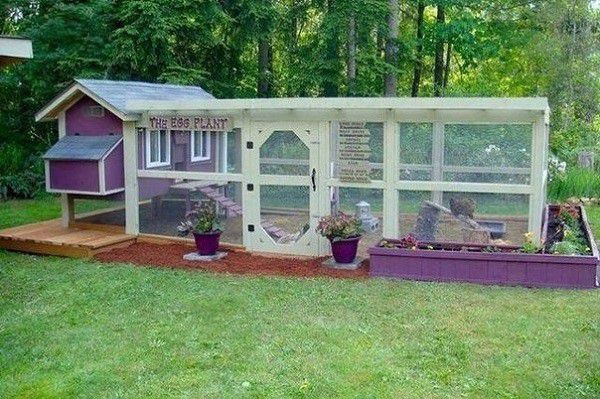
You can make a beautiful and spacious chicken coop yourself
Read in the article
How to make a chicken coop with your own hands for 10 chickens: drawings and requirements
To begin construction work, you should familiarize yourself with the basic requirements for such a structure:
- placement of the building. A rectangular chicken coop should be placed from east to west. Chickens lay eggs better if there is enough daylight, so windows should face south;
- When creating a warm chicken coop with your own hands, it is worth remembering that the room should not be hot, since at temperatures above 25 degrees the chickens will not lay eggs. But even in winter it is necessary to create warmth. In cold weather you will also need a structure. The temperature must be at least 12 degrees;
- it is better to locate the building away from noisy places;
- high humidity can cause poultry diseases, so ventilation is necessary;
- The dimensions of the room are selected taking into account the fact that two chickens can be accommodated per square meter. In cramped conditions, chickens lay eggs worse.
Helpful advice! When designing a poultry house, you need to take into account that over time the number of individuals may increase and more space will be required.

When arranging a room, it is worth equipping the windows with shutters made of, and for walking, provide an area under a tree or under.
chicken coop cage
Features of chicken coop design
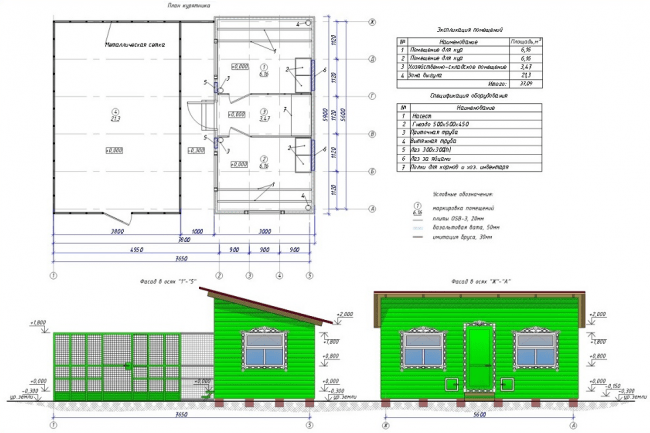
Drawings and photos will help you create a competent project for a chicken coop with your own hands. It is important to choose the right size of the building, which depends on the planned number of birds. The type of structure depends on how many birds will live in it and on the types of materials.

When designing, it is worth planning to open the door inward, and the floor should be arranged with a slope towards the entrance. This will make the cleaning process easier. It is worth considering the interior design of the room. There must be a sufficient number of drinking bowls and perches. For such a structure it is worth considering heating, lighting, etc.
Features of installing the simplest chicken coop at the dacha with your own hands: stages of construction and photos
When deciding how to make a chicken coop with your own hands, you should familiarize yourself with the main stages of installation.
The table shows the main steps in constructing a simple poultry house.
| Image | Stages |
 | Construction (only for structures with large livestock) |
 | |
 | Selection and installation of flooring |
 | |
 |
You can build a chicken coop from scrap materials. To save money, you can use the room without construction or use a base on posts, for which leftovers or cobblestones will do. The floor can be made of adobe or earthen, and the roof is made of durable plastic, tin or remnants of slate.

Nuances of creating a foundation
For a do-it-yourself chicken coop for 20 chickens, a photo of which can be seen in this review, you will need a more durable one. Depending on its type: or columnar - you will need a concrete mixture, a composition of or.

The foundation is erected in accordance with certain rules:
- the area is cleared and the top layer of soil is removed, about 25-55 cm;
- Sand and gravel are used as a cushion;
- the formwork is made of boards, its width is 25 cm;
- rods are used for;
- Concrete grade M300 is used.

Construction of the building can begin after the concrete mass has hardened. It is worth considering that the size of the site should be equal to the dimensions of the future chicken coop.
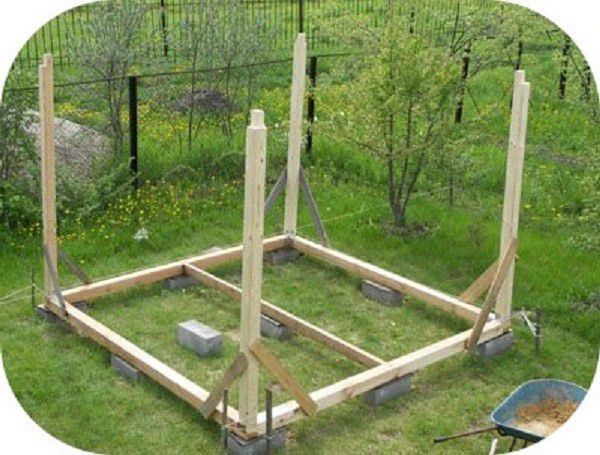
To create a columnar base, you will need markings, which are done using metal rods and rope. Then, cabinets are installed around the perimeter, which are placed at a distance of a meter. In this case, the supports should protrude 25-30 cm from the ground. They are strengthened with cement mortar bricks.
Chicken coop walls
When building a chicken coop with your own hands for 10 chickens, you need to prepare drawings of the walls. Wood is in demand as a raw material for walls. They are used for cladding walls. In this case, the joints must be thermally insulated. In addition to boards, you can use plywood or clapboard. Adobe brick is considered a good material. The combination of straw and clay allows you to retain heat.

Installed according to the standard pattern. As insulation to separate the foundation and beams, roofing material is used, which is laid in two layers. Floor joists are also made of timber, which is laid edgewise. In this case, voids and cracks are sealed with remnants of timber and flax-jute fiber.

Roof, ceiling and floor of the building
To create a winter chicken coop with your own hands for 10-20 chickens, high-quality floors and roofing are of great importance.

The arrangement has some features:
- it is better to use a gable roof, which will protect against the accumulation of moisture and snow;
- coating material: roofing felt or slate;
- thermal insulation is performed using mineral wool or.
In a gable roof, you can build a small attic where you can store bedding for chickens and feed. After installing the ceiling beams, the ceiling covering is laid. In this case, boards are used, and expanded clay and coal slag are used for insulation.

When building a chicken coop you need to do well. If they freeze, the room will be cold. It is recommended to use thick boards for the floor. First, untreated boards are laid, then a layer of vapor barrier material is laid, and treated boards are placed on top.
Note! When arranging a pitched roof, it is necessary to ensure that the slope does not point towards the poultry walking area.

How to make ventilation for a chicken coop for 20 chickens with your own hands: drawings
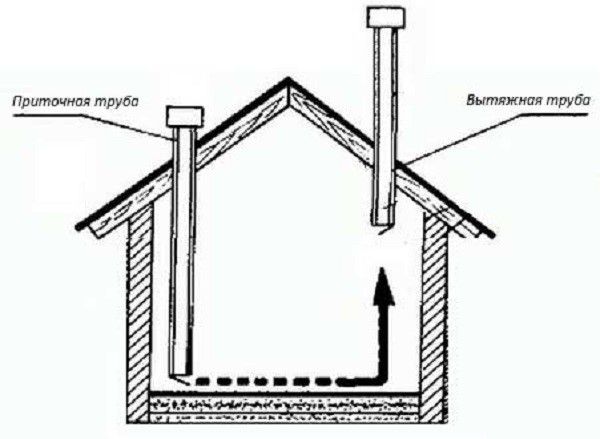
Particular attention should be paid to a do-it-yourself chicken coop. The ventilation device is responsible for supplying fresh air. This is especially important in the cold season, since birds are rarely outdoors. A budget and simple option is natural ventilation, which consists of ventilating the building. In this case, the exhaust window should be small and located on the ceiling or above the door. This scheme has many disadvantages, since heat will leave the room along with the air masses. At the same time, heating will require a large amount of resources.

A more reliable option is an exhaust system. It makes sense to install it if there are at least 20 chickens in the chicken coop. You can build such a structure with your own hands:
- two holes are made for pipes; the entrance for air passage should be located away from the perches;
- Instead of a pipe, you can make special wooden boxes, but they need to be painted and;
- pipes for supplying fresh air are located at a distance of 35-40 cm from the roof, and the pipe for exhaust rises 1.5 meters above the roof;
- To protect against precipitation, the upper ends of the pipes are equipped with small umbrellas.
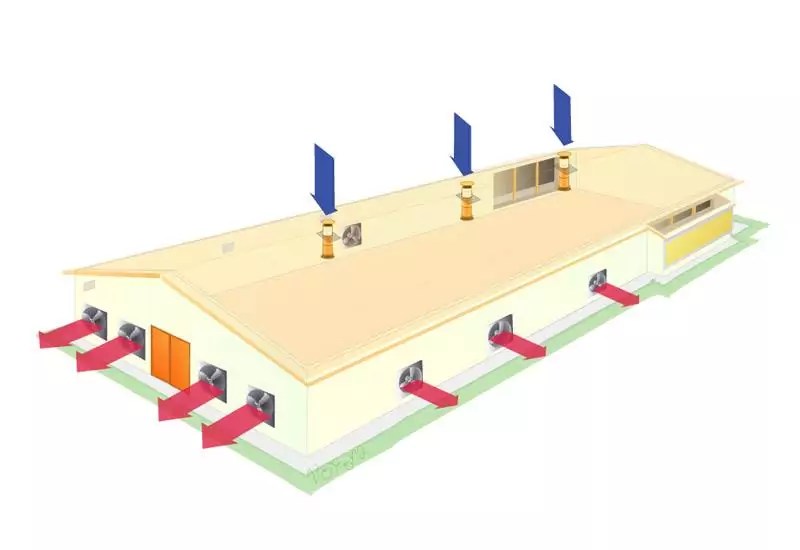
For uniform circulation, it is better to place pipes on opposite sides of the room. In this case, it is used, which is mounted in the window. You need to turn on such a system manually. There are also special sensors that allow you to control the humidity in the room.

How to arrange a chicken coop inside?
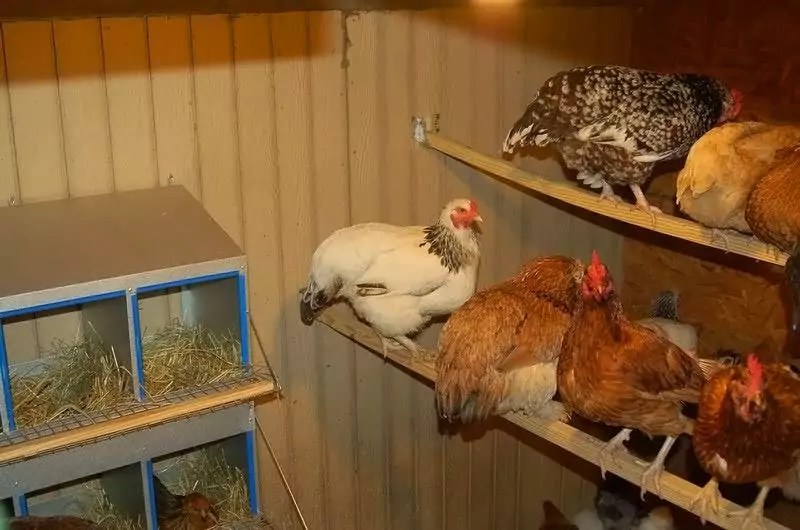
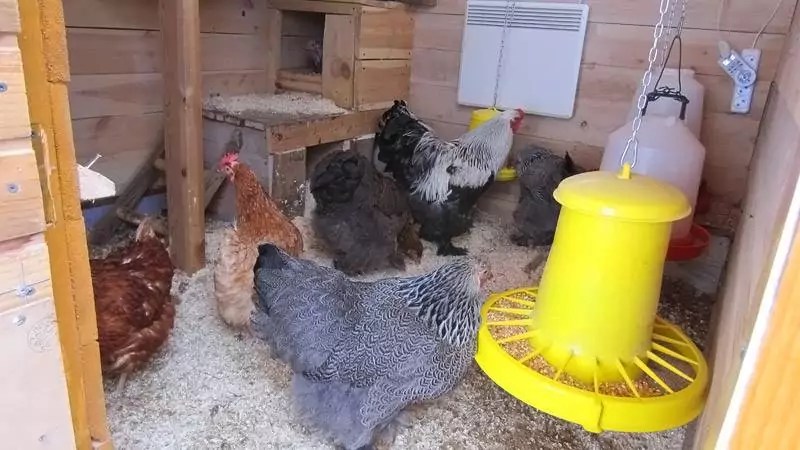
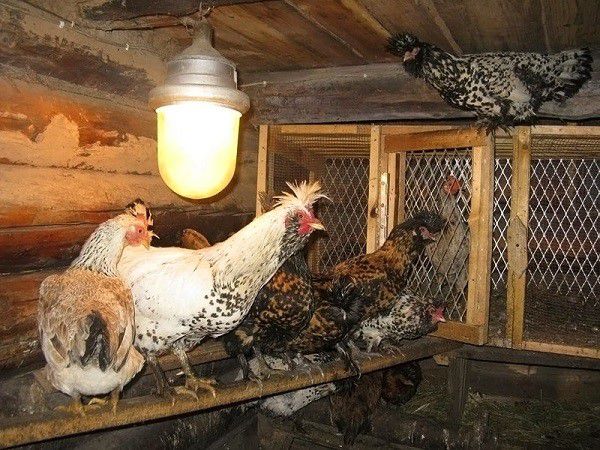
After completion of the main work, the interior of the room is arranged. The construction of comfortable perches is of great importance. In this case, the length of the perches and their number are calculated. These elements are best made from . The perches are ground to a rounded shape so that the chickens do not get injured. Perches should be installed at a height of 65-75 cm, and 55-65 cm should remain between perches. It is recommended to place special pallets or trays under the perches. This will make the cleaning process easier. It is better to make the perches removable to make sanitization convenient.

It is worth equipping nests in the form of boxes, which should be darkened. They are installed in a separate place, and the drawers are covered from above. A separate entrance is recommended for changing bedding and collecting eggs.

Another important element is the feeders. They can be made of wood and installed on a small hill. Bedding is made of peat, straw or sawdust. They come in different depths. When soiled, deeper bedding is dug up. In addition, bedding is optional for the chicken coop in winter.

Lighting Features
Good food ensures the growth and physiological development of birds. You can create a well-equipped and lit chicken coop with your own hands for 10 chickens: drawings, detailed diagrams and photos will help you do this. High-quality lighting affects the following parameters:
- number, size, density and weight of eggs;
- chick development;
- digestibility of consumed feed;
- periods of egg laying and their duration.
When planning a lighting system, you need to know some features. Chickens do not see well in the dark, so in the evening, do not turn off all the lamps at once. When all the birds are settled on the perches, you need to turn off the remaining lamps.
For hatched chicks, lighting with a brightness of 35-45 lux is required. Then, as the bird grows, the light intensity gradually decreases to 6-8 lux. An adult bird will need a light of 10 lux.
A device for smooth switching on of the light is recommended, since if the light is turned off abruptly, the bird may become frightened. This is especially true for breeds that are bred to produce eggs. Chickens should also be accustomed to the dark from the third day of life, so that if the lights go out, the birds will not trample each other.
Helpful advice! If birds behave aggressively and pluck each other's feathers, then a reduced lighting intensity can solve this problem.

Heating
Before choosing, you need to take care of the insulation of the fences. There should be no drafts in the poultry house, so if the walls and roof are blown, they will not help.

It is worth insulating doors and windows, since most of the heat escapes through these openings. It is also worth building a deep litter. This design consists of a layer of slaked lime and 10 cm of shavings, sawdust and straw. Natural heat-insulating materials are also used: peat, foliage and even manure. Natural composting allows heat to be released.
If you approach the construction of a chicken coop responsibly, then this building can be made cozy and reliable. Using inexpensive materials, you can create a high-quality and well-equipped house for birds.
If you decide to start poultry farming, at the beginning of your journey you need to build and properly equip a poultry house. It is important to choose the most suitable type of structure and its location. This stage is fundamental to running a successful poultry business. Many farmers decide to build a chicken coop with their own hands. How to do this - read our article.
What design option will turn out on a farm depends not only on the desire and imagination of its owner. It is important to take into account the climatic conditions of the area in which you plan to raise chickens. The main thing remains one thing - to create comfortable conditions for the bird. Let's take a closer look at the main differences between common types of chicken coops.
Stationary, multi-tiered and mobile chicken coops
Based on the type of construction, bird houses are divided into the following types.
- Stationary– ordinary chicken coops, permanent buildings built for the permanent residence of chickens in one place at any time of the year;

- Multi-tiered- no different from a stationary chicken coop, except for the larger number of floors. Due to the presence of additional space in a relatively small area, it is possible to efficiently maintain a large number of poultry.


- Mobile– in mobile chicken coops, as a rule, they contain a small number of chickens, a maximum of 10 heads. This combined structure looks like a hut on wheels, inside which chickens can hide from rain and wind. The booth is located under a metal mesh cover that extends far beyond its boundaries, forming a walking area.


We present a table of the advantages of each type of chicken coop.
| stationary | multi-tiered | mobile |
|---|---|---|
|
|
|
The main advantages of mobile chicken coops are the ability to renew feed for poultry while grazing and ease of cleaning - if necessary, the building can be moved closer to the reservoir. There are many options for mobile chicken coops.
Portable using boards
The simplest option, resembling a box in shape. A pair of boards are attached to the bottom of the chicken coop, with the help of which you can change the location of the structure at any time.
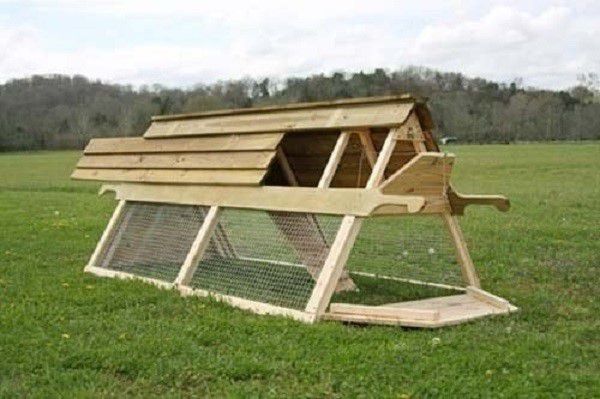
Due to the semicircular shape, the overall weight of the structure is reduced and its mobility is increased. One of the most popular options for mobile chicken coops.

Chicken coop - wheelbarrow
A mesh box on wheels that can be easily transported by one person from place to place. This usually does not have an additional part for overnight roosting, so it is used either in conjunction with a regular chicken coop, or in the southern regions.

Monumental construction. Includes a spacious hen house connected to a bottomless run. It will be convenient for those farmers who need to transport poultry over long distances for any purpose.

Chicken coop on roller wheels
You literally won't get far with a chicken coop like this. It can be moved, but only over short distances, for example, within one’s own area.

Types of walking
In addition to differences in the design of chicken coops, they are also classified according to the type of run. According to this criterion, the poultry house can be built in the following options:


Prices for chain-link mesh for enclosure fencing
Rabitz
Capacity
The size of the future chicken coop directly depends on the number of birds expected to be kept. So the minimum area in which up to 5 chickens can be housed is 3 square meters. If, for example, 20 chickens are kept, then the dimensions of the room will be approximately 5-6 meters in length and 2-3 in width. Accordingly, the more chickens, the larger the area.

It is also important to take into account that when the egg hatching season begins, the number of individuals will increase.
Note! Different breeds and crosses of chickens differ in character and, therefore, requirements for living conditions. Active, temperamental birds need more space.
Season of content
In accordance with the seasons of the year during which you plan to keep the birds, chicken coop designs are divided into:
- winter;
- summer
Those who plan to keep poultry year-round need to take care of having a warm chicken coop. This design is called winter. It assumes the presence of a heating system necessary to maintain a comfortable temperature level in the room. Additionally, the chicken coop is insulated with thermal insulation of walls, ceilings, floors, doors and windows.

The summer design of the chicken coop is used for keeping and breeding poultry only in the warm season. Often clapboard or plywood is used for its construction.
Polycarbonate is a light material, both in weight and in installation, that even an inexperienced builder can work with. Read on to find out how to build a polycarbonate chicken coop with your own hands: step-by-step instructions, photos of chicken coops, useful videos.

Breeding direction
As you know, chickens are bred to produce one of two products: meat or eggs. The type of chicken that lives in the chicken coop also depends on the type of target product. Meat and egg breeds of chickens require different conditions for keeping.
Broiler chickens are bred specifically to produce meat. They are characterized by early maturity and large mass. Find out what breeds and crosses of chickens are classified as meat, how to properly feed chickens to gain weight and how to keep them.
Chicken coop for egg hens
Organizing a chicken coop for egg-laying hens requires the presence of a modular structure. It is distinguished by its large size, which allows birds to move freely around the internal territory. There is no need to use cages in such designs. Laying hens feel good on comfortable perches and nests. In addition, the structure needs to be insulated, since the temperature regime for laying hens must be stable even in winter frosts.

Chicken coop for meat breeds
The structure is called a prefabricated structure and is suitable for seasonal use. The dimensions of the structure are small. The territory of the chickens is limited so that they walk as little as possible, eat more often and more. Most often, enclosures intended for birds to walk around are not made for meat chickens. The size of the nests and the total area of the structure are significantly smaller than the previous one.


How to choose a place?
An important step is choosing the location of the future structure. It also determines what the final version of the chicken coop will be. To determine the location correctly, it is recommended to use the following principles.
- Choose a site that is located on a hill to place the chicken coop, since the location in the lowlands prevents the birds from free range. This is due to the fact that moisture evaporates more slowly, as does the snow cover, which disappears much later than on the rest of the site.
- The structure must be correctly oriented relative to the cardinal directions.
- If the shape of the building is rectangular, then stick to the western direction. The best option for installing a chicken coop is to place it so that the windows face south and the doors face east. The egg production of a bird depends on the length of daylight hours, so providing the room with light through windows on the south side will be very useful.
- Maintain a neutral temperature. Birds do not like temperatures that are too high or low. If the microclimate in the chicken coop reaches a temperature level of +25°C, then you can notice a decrease in productivity, and if you add another 5 degrees to this level, then this promises a cessation of reproduction.
- It is important for birds to be in a calm state. To do this, the building is located in that part of the site where no one will disturb them. A good option is to erect a hedge around the house to give the birds a sense of security.

- The area is calculated taking into account the number of birds. 1 square meter of construction allows for 1-2 chickens to live. If you need to breed birds in winter, keep in mind that you will need a warm room with a vestibule, which will serve for additional insulation of the chicken house. It prevents cold air currents from entering the room with birds.
Video - How to build a chicken coop for the winter
Consider the process of building a simple chicken coop
Building a chicken coop designed for year-round living of chickens is not easy. This requires certain skill and construction experience. If you understand the principle of constructing a structure, after some time you will be able to build another one or improve the first one. For example, a bird house for one season is built in a similar way, only without insulation measures. As for the construction of a building for several dozen chickens, the best option would be to build a winter stationary chicken coop with an open or closed type of run. The last moment is chosen based on the farmer’s capabilities.
The construction process has several stages, each with its own characteristics and nuances.

Planning
Start planning, calculating area and determining construction zones. If it is intended to equip a poultry house for 20 or more individuals, then it is necessary to calculate the area value based on the established standard. It involves placing 2-3 chickens per square meter. It is worth remembering that the minimum building area must be at least 3 m2.
Having determined the parameters of the room in which the birds will spend the night and spend the whole winter, it is necessary to calculate the size of the enclosure. Based on the fact that there is 1-2 m2 per individual, 20 chickens will need 25 m2. Accordingly, for a warm house the dimensions will be 4x4 (m), for a walking area 4x6 (m).

It is best to use drawings made yourself or taken from the Internet at the planning stage. This stage is quite important, regardless of the size of the structure. It is recommended that the drawing be drawn up in detail and clearly. This will allow you to arrange all the details of the future object as conveniently and competently as possible. When calculating the area, it is necessary to start based on the above parameters.


Foundation
When starting work, you need to decide what type of foundation will be built. There are two options:

To build a winter poultry house, it is preferable to choose a columnar type of foundation. It is constructed quickly, since there is no need to wait for the concrete to dry in the case of a monolithic structure. In addition, the columnar type of base has the following list of advantages.
- The filling process is quite simple and convenient.
- This type of foundation allows for ventilation under the floor. It is necessary to protect the premises from rodents.
- Allows you to save money and extend the operational life of a poultry house constructed from wooden material.
In any case, the farmer will choose the type of foundation based on his capabilities and the individual characteristics of the site.
Video - Foundation for a chicken coop
Making a columnar structure
| Photo | Step, description |
|---|---|
 | Step 1. Using rope and metal rods, mark the area where the chicken coop will be located. To do this, you need to hammer the rods at points along the entire perimeter and stretch a rope between them. The rope should be pulled flush with the ground. |
 | Step 2. Starting from the markings, the top layer of soil is excavated. In the corners of the markings, recesses are dug, which are necessary for installing the foundation pillars. It is necessary to dig about 70 centimeters deep, the width of the recesses is 50 centimeters. The pipes should be located at a distance of 1 meter from each other. |
 | Step 3. Using a rope, install the hydraulic level, the value of which is 25 centimeters. |
 | Step 4. We pour sand combined with gravel into each of the recesses. The thickness of the layer is 10 cm. After this, we lay bricks or stones, which are filled with pre-prepared cement mortar. After this, we lay the next batch of stones across, while raising the foundation pipes to the level marked with the rope. |
 | Step 5. We fill the remaining space between the pillars of brick and soil using gravel. After all, the area under the future structure is covered with the same gravel. |

Walls
When choosing the material from which the walls of the chicken coop will be constructed, it is necessary to take into account their thermal conductivity and strength. The most durable materials include cinder block, brick and stone. But such materials are not suitable for maintaining a stable temperature inside the chicken coop. In winter, they will cool down too quickly, which will lead to the need for additional heating. The most rational choice is considered to be wooden beams.
| Photo | Step, description |
|---|---|
 | Step 1. We cover the junction of the foundation and future walls with waterproofing material, for example, roofing felt, and securely screw the material using metal fasteners. |
 | Step 2. Next, along the perimeter of the entire foundation we lay a lining beam, the thickness of which is approximately 100x100 millimeters. At the corners of the future wall we connect the timber using long nails. |
 | Step 3. On top of the backing beam we lay glued or ordinary blanks for the walls using the corner cutting technology, the diagram of which is shown in the picture. We connect them at the joints with dowels as follows: the beam located on top is stitched through, and the bottom one only halfway. |
 | Step 4. Bring the height of the laid walls to the desired size and complete the laying by laying another layer of waterproofing. Now you can start building the roof. |

Prices for various types of timber
Roof
To build a roof, you can use the following step-by-step guide.
| Photo | Step, description |
|---|---|
 | Step 1. A double layer of roofing material is laid on the constructed base of the walls. Insulation - flax-jute fabric - is laid in the space between the crowns. After the walls are erected to a level of 1.8 meters, they begin to attach the ceiling beams. |
 | Step 2. Then the ceiling joists are laid, the cross-section of which is 150x100 millimeters, and it is necessary to maintain a distance during installation of 50 centimeters. |
 | Step 3. The ceiling is made of boards or plywood overlaid on joists. Insulation made of mineral wool or polystyrene foam is attached to them. |
 | Step 4. Next, a simple rafter system is erected and a roof covering, for example, slate or profile, is laid. |
An alternative instruction for building a roof is shown in the figure below.


It is best to choose a gable roof type for a chicken coop. This will allow you to store both bedding material and feed in the so-called attic. In addition, the design of the gable roof allows for additional insulation of the entire building.
Video - How to cover a roof in a chicken coop
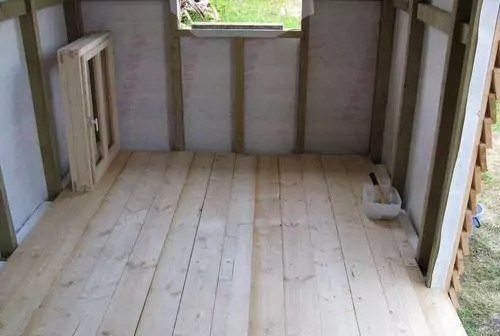
Floor
Let's start laying the floor in the chicken coop.
 | Step 1. To begin with, we lay an edged board on top of the foundation, the edges tightly adjacent to each other. |
 | Step 2. On top of the boardwalk we lay beams and a layer of insulation, which can be mineral wool or cork material. |
 | Step 3. On top of the beams and insulation we lay out a second layer of boards, this time tongue-and-groove. We hammer the flooring with nails and use insulation to close the resulting gaps between the floor and the walls. We stuff wooden slats or plastic baseboards on top. That's it, the heated floor in the chicken coop is ready! |
The insulation inside the floor structure can be covered with a layer of moisture-proofing material, and the tongue and groove boards can be covered with plywood to prevent them from rotting from chicken feces.
Ventilation
It is necessary to install a ventilation system to allow fresh air flows into the room, which will relieve the chicken coop of unpleasant odors and make the temperature comfortable.
To construct ventilation, two wooden boxes are used. They are mounted on opposite walls of the chicken coop. In this case, it is better to place one channel at a distance of 50 cm from the ceiling, and the second directly under the ceiling. Additionally, special dampers are constructed, which are necessary to control the incoming air masses.
Prices for ventilation units
Ventilation units
Insulating the chicken coop
A very extensive stage is finishing the room with insulating materials. Insulation may be needed both during the initial construction process and to provide heat to a ready-made, operating poultry house. Initially, choose the material that will be used for the work. With regards to walls and floors, they mainly choose polystyrene foam, sawdust or mineral wool. For the roof, foam boards are a good option.

Wall insulation
The process of insulating a chicken coop begins with determining the location of the material. It can be placed outside or inside the poultry house. The best option is to carry out insulation from the outside, as this will provide a good barrier to cold air flows and will not allow them to penetrate deep into the walls. Insulation is carried out according to the following instructions.
| Photo | Step, description |
|---|---|
| Step 1. In the case when the material for insulation is secured outside the room, it is necessary to install plywood sheets on the constructed frame. They are secured from the inside, while it is necessary to leave openings for windows and doors. |
| Step 2. If the insulation is laid on the outer surface of the structure, then the material is laid between the frame beams. In this case, the best option would be to use mineral wool or foam boards. |
| Step 3. If polystyrene foam is used, then the remaining gaps between the wooden frame of the structure and the insulating material are sealed using polyurethane foam. |
| Step 4. When constructing a frame on which mineral wool will be attached, it is recommended to maintain the distance between the beams, leaving it so that it is 5 centimeters less than the width of the insulation. |
| Step 5. After laying the insulating material, a vapor barrier film is rolled out on top of it using staples. After this, wooden slats are installed to the frame beams. |
| Step 6. We proceed to the stage of covering with decorative materials. Often, fitted boards are used for these purposes. If there is a need to maintain the overall style of the site and its design, then you can use vinyl siding panels. |


Ceiling insulation
| Photo | Description | |
|---|---|---|
| Step 1. Plywood sheets are attached to the floor beam, which is drawn from the rafters, on the upper side of the surface. You can use moisture-resistant drywall instead of plywood. | Step 3. On top of this layer, boards or plywood are fixed, depending on the farmer's preferences. |

Floor insulation is carried out by creating a 10 cm layer of bedding material. To do this, use shavings, sawdust and straw mixed with quicklime. In some cases, peat or foliage can be used. Keeping the compost mixture in the coop will provide increased heat generation.

In our article, what else can be done to maintain comfortable conditions for birds in winter: insulating windows and doors, installing heating systems. And you will read what to feed chickens in winter to maintain egg production.
How to set up a chicken coop?
Its productivity and well-being depend on the comfortably created conditions for the bird. There are several points that must be taken into account when arranging a poultry house.
- An important point is the space for walking. It is fenced with a mesh, and the best option would be to use a plastic name;
- Perches and perches. These devices are necessary for the bird to rest. It is recommended to position the perches so that they are at the same height.
- The perches should be positioned in such a way that sunlight can reach them.
- Long boxes filled with dry varieties of feed are suitable as feeders for the poultry house. For wet food, it is best to use narrow boxes made of metal or wood. It is advisable to place them under sheds or in a house - this will protect the food from bad weather.

- An ash bath for birds to bathe should be located next to the house.
- In the open part of the poultry house, it is necessary to construct a small canopy under which the birds can shelter from the heat or rain;
- The water container should be deep, and it is important to ensure that the water is always fresh and clean.

How to set up a chicken coop?
When arranging a chicken coop, it is necessary to take into account many little things - from lighting, ventilation and heating to perches, feeders and drinkers. In order not to forget anything, read Also on our website you will find information on how to do and.
Prices for a nest for laying hens
Nest for laying hens
Lighting
This point deserves special attention, since the healthy life of birds depends on the equipped lighting system. In this process, it is important to consider that chickens do not see very well in the dark. This means that you cannot turn off the lights completely in the evening. The lamps turn off only after all the chickens have settled into their roosts.
The young generation of chickens needs constant bright light, but over time and the development of chickens, the brightness of the lighting is reduced.
Lighting is the most important element of a chicken coop.
In addition, you can build a system that will smoothly turn off the lighting. This is preferable because turning the lights on and off suddenly frightens the chickens.

Video - How to build a chicken coop with your own hands
Let's sum it up
Building and equipping a high-quality chicken coop is not so easy, however, if desired, anyone can cope with this task. Read the article carefully and follow the instructions, you will definitely build the chicken coop of your dreams!
Recently, poultry farming has become increasingly popular. Chickens allow you not only to have domestic eggs all year round, but also meat. Chicken feathers can be used as filler for feather pillows and blankets. However, in order not to run into serious problems, you should think carefully about this idea at the initial stage, paying special attention to the construction of the chicken coop.

How to choose the right option?
A well-built chicken coop for laying hens is not a barn, but a separate, small, warm building, with the most correct and closest to natural conditions for keeping and breeding poultry. The right “house” is comfortable not only for chickens. The owner can easily clean up, feed and care for the animals.
An ideal option would be a chicken coop consisting of 2 parts. The first is represented by a closed, comfortable room, and the second by an aviary fenced with a special net for walking birds. You can also purchase or make portable chicken coop models yourself, however, they are not suitable for keeping a large number of laying hens.

When designing an individual chicken coop, it is necessary to take into account the following subtleties:
- thermal insulation is necessary, especially when keeping birds all year round;
- the safety of the building must be high, this will prevent the loss of chickens and eggs due to attacks by predators;
- ventilation is needed to ventilate the chicken coop and provide a constant supply of fresh air, however, there must be no draft, otherwise many animal diseases cannot be avoided;
- To increase the production of eggs by chickens, it is necessary to organize artificial lighting at some time of the day.
Nevertheless, there are no strict rules in the construction of a pen for chickens and everyone can independently design an object suitable in size for 500, 1000, 10 or 200 birds.


Device and drawings
Setting up a chicken coop yourself is not very difficult and even a beginner can do it. First of all, you should decide on the plan for the future construction and draw up a schematic drawing with dimensions. You can take ready-made drawings, however, it is better to prepare them yourself based on individual requirements and dimensions.
When determining the size, you should take into account the maximum number of birds you plan to keep, and base your calculations on this figure. It is optimal to house 4 chickens per square meter.


When the design of the future chicken coop has been determined, you need to prepare the materials:
- gravel, water, sand, formwork, concrete and metal mesh;
- gas block, brick or log house;
- floor boards;
- slate or roofing felt;
- insulation (for example, isover);
- plywood for interior design;
- windows (can be made independently, can be ordered individually from specialized companies);
- ventilation;
- netting for pens;
- wires and lamps;
- dimmer or 2 switches;
- hardware.
All necessary materials can be purchased at any hardware store. The internal arrangement of the chicken coop depends on individual needs, but it must have perches, feeders, nests and equipped feeding areas.


How to build it correctly?
The work plan must be adhered to which looks like this:
- choice of location;
- foundation installation;
- floorboard flooring;
- walling;
- roofing;
- insertion of windows and ventilation device;
- work on the internal improvement of the chicken coop.
Having prepared the drawings and all the necessary materials and tools, you can begin to build a chicken coop with your own hands. Particular attention should be paid to the choice of location for the construction of a building. It should be located on a hill, away from excess humidity and drafts.


The foundation begins with preparing the soil. To do this, the top layer of earth is removed (20-30 cm) and covered with gravel and sand. The formwork is prepared, a metal mesh is laid on it and concrete is poured. This type of foundation is the most solid, although other support options can be used. The floor is covered with boards; if desired, you can pour a small (up to 10 centimeters) layer of expanded clay under the floor. This will insulate the room and make the temperature in it more comfortable for the hens.
Walls can be built from various materials. If the walls are built from logs, then there is no need for additional insulation; they already maintain a fairly comfortable temperature. It is better to insulate brick or aerated concrete walls both outside and inside.


The roof of most chicken coop designs is gable. This allows moisture not to linger on it. The roof can also be insulated by placing isover or mineral wool under slate or tiles. The number of windows in the building is calculated from the proportion of 1 to 12, in relation to the floor area. It is advisable to add mosquito nets to the windows, which will prevent insects from entering the chicken coop.
Ventilation holes are installed in the wall and allow for proper circulation of fresh air. After completing all external work, you can begin decorating the chicken coop interior.


How to arrange it inside?
Equipping the chicken coop from the inside is one of the most critical stages of construction. First of all, you should decide on a list of what must be in a proper chicken coop and this is:
- sleeping places;
- nests;
- feeding cups;
- container for water procedures;
- place for walking.
Separately, you should deal with lighting. The main thing in the arrangement of wires and lamps is to place them as high as possible to avoid injury to the birds. The fixing elements must be securely fastened and have no sharp accessible parts so that the chickens do not get hurt by them. When arranging lighting, you should know one feature of domestic laying hens - they are very poorly oriented in the dark, and if you suddenly remove the light from them, not all of them will be able to settle down for the night and will fall asleep in an uncomfortable position on the floor. First, the main light is turned off, and then, after the chickens have settled in their places, they are turned off completely. Therefore, you need to provide a main bright light and an additional one with a dim lamp, or install a dimmer that allows you to smoothly adjust the light intensity.


The sleeping place is represented in the chicken coop as a roost. This is a universal object that birds use not only for rest, but also for sleep. According to some data, domestic chickens spend about half of their lives on the roost, so it should be comfortable and safe.
Perches are made from wooden blocks and even branches of large trees.
The sleeping place must meet the following requirements.
- Strength. A crossbar that is too thin may break under the weight of the birds, causing injury to them.
- Safety. Before installation, the handle must be processed with a plane and, if necessary, brought to smoothness using sandpaper. All sharp corners must be removed, otherwise the birds may damage their paws and become “de-legged”.
- Sufficient planting area. In the warm season and off-season, one chicken should have at least 20 centimeters. In the cold season, this figure is reduced in order to place the hens closer together so that they do not freeze.
The installation of plastic structures is not justified, since plastic does not have the environmental friendliness and strength of wood and can injure birds if broken with sharp edges.

To install the nest, you should choose a convenient and spacious place. The egg production of chickens will depend on the correctness and convenience of installing this item in the chicken coop. They need to be located in secluded corners where daylight does not penetrate. The nest can be made from a wooden or plastic box of a suitable size. For an adult chicken, it is better to take a nest of 40x60 centimeters.
A thick layer of straw is laid inside the nests and changed regularly. It is not recommended to place these structures under perches - the chickens will shit and endlessly pollute the straw inside.

The feeding area can be arranged in 2 ways.
- Feed can be poured to chickens in a certain place, directly on the litter. Thus, the natural need of birds to scurry around in search of food is satisfied. The only condition is to locate the feeding area as far as possible from the active habitats of the chickens.
- Arrangement of special feeders. You can either make them yourself from improvised containers or purchase them in a specialized store. But this method has a number of disadvantages. Chickens are not very tidy creatures and like to dig into their food, so you will have to clean this “kitchen” very often. Birds are also quarrelsome and often cannot share food, which can ultimately result in a fight and an overturned feeder.
Water containers are a must in the chicken coop. It is better to give preference to modern automatic drinkers, which supply new portions of water as needed.


In order for chickens to lay eggs and be healthy, they need fresh air and sun, and therefore a specially equipped pen for walking. You should not send domestic chickens to “free-float” around the yard, as they can make a lot of mess and injure themselves in a short time. And if you have a garden, then it’s better not to let birds near it at all, because they will peck, eat and dig up everything around. But keeping birds indoors, without walking, is fraught with serious health problems.

To equip the correct pen, you should do this:
- on the side of the door - the entrance to the chicken house - a walking area is fenced off with a net;
- posts are dug in around the perimeter and a metal mesh is attached to them;
- make the fastening carefully, avoiding the formation of sharp edges that could harm the bird;
- be sure to bury the net 40 centimeters into the ground. This measure will protect the chickens from predators who can dig a passage into the pen;
- the height of the fence is 200 centimeters. Domestic chickens are excellent flyers over short distances and will easily jump over fences 150 and even 170 cm high.
To build a house for laying hens yourself, you will not need a lot of expenses and special knowledge and skills in the field of construction. However, you should take into account the characteristics of these birds, then you will be able to create favorable conditions for them to live and reproduce.
For information on what should be in a chicken coop for laying hens, see the following video.
Before you build a good chicken coop with your own hands, you need to decide for what purpose the chickens are raised. The size of the poultry house primarily depends on the number of its inhabitants. If chickens are bred to sell eggs, then there must be at least fifty birds. A chicken coop with a large number of inhabitants will differ in size from a structure designed for 20 chickens.
Blueprints
After determining the number of chickens, you can begin the design stage of the poultry house itself. It is not advisable to neglect this point and keep numbers in your head. After all, the drawn diagrams of the future construction will give a clear idea of what the built chicken coop will be like.
It must be taken into account that chicken coops can be used both year-round and seasonally. The list of building materials depends on the choice of operating period, since all-season construction requires an additional insulating layer.
Interesting! 10 chickens can provide eggs for a family of 3 people.
If you have little experience in constructing buildings, it is easier to use ready-made projects. It is necessary to take into account the characteristics of the site and build on the productivity of the chickens. After all, too cramped a room will disrupt the egg-laying process. For ten laying hens and one rooster you will need a room with a minimum size of 2x2 m2. For 20 individuals, the chicken coop will be 3x3 m2.
When drawing up a plan, it is important to consider the space that will be needed for the aviary needed for walking the birds. Its parameters are related to the main room, and for a building with a width of 2x2 m2, the enclosure will be 2x6 m2.
To build a chicken coop for broilers, special cages are used, which are arranged in several tiers. Birds will gain weight faster in them. In this case, it is based on calculations that in a broiler chicken coop, built with your own hands, up to 50 chickens or 10 adults will be located per 1 m2.
Materials and tools
After the chicken coop model is designed, we begin collecting the necessary building materials and tools:
- cement and sand;
- hammer and nails;
- Rabitz;
- insulation wool;
- roofing felt;
- boards;
- lock and hinges for the door;
- bricks;
- cable;
- light bulbs.
Only high-quality materials will ensure long-term operation of the chicken coop.
Place to build
A chicken coop is a space where birds live all their time. When determining the construction point, the following aspects are taken into account step by step:
- the area must be dry, as high humidity will negatively affect the health of the birds;
- the place should be quiet and calm, as noise has a negative effect on birds;
- the building should be located at an angle so that moisture after precipitation immediately leaves from under the base of the chicken coop;
- It is better to find a place far from the living quarters, as chickens give off an unpleasant odor.
If in the future it is planned to expand the poultry house, then a place is chosen in advance where additional buildings can be erected and an extension can be made to existing facilities.
Construction
The chicken coop consists of five main elements:
- foundation;
- walls;
- roof;
- aviary
In addition, the bird room must include windows and doors.
All these elements are built in stages, starting with the foundation.
To build a chicken coop, columnar foundation technology is used. Constructed columnar foundation:
- does not require a long cement hardening time;
- ensures long-term operation of the floor, since the construction is made above ground;
- protects birds from rodents.
To build a columnar foundation:
- At the construction site, dig holes 20 cm in diameter and 1 m deep at 1 m intervals from each other.
- Make formwork from scrap materials or use asbestos-cement pipes.
- Place the pipes in the dug holes.
- Insert threaded fittings into the pipes.
- Fill the resulting structure with concrete.
The result will be a foundation with protruding reinforcement, onto which the poultry house support beam will later be secured.
Important! The height of the columnar foundation should rise at least 20 cm from the ground.
Frame chicken coop
The features of the frame structure are low costs and ease of assembly. To mount it:
- Attach vertical posts to the support beam.
- Nail horizontal crossbars that will form the base for the roof and floor.
When building a frame poultry house, be sure to consider its capacity. The height of the small and large walls on which the pitched roof will rest depends on this.
Also, during installation of the frame, openings are made for manholes, doors and windows. The doors are located on the east or west side, and the windows are located on the south direction. This layout will increase daylight in the chicken coop and protect the birds from the north wind.
Floor
The warmth in the chicken coop will be provided by a double floor. To build it:
- Nail boards to the bottom of the frame sheathing.
- Fill the space at the bottom of the frame with insulation.
- Lay the floor.
It is not necessary to use special components as insulation. The floor can be equipped with a dense layer of straw or sawdust.
Roof
A pitched roof in a chicken coop will ensure rapid removal of moisture after precipitation, and this is an indicator that the poultry house will always be dry. To install the roof:
- Place the bars on the small and high walls in 50 cm increments.
- Place roofing felt on top and secure it with nails.
If necessary, you can make an insulating layer by sheathing the inside of the roof with boards.
Warm chicken coop
If you plan to use the poultry house throughout the year, then it should be insulated. Before sheathing the outer part of the body with boards, fill the space between the vertical beams with insulation. Mineral wool or polystyrene foam is used as an additional layer. It is important to monitor the temperature in the poultry house, which should not fall below 12º C
If you plan to breed chickens only in the warm season, then the summer chicken coop does not need to be insulated. The optimal temperature for birds in summer is 25º C
The video shows an example of a winter chicken coop for a small number of chickens:
Important! A vestibule attached to the poultry house reduces heat loss in winter.
Required elements of a poultry house
In addition to the housing itself, which protects the birds from precipitation and wind, chickens need comfortable living. And for this, the wards need to organize:
- ventilation;
- perches;
- feeders;
- nests;
- dust baths.
A supply and exhaust system is required for ventilation. To remove air from the room, use an exhaust pipe, which is located in the upper part of one of the walls. On the contrary, but already below, at a distance of 30 cm from the floor, a supply pipe is placed.
Birds need perches for sleep and rest. To make them, use ready-made poles or planed beams. The diameter of the perches should be 3–4 cm.
Place the poles in the chicken coop at a distance of 35–40 cm from each other, at different levels. The lower perch is located 50 cm from the floor. A distance higher than this will prevent young birds from climbing freely.
Important! To prevent chickens from overheating in the summer, it is worth darkening the windows in the chicken coop.
Birds need nests to lay eggs. For this element, you can use, for example, wicker baskets or boxes. The main thing is that the parameters of the nest are 30 cm in width and height, and 40 cm in depth.
The cells are located in a place remote from large concentrations of birds. Chickens need calm while laying eggs.
Place containers with sand or soil used in the garden in the chicken coop. In such dust baths, birds are freed from harmful insects and take care of their plumage.
Fact! A sedentary lifestyle reduces the immunity of chickens.
To help the novice builder, the Internet is replete with a variety of photos and videos with step-by-step construction of chicken coops for any size, capacity and season. The happier the hens are in their new home, the more eggs they will lay.
If you have the desire and minimal experience in keeping chickens and are thinking about how to build a chicken coop with your own hands, then we will tell you how to build a winter chicken coop for 10 chickens.
The small size and thermal insulation of the chicken coop will allow the birds to warm the room with the heat of their bodies. At the same time, building such a chicken coop is within the power of every householder! This project will not take too much time and will not require expensive tools.
DIY chicken coop for 10 chickens.
When designing and building a chicken coop, it is important to keep many components in mind. After all, a chicken coop is both a comfortable home for birds and an outbuilding designed to make it easier for people to care for animals and increase labor productivity. Therefore, before making a chicken coop with your own hands, let's figure out what design elements and features should be inherent in every good chicken coop.
1. We rise above the ground
Dampness and moisture are the main enemies of any chicken coop. In a damp room, birds begin to get sick, so the chicken coop is always raised above the ground. Some designs provide for a very high lift - up to a meter, and sometimes higher. If your area, like ours, does not have excessive humidity, then 25-40cm should be quite enough.

Speaking of the area! Choosing the right place for the chicken coop is 50% of success. Here are some tips to help with this:

3. Inputs and outputs for chickens and people
Each chicken coop must have an entrance for birds, as well as access for cleaning the premises. In our chicken coop, the passage for the chickens is made behind the back wall, and two doors provide the possibility of cleaning the chicken coop.

4. Nests and roosts
Chickens will lay eggs in the nests, and you will take these eggs from the nests, so the nests should be comfortable for both you and the chickens. It is believed that The ideal nest size is 30x30cm in length and width, and 30-40cm. in height. In this case, it is recommended to make the entrance to the nests narrower.

There should be easy access to the nests from the outside.

The lid opens, so you don't have to climb inside the coop to collect eggs.

The lid must be inclined so that water flows freely from it and does not fall into the nests.

Total The length of the perch is calculated based on 25 cm per chicken. Since we are planning our chicken coop for ten chickens, we have enough crossbar for the entire length of the chicken coop (almost 2.5 m).

5. Lighting and ventilation of the chicken coop
Chickens simply need light. Reduced daylight hours are one of the main reasons why chickens stop laying eggs in winter, and experienced owners know that this problem can be solved by turning on a light bulb. Therefore, there should be windows in the chicken coop!

It is better to make windows on at least three sides so that light penetrates into the chicken coop throughout the day. Also note the hinged ventilation window on the back wall. In wet weather it can be opened for additional ventilation. The windows above the slots on the front wall also open. Ventilation is very important, but remember: no matter what tricks you use to ventilate your winter coop, be sure to provide the ability to adjust the air flow up to its complete blocking - this will be useful to you in winter, when ventilation will suck out precious heat.

Chicken coop drawing.
Below we provide drawings of our chicken coop. For construction, we used softwood timber and boards, as well as 15mm thick plywood. It is quite possible to use OSB for the floor and roof underlay. When specifying the pitch between joists and rafters, the distances are indicated between the centers of the beams.


How to insulate a chicken coop with your own hands
So we built a chicken coop. Now we have to insulate it. Various materials can be used as insulation. Mineral wool is perfect for this.

As well as polystyrene foam and polystyrene foam.

At worst, you can line the walls with cardboard and old blankets.

The insulation is placed between the beams and then covered with plywood. Otherwise, birds may peck it off (they especially love polystyrene foam).

In winter, it is also worth covering the windows with insulation. It is important to provide artificial lighting.

In case of severe frosts, infrared lamps can be provided. At the same time, their operation can be controlled by a timer or even a thermal relay - this eliminates unnecessary hassle, eliminates the human factor (forgot to turn it on/off) and saves money.

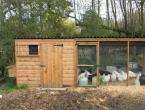
DIY chicken coop. Summer paddock.
During the warmer months, chickens need more space and will happily spend most of their time outside. Therefore, when making a chicken coop with your own hands, you need to make an open summer pen for chickens. The paddock area is calculated using the formula 1 sq.m. for every chicken.

Pay attention to the mesh at the bottom of the coop - it protects against predators. It should be buried 20-30cm into the ground, since some predators are quite capable of making a tunnel. And if there are large birds of prey in your area, then the enclosure must also be protected from above.

It is also very important that at least part of the pen is in the shade - the chickens should be able to hide from the scorching sun. If there is no natural shade, then build a small canopy.

So that birds can freely enter and exit the chicken coop raised above the ground, a simple ladder is usually built for them.

Do-it-yourself chicken coop from scrap materials.
A German farmer turned an old kitchen cabinet into a small chicken coop.

This scrap coop is fully compliant with EU chicken housing specifications and provides enough space for three hens to collect and lay eggs.

Chickens need space to roam, so the coop is placed in the backyard to give them plenty of room to roam.

A chicken coop made from scrap materials shows how modern methods of keeping chickens can be implemented using non-standard means.

As you can see, in the construction of such a seemingly simple thing as a chicken coop, there are many nuances and important points, lack of knowledge of which can negate all efforts.

But despite this, anyone can build a good chicken coop with their own hands.

The main thing is to arm yourself with the right knowledge and think through all aspects of the design in advance. You can build a chicken coop according to our drawings, or, taking their basis, modify its structure to suit your needs.
Please share your experiences and tips on this topic in the comments!