Volume s90. Speakers S90: technical specifications, diagram. DIY speakers. Refinement of the S90 or how to make them “sing” at minimal cost
Here are located scheme,detailed description, options Acoustic speakers speakers Radiotehnika class S90 (S90, S90B, S90D, S90F)
High-quality acoustics from Soviet times, after minor modifications and restoration, we can confidently say that they will give a head start to many modern acoustic systems. If you have similar ones lying around or bought them somewhere cheap, then put them in order and they will delight you for a long time with powerful bass, rich mids and high frequencies in musical works of any style and direction.
S-90 first model
In the speaker system
S-90 There are two step playback level controls separately for mid and high frequencies in the ranges from 500 to 5000 Hz and from 5 to 20 kHz, respectively. Both regulators have three fixed positions: “0”, “-3dB” and “-6 dB”. In position "0", the signal from the crossover filter is supplied to the corresponding head directly. In the “-3 dB” and “-6 dB” positions, the signal is weakened relative to the “0” position by 1.4 and 2 times, respectively.
With the appropriate spectral composition of the program, switching the regulator changes the timbre coloring of the sound.
S-90
Nameplate power 90 W
Rated power 35 W
Nominal electrical resistance 4 ohms
Frequency range 31.5-20000 Hz
Nominal sound pressure 1.2 Pa
Overall dimensions of speakers 360x710x285 mm
Speaker weight no more than 30 kg
Schematic diagram of S90


IN AC There is an indication of speaker head overload. Regulators located on the front panel AC, make it possible to smoothly adjust the sound pressure level of the high-frequency and mid-frequency loudspeaker heads in the range from 0 to minus 6 dB.
There is also a model of the speaker system" S-100D", it uses a mid-frequency head 30 GDS-3 with MAHID magnetic fluid, which allows you to increase the rated power of the speaker system to 100 W. The rest of the design" S-90D" And " S-100D" are similar.
To operate, the speakers must be connected to an amplifier that has the highest (maximum) power at the output of each channel, ranging from 50 to 150 W.
If the OVERLOAD indicators start to light up when the speaker is operating, then you should reduce the level of the input signal supplied to it (by using the volume control in the amplifier to which the speaker is connected).
Passport specifications S-90D
Nameplate electrical power " S-90D"/"S100-D" not less than 90 W 100 W
Rated electrical power 35 W
Nominal electrical resistance 8 ohms
The range of reproduced frequencies is no longer 25-25000 Hz
Characteristic sensitivity in the frequency range 100-8000 Hz, at a power of 1 W, not less than 89 dB
Overall dimensions of speakers 360x710x286 mm
Speaker weight no more than 23 kg
The figure below shows the principle scheme speakers S90D.
Schematic diagram of S90D


Speakers S90 diagram, description.
Radiotehnika 35AS-012, Radiotehnika S-90, Radiotehnika 35AS-012, Radiotehnika S-90
Currently I am the proud owner of Radiotehnika S-90 speakers.
Consideration of acoustics in normal condition
First, you should specify the full name of the acoustics – 35AC-012. From their number it immediately becomes clear that we are dealing with top-class acoustics, by Soviet standards, that is, with acoustics that have very high characteristics. It should be noted right away that by Soviet standards this was not the best acoustics, but an ordinary ordinary workhorse. There were acoustics that had a more balanced sound, for example the same Cleaver/Corvette 35AC-008.
But as they say, we have what we have. Let's go back a little to the moment of their purchase. I bought them from a friend of mine for $50, when I came to him, when I saw the decorative grilles protecting the sound-emitting heads, I wanted to cry, they were dented and, at that, very cruelly (mainly the grilles of the high-frequency and mid-frequency speakers were damaged). But this didn’t scare me, since what was sold on our market cost at least $100, and the quality of the speakers deserved no more than 3, and in these speakers the speakers looked like 5. In general, I took these speakers to my home. When connecting them to an amplifier the sound was quite decent. But nevertheless, two drawbacks should be noted, 1 of which is inherent in all 35AC-012, and as it turned out, in all its 35AC clones, to one degree or another.
The first of the shortcomings that simply killed me on the spot was an incomprehensible overtone when the woofer was working, very similar to the fact that something was stuck to the speaker from behind, and now it was vibrating, as it turned out later it was a drop of solder that stuck to diffuser from the reverse side. The second drawback was precisely in the mid-frequency dynamics 15GD-11A - according to the old standard and 20GDS-1-8 according to the new one (these speakers came in a large number of modifications for this reason, which ones are extremely difficult to track). And again, a small digression in which I will say that the differences in the standards lie in the designation of power, that is, according to the old standard, the rated power of the speaker was indicated, and according to the new standard, the rated power is indicated (from the audio engineering course:
- The rated power of the speaker is the power of the speaker, when supplied, it operates with harmonic distortion levels not exceeding the permissible
- Nameplate power (often also called noise): this is the level of power supplied to the speaker at which the level of harmonic distortion is equal to ten times the level at rated power).
An additional division into the frequency ranges of the heads was also introduced, which was now indicated in the name of the speaker, in particular this is the third letter.
So the disadvantage of this speaker is that it often begins to resonate at high volumes and thereby spoils the sound picture, and as you know, the mid-frequency speaker is crucial in the formation of the sound picture.
Let us now consider in order all the speakers that we have in stock:
1)Low frequency - 30GD2, also known as 75GDN-1-4(8):
Purpose - use in closed and phase-inverted remote acoustic systems of household radio equipment of the highest complexity group as a low-frequency link when working indoors. The loudspeaker head is of electrodynamic type, low-frequency, round, with an unshielded magnetic circuit. The diffuser holder is made by injection molding from aluminum alloy. The cone diffuser is made of impregnated paper pulp. The suspension is toroidal-shaped and made of rubber. The centering washer is made of impregnated fabric.

I would also like to add that the speakers have a relatively heavy dome and a rubber surround, which spoils the quality of the bass; it becomes less continuous and booming than speakers with a lighter moving part and a foam surround. But it should be borne in mind that the bass is influenced not only by the design, but also by the acoustic design itself; for this reason, these problems can be eliminated a little and the speaker will play decently. On the other hand, due to the rubber suspension, the speaker turned out to be very reliable and practically indestructible, while the foam suspension soon crumbles due to the presence of sulfur in the air and the speaker requires repair.
Purpose - use in closed and phase-inverted remote acoustic systems of household radio equipment of the 1st and 2nd complexity groups as a mid-frequency link when working indoors. The loudspeaker head is of electrodynamic type, mid-frequency, round, with an unshielded magnetic circuit. The diffuser holder is made by injection molding from aluminum alloy. The conical diffuser and spherical cap are made of impregnated paper pulp. The toroidal-shaped suspension is made of polyurethane foam. The centering washer is made of impregnated fabric.
Here is actually a photo of this miracle of technology:

It is worth saying that at a good volume it significantly distorts the sound, but as practice has shown, this problem is very easily solved and, at that, quite simply.
Purpose - use in closed acoustic systems of household radio equipment of the highest complexity group as a high-frequency link when working indoors. The loudspeaker head is of electrodynamic type, high-frequency, round, with an unshielded magnetic circuit. The mounting flange and acoustic lens are made of plastic. The dome-shaped diaphragm with suspension is made on the basis of polyethylene terephthalate.


In general, they sound good, but the filters are tuned close to the resonant frequencies.
Upon closer examination of the acoustics (especially from the inside), you begin to be horrified by the build quality, for this reason we will begin to refine it. We will refine it according to the simplest possible scheme, without interfering with the filters, since without specialized equipment there is nothing to do there. For anyone interested, here is the acoustics diagram:

Revision 35AS-012
I will describe in order all the stages of improvement that my speakers went through:
1. Disassembly:
- First of all, we take them to a secluded place (meaning a room) in which our experimental subjects will not be accessible to children (if any) and other family members. We lay the speaker system on its back and begin to disassemble it.
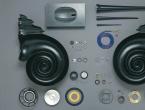
- Now remove the decorative covers from all the speakers and put them aside.
Here they are:

Then we take out the speakers. ATTENTION: when unscrewing the bass speaker (the treble and midrange speakers are secured with the same screws as the decorative trim, and the woofer is mounted separately from the trim), be extremely careful, because if the screwdriver comes off, you will disfigure it. Then we use a soldering iron to unsolder the wires connecting the filter and the speakers, and safely hide the speakers in a secluded place.
- We remove the bass reflex cover and take out the bass reflex itself, and this must be done as carefully as possible, since we are working with plastic, and it can easily break. Then we hide these details in a secluded place.
- Now let's take on the regulator/controllers of the HF/MF sections. To dismantle them, you need to remove the decorative plug in the center of the regulator, then unscrew the exposed screw and remove the regulator handle. After this, carefully pry up the remaining plastic lining using two chisels and carefully remove it, then unscrew the 4 screws securing the attenuator itself and now it can be pushed inside the case. We push it out and unsolder it from the filter. We put it aside, in the future you will need to work a little magic on it. By the way, the joint between the attenuator body and the speaker body is generously covered with a viscous sealing substance; I personally reused it when putting it back into place, but you can use sealant or plasticine.
- We take out the cotton wool bags that are supposed to be in your speaker system and set them aside.
- We dismantle the panel with filters; it is screwed to the body with screws, having previously unsoldered the wires from the output at the back of the speaker system. We put it aside, since we will spend a lot of time working with them.
- Finally, remove the terminal panel from the back cover of the speaker and set it aside.
It seems like a lot of work has been done, but in reality it is just a drop in the ocean. More interesting and time-consuming work lies ahead.
2. Restoration of appearance:
For this purpose, we take the grilles and covers from the speakers that we removed earlier, level them, carefully sand them, degrease them and paint them in several layers with car paint (which is in spray cans) several times and leave them to dry. I’ll make a reservation right away that I restored the grilles only for the reason that I have a small child who can damage the speakers, otherwise the simplest solution would be to abandon the grilles as such, since they only introduce disadvantages into the sound, think for yourself.
3. Refinement of the speaker system housing:
Here everything is actually very simple, and is carried out in several stages:
- If desired, the body can be strengthened. What will this give us? Clearer and smoother bass, since the cabinet panels will vibrate less and, accordingly, will introduce less overtones into the bass component of the sound. How to do it? This is purely a matter for everyone, since as many people there are as many decisions. In general, it all consists of installing spacers, installing additional corners at the joints of the walls of the speaker system, and installing stiffeners on the walls of the speaker. Personally, I limited myself to gluing in additional corners at the joints. You can also tightly glue all joints. Unfortunately, I can’t show you a photo since the entire speaker system is already damped with foam rubber.
- Sealing all joints and seams. It is done very simply using various materials. For example, I used plumbing sealant. The procedure is simple: cover the joints with sealant and carefully smear it with your finger, thereby tightly sealing any cracks.
- At a hardware store we buy foam rubber 10mm thick (personally, I chose this thickness, don’t take too much as it will suffocate the body) and glue it to all the walls except the front. In this way we dampen the body, thereby increasing its virtual volume.
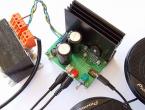
To do this, we buy terminal blocks with gold-plated universal-type connectors in the store. Since the S-90 terminal block itself is large, and the new ones are small, we remove the connectors from the terminal blocks and install them on the body of the S-90 terminal block. Then we lubricate the installation area with sealant (don’t be sorry, wipe off the excess later) and put it all in place, tighten the screws. Here's a photo of what you should get:


5. Let’s move on to reworking and replacing the filter:
- First of all, carefully examine the filter, pay attention to the fastening of the parts, since often the inductors were fastened with metal screws, which immediately disrupts the filter settings.
- If there were problems with the fastener, complete it by eliminating metal parts from the fastener. There are also cases of assembling the filter on a metal plate, then transfer the filter to a plywood panel.
- We pick up a piece of paper, a pen, and carefully redraw all the elements of the circuit, restoring, so to speak, the filter circuit itself, because the parameters of the speakers were wrong and for this reason the filter circuit could have been changed at the factory. By the way, we exclude the attenuator from the circuit, it simply spoils the sound.
- Now we take a soldering iron (preferably 100 watts) and disassemble the filter, or rather, simply remove all the jumpers that were installed from the factory.
- Now we are assembling the filter, instead of jumpers we will now use a cable made of oxygen-free copper with a cross-section of 4 mm 2, the cable can be bought at any car audio store. It should also be noted that you should not buy a very expensive cable, as the changes in sound quality will be insignificant, but the costs are simply colossal.
- After assembling the filter, we solder the wires that will go to the speakers based on: for the low-frequency link 4 mm 2, for the mid-frequency link 2.5 mm 2, for the high-frequency link 2 mm 2.
- We put the filter in place, and then solder the terminal blocks to it (observe the polarity, otherwise you will lose the sound picture).
- The very last step is to run the wires to the speakers, secure them and cover the filter with foam.
You'll end up with something similar to these photos:


6. Attenuator installation:
- We remove all resistance from it.
- Let's put it in its place.
- We carefully seal it.
- Additionally, we cover it with foam rubber (I only covered it on the front wall)
- We install all the decorative panels completely.
7. Installation of the bass reflex:
Everything is simple here, we put it back on the sealant, carefully make sure that it is not pinched anywhere by the foam rubber, as this will throw off its setting.
8. Reinstall the bass reflex cover:
We install it the same way as we removed it, just install it with sealant and new screws, since the panel itself often rattles in the bass. Seal the joint between the panel and the bass reflex well.
9. We proceed to installing the dynamic heads in place:
- A) Install the HF head:
1) We remove the travesty of the seal that is on it (some kind of rubber or cardboard at the back).
2) Cut out a new seal; a mouse pad, in particular a black porous base, is perfect.
3) Solder the wires to the speaker and install it in place.
4) Put the decorative trim (grid if desired) in place and tighten it tightly with the screws.
- B) Install the midrange head:
1) We make a cylinder from foam rubber, such a size that our box will fit into it. We place this cylinder inside the speaker and pass a cable through it, which we take out.

2) Pass the wire through the box (most likely you will have to widen the hole), then put the box in place, adjust the length of the wire and seal the hole into which the wire is passed.
3) Solder the wires to the speaker.
4) Now the crucial step is damping the mid-frequency head. To do this, we sew a cylinder of foam rubber, such a size that it fits tightly onto the speaker frame and covers all the windows.


5) Fill the box with cotton wool, having previously fluffed it.
6) Put the dynamic head, grille (optional) and frame in place and tighten it.
1) First, put back the bags of cotton wool that were removed during disassembly of the speakers. Solder the wires to the head. I tied the wires that are soldered to the head to the frame so that they do not hit the diffuser, because there is a possibility that when you put the speaker in place, the wires will bend and fall into the window of the diffuser holder.

2) We make a gasket from a porous material, for example
Apply window seal and carefully place the speaker in place.
3) Tighten the mounting screws. Do not apply much force, then the speaker will be spring-loaded by the gasket and this will reduce the energy of vibrations transmitted to the body.
4) Put the grille (optional) and decorative trim in place. If you do install a grille, then I advise you to cut out small triangles from foam rubber and place them on the speaker at the place where it is attached; this will eliminate the vibrations of the grille, and therefore eliminate overtones at high volumes.
I came up with this solution a long time ago, look at the photos for more details:

Conclusion:
After the modification, all the listeners (there were not many of them, about five people, but I asked for the most honest information from them) noted more delicate and soft bass, a much cleaner middle, the highs remained practically unchanged (it seemed to me that they became a little cleaner). Also, the acoustics began to calmly reach higher volumes.
In conclusion, I would like to say that the proposed method is the cheapest, simplest and most accessible. All components, of course, can be modified or changed several times. For example, instead of foam rubber, you can use felt (natural), this, in theory, will give better results than foam rubber; it is also a good idea to use vibrating mastics. Many people advise replacing the 15GD-11A with a 5GDSH broadband receiver; in my opinion this is a bad idea, but that’s everyone’s business. 10GD-35 - it is recommended to treat it with a notch filter, 15GD-11A should be modified based on halves of a tennis ball (by the way, the idea is quite interesting, I haven’t done it myself since I don’t have such speakers in stock).
At the moment, there are two 6GD-13 speakers available (considered the best in Soviet times), so perhaps I’ll write about what happened sooner rather than later.
And perhaps lastly, I’ll say that if you’re a fan of MP3 music and you have inexpensive source equipment, then maybe you shouldn’t bother so much, although I heard differences when extracting sound from a Creative Sound blaster 24 bit sound card. It should also be noted that the room in which you listen to music has a huge impact on the sound.
11-01-2009
Modification of acoustic systems Radiotehnika 35AC-012 (S-90)
Radiotehnika 35AS-012, Radiotehnika S-90, Radiotehnika 35AS-012, Radiotehnika S-90
Currently I am the proud owner of Radiotehnika S-90 speakers.
Consideration of acoustics in normal condition
First, you should specify the full name of the acoustics - 35AC-012. From their number it immediately becomes clear that we are dealing with top-class acoustics, by Soviet standards, that is, with acoustics that have very high characteristics. It should be noted right away that by Soviet standards this was not the best acoustics, but an ordinary ordinary workhorse. There were acoustics that had a more balanced sound, for example the same Cleaver/Corvette 35AC-008.
But as they say, we have what we have. Let's go back a little to the moment of their purchase. I bought them from a friend of mine for $50, when I came to him, when I saw the decorative grilles protecting the sound-emitting heads, I wanted to cry, they were dented and, at that, very cruelly (mainly the grilles of the high-frequency and mid-frequency speakers were damaged). But this didn’t scare me, since what was sold on our market cost at least $100, and the quality of the speakers deserved no more than 3, and in these speakers the speakers looked like 5. In general, I took these speakers to my home. When connecting them to an amplifier the sound was quite decent. But nevertheless, two drawbacks should be noted, 1 of which is inherent in all 35AC-012, and as it turned out, in all its 35AC clones, to one degree or another.
The first of the shortcomings that simply killed me on the spot was an incomprehensible overtone when the woofer was working, very similar to the fact that something was stuck to the speaker from behind, and now it was vibrating, as it turned out later it was a drop of solder that stuck to diffuser from the reverse side. The second drawback was precisely in the mid-frequency dynamics 15GD-11A - according to the old standard and 20GDS-1-8 according to the new one (these speakers came in a large number of modifications, for this reason it is extremely difficult to track which one you have). And again, a small digression in which I will say that the differences in the standards lie in the designation of power, that is, according to the old standard, the rated power of the speaker was indicated, and according to the new standard, the rated power is indicated (from the audio engineering course:
- The rated power of the speaker is the power of the speaker, when supplied, it operates with harmonic distortion levels not exceeding the permissible
- Nameplate power (often also called noise): this is the level of power supplied to the speaker at which the level of harmonic distortion is equal to ten times the level at rated power).
An additional division into the frequency ranges of the heads was also introduced, which was now indicated in the name of the speaker, in particular this is the third letter.
So the disadvantage of this speaker is that it often begins to resonate at high volumes and thereby spoils the sound picture, and as you know, the mid-frequency speaker is crucial in the formation of the sound picture.
Let us now consider in order all the speakers that we have in stock:
1)Low frequency - 30GD2, also known as 75GDN-1-4(8):
Purpose - use in closed and phase-inverted remote acoustic systems of household radio equipment of the highest complexity group as a low-frequency link when working indoors. The loudspeaker head is of electrodynamic type, low-frequency, round, with an unshielded magnetic circuit. The diffuser holder is made by injection molding from aluminum alloy. The cone diffuser is made of impregnated paper pulp. The suspension is toroidal-shaped and made of rubber. The centering washer is made of impregnated fabric.

I would also like to add that the speakers have a relatively heavy dome and a rubber surround, which spoils the quality of the bass; it becomes less continuous and booming than speakers with a lighter moving part and a foam surround. But it should be borne in mind that the bass is influenced not only by the design, but also by the acoustic design itself; for this reason, these problems can be eliminated a little and the speaker will play decently. On the other hand, due to the rubber suspension, the speaker turned out to be very reliable and practically indestructible, while the foam suspension soon crumbles due to the presence of sulfur in the air and the speaker requires repair.
Purpose - use in closed and phase-inverted remote acoustic systems of household radio equipment of the 1st and 2nd complexity groups as a mid-frequency link when working indoors. The loudspeaker head is of electrodynamic type, mid-frequency, round, with an unshielded magnetic circuit. The diffuser holder is made by injection molding from aluminum alloy. The conical diffuser and spherical cap are made of impregnated paper pulp. The toroidal-shaped suspension is made of polyurethane foam. The centering washer is made of impregnated fabric.
Here is actually a photo of this miracle of technology:

It is worth saying that at a good volume it significantly distorts the sound, but as practice has shown, this problem is very easily solved and, at that, quite simply.
Purpose - use in closed acoustic systems of household radio equipment of the highest complexity group as a high-frequency link when working indoors. The loudspeaker head is of electrodynamic type, high-frequency, round, with an unshielded magnetic circuit. The mounting flange and acoustic lens are made of plastic. The dome-shaped diaphragm with suspension is made on the basis of polyethylene terephthalate.

In general, they sound good, but the filters are tuned close to the resonant frequencies.
Upon closer examination of the acoustics (especially from the inside), you begin to be horrified by the build quality, for this reason we will begin to refine it. We will refine it according to the simplest possible scheme, without interfering with the filters, since without specialized equipment there is nothing to do there. For anyone interested, here is the acoustics diagram:

Revision 35AS-012
I will describe in order all the stages of improvement that my speakers went through:
1. Disassembly:
- First of all, we take them to a secluded place (meaning a room) in which our experimental subjects will not be accessible to children (if any) and other family members. We lay the speaker system on its back and begin to disassemble it.
- Now remove the decorative covers from all the speakers and put them aside.
Here they are:

Then we take out the speakers. ATTENTION: when unscrewing the bass speaker (the treble and midrange speakers are secured with the same screws as the decorative trim, and the woofer is mounted separately from the trim), be extremely careful, because if the screwdriver comes off, you will disfigure it. Then we use a soldering iron to unsolder the wires connecting the filter and the speakers, and safely hide the speakers in a secluded place.
- We remove the bass reflex cover and take out the bass reflex itself, and this must be done as carefully as possible, since we are working with plastic, and it can easily break. Then we hide these details in a secluded place.
- Now let's take on the regulator/controllers of the HF/MF sections. To dismantle them, you need to remove the decorative plug in the center of the regulator, then unscrew the exposed screw and remove the regulator handle. After this, carefully pry up the remaining plastic lining using two chisels and carefully remove it, then unscrew the 4 screws securing the attenuator itself and now it can be pushed inside the case. We push it out and unsolder it from the filter. We put it aside, in the future you will need to work a little magic on it. By the way, the joint between the attenuator body and the speaker body is generously covered with a viscous sealing substance; I personally reused it when putting it back into place, but you can use sealant or plasticine.
- We take out the cotton wool bags that are supposed to be in your speaker system and set them aside.
- We dismantle the panel with filters; it is screwed to the body with screws, having previously unsoldered the wires from the output at the back of the speaker system. We put it aside, since we will spend a lot of time working with them.
- Finally, remove the terminal panel from the back cover of the speaker and set it aside.
It seems like a lot of work has been done, but in reality it is just a drop in the ocean. More interesting and time-consuming work lies ahead.
2. Restoration of appearance:
For this purpose, we take the grilles and covers from the speakers that we removed earlier, level them, carefully sand them, degrease them and paint them in several layers with car paint (which is in spray cans) several times and leave them to dry. I’ll make a reservation right away that I restored the grilles only for the reason that I have a small child who can damage the speakers, otherwise the simplest solution would be to abandon the grilles as such, since they only introduce disadvantages into the sound, think for yourself.
3. Refinement of the speaker system housing:
Here everything is actually very simple, and is carried out in several stages:
- If desired, the body can be strengthened. What will this give us? Clearer and smoother bass, since the cabinet panels will vibrate less and, accordingly, will introduce less overtones into the bass component of the sound. How to do it? This is purely a matter for everyone, since as many people there are as many decisions. In general, it all consists of installing spacers, installing additional corners at the joints of the walls of the speaker system, and installing stiffeners on the walls of the speaker. Personally, I limited myself to gluing in additional corners at the joints. You can also tightly glue all joints. Unfortunately, I can’t show you a photo since the entire speaker system is already damped with foam rubber.
- Sealing all joints and seams. It is done very simply using various materials. For example, I used plumbing sealant. The procedure is simple: cover the joints with sealant and carefully smear it with your finger, thereby tightly sealing any cracks.
- At a hardware store we buy foam rubber 10mm thick (personally, I chose this thickness, don’t take too much as it will suffocate the body) and glue it to all the walls except the front. In this way we dampen the body, thereby increasing its virtual volume.
To do this, we buy terminal blocks with gold-plated universal-type connectors in the store. Since the S-90 terminal block itself is large, and the new ones are small, we remove the connectors from the terminal blocks and install them on the body of the S-90 terminal block. Then we lubricate the installation area with sealant (don’t be sorry, wipe off the excess later) and put it all in place, tighten the screws. Here's a photo of what you should get:


5. Let’s move on to reworking and replacing the filter:
- First of all, carefully examine the filter, pay attention to the fastening of the parts, since often the inductors were fastened with metal screws, which immediately disrupts the filter settings.
- If there were problems with the fastener, complete it by eliminating metal parts from the fastener. There are also cases of assembling the filter on a metal plate, then transfer the filter to a plywood panel.
- We pick up a piece of paper, a pen, and carefully redraw all the elements of the circuit, restoring, so to speak, the filter circuit itself, because the parameters of the speakers were wrong and for this reason the filter circuit could have been changed at the factory. By the way, we exclude the attenuator from the circuit, it simply spoils the sound.
- Now we take a soldering iron (preferably 100 watts) and disassemble the filter, or rather, simply remove all the jumpers that were installed from the factory.
- Now we are assembling the filter, instead of jumpers we will now use a cable made of oxygen-free copper with a cross-section of 4 mm 2, the cable can be bought at any car audio store. It should also be noted that you should not buy a very expensive cable, as the changes in sound quality will be insignificant, but the costs are simply colossal.
- After assembling the filter, we solder the wires that will go to the speakers based on: for the low-frequency link 4 mm 2, for the mid-frequency link 2.5 mm 2, for the high-frequency link 2 mm 2.
- We put the filter in place, and then solder the terminal blocks to it (observe the polarity, otherwise you will lose the sound picture).
- The very last step is to run the wires to the speakers, secure them and cover the filter with foam.
You'll end up with something similar to these photos:


6. Attenuator installation:
- We remove all resistance from it.
- Let's put it in its place.
- We carefully seal it.
- Additionally, we cover it with foam rubber (I only covered it on the front wall)
- We install all the decorative panels completely.
7. Installation of the bass reflex:
Everything is simple here, we put it back on the sealant, carefully make sure that it is not pinched anywhere by the foam rubber, as this will throw off its setting.
8. Reinstall the bass reflex cover:
We install it the same way as we removed it, just install it with sealant and new screws, since the panel itself often rattles in the bass. Seal the joint between the panel and the bass reflex well.
9. We proceed to installing the dynamic heads in place:
- A) Install the HF head:
1) We remove the travesty of the seal that is on it (some kind of rubber or cardboard at the back).
2) Cut out a new seal; a mouse pad, in particular a black porous base, is perfect.
3) Solder the wires to the speaker and install it in place.
4) Put the decorative trim (grid if desired) in place and tighten it tightly with the screws.
- B) Install the midrange head:
1) We make a cylinder from foam rubber, such a size that our box will fit into it. We place this cylinder inside the speaker and pass a cable through it, which we take out.

2) Pass the wire through the box (most likely you will have to widen the hole), then put the box in place, adjust the length of the wire and seal the hole into which the wire is passed.
3) Solder the wires to the speaker.
4) Now the crucial stage is damping the mid-frequency head. To do this, we sew a cylinder of foam rubber, such a size that it fits tightly onto the speaker frame and covers all the windows.

5) Fill the box with cotton wool, having previously fluffed it.
6) Put the dynamic head, grille (optional) and frame in place and tighten it.
1) First, put back the bags of cotton wool that were removed during disassembly of the speakers. Solder the wires to the head. I tied the wires that are soldered to the head to the frame so that they do not hit the diffuser, because there is a possibility that when you put the speaker in place, the wires will bend and fall into the window of the diffuser holder.

2) We make a gasket from a porous material, for example
Apply window seal and carefully place the speaker in place.
3) Tighten the mounting screws. Do not apply much force, then the speaker will be spring-loaded by the gasket and this will reduce the energy of vibrations transmitted to the body.
4) Put the grille (optional) and decorative trim in place. If you do install a grille, then I advise you to cut out small triangles from foam rubber and place them on the speaker at the place where it is attached; this will eliminate the vibrations of the grille, and therefore eliminate overtones at high volumes.
I came up with this solution a long time ago, look at the photos for more details:
Conclusion:
After the modification, all the listeners (there were not many of them, about five people, but I asked for the most honest information from them) noted more delicate and soft bass, a much cleaner middle, the highs remained practically unchanged (it seemed to me that they became a little cleaner). Also, the acoustics began to calmly reach higher volumes.
In conclusion, I would like to say that the proposed method is the cheapest, simplest and most accessible. All components, of course, can be modified or changed several times. For example, instead of foam rubber, you can use felt (natural), this, in theory, will give better results than foam rubber; it is also a good idea to use vibrating mastics. Many people advise replacing the 15GD-11A with a 5GDSH broadband receiver; in my opinion this is a bad idea, but that’s everyone’s business. 10GD-35 - it is recommended to treat it with a notch filter, 15GD-11A should be modified based on halves of a tennis ball (by the way, the idea is quite interesting, I haven’t done it myself since I don’t have such speakers in stock).
Register.
No matter what the snobs say, the Soviets were at the highest level. Even now they can bypass many modern beepers. And after appropriate modifications, even budget speaker systems from Yamaha cannot compare with them. And now we will look at the legendary Radiotehnika S90. This is a symbol Even abroad they noted the high quality of this (at one time). Therefore, it makes sense to consider these columns. Moreover, many people still use them to this day.
A little history
Radiotehnika S90 speakers were first released in the early eighties of the last century. They were produced by a plant located in Latvia, which became an additional incentive for citizens to buy them. Despite the rather high price, the speakers sold like hot cakes. People saved for a long time, did not eat enough, hiccupped them wherever possible. They even purchased used speaker systems. Just to decorate your closets with “Radio Engineering”.
Nowadays, many audiophiles are still chasing this speaker system. Speakers "Radio Engineering" are the dream of every connoisseur of high-quality sound. But now they can only be purchased on the secondary market. And it’s far from a fact that their condition will be acceptable (they do. However, this acoustic system can give a head start to many modern speakers. And after appropriate modifications, it completely turns into Hi-End class acoustics. And this is a completely different level.
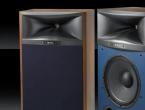
Appearance and Design
Looks impressive from Radiotekhnika. These are very large speakers. Each of them weighs about 15-20 kilograms. This is not to mention the fact that carrying them is not very convenient due to the bulky and bulky case. The front panel (like the entire body) is covered with veneer. There are several color combinations. The speakers are covered with a metal mesh. Only the tweeter is not covered with protection. This is, of course, good, but it does not have the best effect on the acoustic properties of the speakers. However, the design is quite acceptable. Much better than other speakers of “clumsy” Soviet production.

On the right side of the mid-frequency and high-frequency speakers there are two operating mode switches. It is unknown why they were placed here. A normal amplifier itself is capable of switching modes. And the job of speakers is to reproduce sound correctly. Nevertheless, Radiotehnika S90 has such switches. But during the finalization process they can be removed, because they have a very negative effect on the overall sound quality. But for those who appreciate retro and antiques, such proposals will seem blasphemous.
Specifications
So let's get down to the hard numbers. Normal speaker power is 35 watts. But these beauties can easily give out 90. That is why they were called “the neighbors’ nightmare.” However, to fully exploit them, stereo amplifiers of appropriate power are required. Only then will this speaker system really sound. The frequency range starts at 20 hertz and ends at 25,000 hertz. This wide range allows the speakers to reproduce almost all instruments quite reliably. The frequency response is quite acceptable for an acoustic system of this level. You can't expect any miracles from her. But the sound is quite decent.

Now comes the fun part - the woofer. This is the legendary "Din 75 GD". The thing is, of course, good, but it does not produce perfectly reliable bass. If the low-frequency speaker is at least something, then the mid-frequency and low-frequency drivers, although they cope with their task, can not be called “kosher”. Ordinary paper bubbles. It would be much better to replace them with Kevlar or silk canopies during refurbishment. That's when the big speakers will start sounding. And it’s better to rewind the woofer, since in used speakers it often burns out due to “super-mega bass”.
Sound quality
As mentioned above, Radiotekhnika speakers with standard components cannot boast of very clean and correct sound. But the quality is enough for not very demanding listeners. The acoustic system copes well with instrumental music (light rock, jazz, blues), and the electronic system also works well. But heavy and other subgenres of great and terrible metal - not so much. That is, the speakers reproduce it as expected, but the woofer jerks so much that it could easily break. Especially when listening to those groups that often abuse the cardan on the kick drum.

The classics also go well. This is probably the only genre that the Radiotehnika S90 copes with very well. All instruments sound crystal clear. Nothing gets ahead of itself. Even audiophiles may enjoy listening to classics on these speakers. However, it is impossible to call this speaker system a Hi-End item. To achieve this level, the speakers will have to be modified. As standard, this is an average but confident Hi-Fi. But the Soviet people didn’t need more.
Amplifiers for S90
In order for passive acoustics to sound good, high-quality stereo amplifiers are also required. It should be noted that the “nineties” can only be driven and fully revealed by a very powerful amplifier. The Soviet vehicles "Brig" and "Odyssey" will cope with such work perfectly. These monsters are capable of getting everything out of the speakers. Amphiton U-001 will also do a good job. Just don’t even think about connecting this speaker system to the Vega 50U. The amplifier will immediately refuse to work even at minimum volume.

The ideal option for this speaker system is the Radiotekhnika amplifier. They were produced in huge quantities, with varying power and resistance. Therefore, finding such a thing on the secondary market is not a problem. There are more than enough amplifiers of this type that are suitable in terms of power. You can, of course, puzzle yourself and connect these speakers to a completely modern receiver like Yamaha. But then such a kit will go far beyond the “budget” scope. And such a decision is not worth the candle. It's like putting a Porsche engine into a Zaporozhets. It's possible, but there's no point.
Price S90
Now let's look at the most interesting quality of Radiotehnika S90. The price on the secondary market depends on the “kill” of the kit and its originality. Speakers in standard configuration and in decent condition will cost from 1000 to 2000 rubles. Depending on how good they look. Speakers with a whole internal system cost almost the same. You can even find ones that are barely used. It all depends on the seller himself and the buyer’s level of awareness. Speakers modified according to all the rules will cost more, since this is an acoustic system of a completely different class. They will cost about 3,000 rubles.

The Radiotekhnika amplifier will also cost about the same amount. Monsters like the Brig or Odyssey in perfect condition will cost around 15,000 rubles. But the problem is that finding them is almost impossible. In total, the approximate cost of the complete set will be approximately 6,000 rubles. Much better than an obscure Chinese speaker system for the same money. However, this is an approximate cost. It may vary depending on the degree of modification of the speaker system and its condition. But it still turns out to be much more profitable. And the sound quality will be at the same level.
Positive feedback from owners
Now let's look at the reviews about the Radiotehnika S90 speaker system. The amplifier is a separate topic, so we will not consider it here. So what will the owners say? Positive and negative reviews about these speakers go neck and neck. Competent audiophiles have long since finalized their “nineties” and therefore their reviews are laudatory panegyrics addressed to Soviet speakers. There is clear sound, clearly defined bass, wide range, versatility (for all genres) with some equalizer adjustment. Also an important advantage for many was the completely wooden body. And the power of these speakers is the talk of the town. Everyone noted this quality.

Negative reviews from owners
However, there are also snobs who are not satisfied with the sound quality of this speaker system. They note insufficient definition of mid and high frequencies (and this is true). After so many years of use, the case is simply rattling. The subwoofer thumps out of place. But, comrades, any thing needs to be monitored and timely prevention carried out. This also applies to speakers. After the appropriate procedures, they will sound completely different. Dissatisfied S90 owners - take note!
Conclusion
Radiotehnika S90 is one of the most preferred budget options. It copes with its responsibilities much better than any modern acoustics from China, is highly customizable and can provide Hi-End class sound. What else does a music lover need to be happy?
Modification of 35AC-212 (S-90) with original speakers and switches.
According to the prospectus of the 90s, the Riga Radio Plant mass-produced two models of acoustic systems: 35AC-212 or “S-90” and 35AC-012 in the modifications “S-90B”, “S-90D”, “S-100B”. The time has come to modify the older model 35AC-212, as well as its predecessor 35AC-1, which have a similar set of speakers.
These models have switches for the level of attenuation of the energy supplied to the midrange and tweeters, allowing you to adjust them to the level of the woofer and adjust the system to specific listening conditions. All this is good, of course, but it “thumps and clicks” no matter how you turn the switches. I want it to be musical. Somehow I was talking about alternative thoughts about finalizing the S-90. These thoughts happily dissipated without being realized. They were replaced by others, more interesting ones. It seemed the most promising to use the “Nivaga 9” filter from the previous article and convert it to another set of speakers, and leave the midrange and high-frequency switches in their original factory form. The resulting filter diagram for the S-90 is shown in the figure. I propose to call it “Nivaga 10”.
A distinctive feature of the filter is the presence of resistors R1, R2, R3, R4, which provide direct potential contact of all speakers with the PA output and do not allow the phase response to deviate far from a linear frequency dependence. If you look closely at the diagram, you will notice that the resistance of these resistors is close to the active resistance of the corresponding speakers. Meticulous comrades can of course add the inductive equivalent of these speakers. I was lazy, because even in this form the sound quality completely satisfied me, but I didn’t have the opportunity to experiment in a sound chamber. Well, if you look even more closely at the circuit of the bandpass filter leading to the midrange speaker, you can see that it was created from a previously developed filter like “Nivaga 6 or 8” by replacing the speakers with equivalent resistors. Similarly in the lowpass and highpass filters resistors R1 and R3 are equivalent to the corresponding speakers. Therefore, this circuit with parallel connection of speakers is a logical development of the previous one with series connection of speakers, which means it retains all its advantages, which were written about in earlier articles. And at the same time, it creates new opportunities to move the cutoff frequency of all four filters included in the circuit independently of each other, controlling the peaks and dips in the frequency response of the speaker, which was not the case in the previous circuit.In the specific case of this circuit, I sought to expand the cutoff frequencies of the low and midrange speakers, as well as the cutoff frequencies of the midrange and high frequencies speakers by half an octave. The results are brilliant. Elastic bass, stereo panorama, volume, clear mids - everything that the ear of a music lover craves is present in the modified S-90 speakers.
The fear that the introduced resistors would heat up was not justified. Their power is theoretically based. In practice, it can be reduced by 2 - 3 times, but the resistors must be wirewound.
Practice shows that not everything that I like suits others. Well, the proposed scheme is open to reasonable modifications, and I am ready for serious discussions.
This treatise was compiled on February 20, 2012.