Installation of metal siding with insulation. Installation of metal siding - step-by-step instructions for do-it-yourself installation. Important points when facing a building with metal siding
For an unprepared person, the variety of outdoor materials available on the market today can cause some confusion.
Such advantages often become decisive factors when choosing siding for house cladding. The only issue is the installation technology, which should be discussed in more detail.
If there is no experience in finishing work, siding becomes the best solution, which has a number of advantages over other types of finishes:
- There is no need for "wet" work (plastering, etc.).
- Restrictions on weather or temperature conditions are set by the employee according to his own feelings.
- To install the material does not require any special skills, ease of installation provides the possibility of self-plating at home.
- The result of the work looks very impressive and lasts a very long time.
This article is a step by step installation guide for dummies.
Siding is a sheathing material used for exterior decoration of buildings. It has the form of oblong narrow strips with a longitudinal relief applied to them, imitating various options for a wooden building (most often) or, less often, masonry.
Strips (panels, lamellas) are equipped with special sides for fastening to a support on one side and for connecting to each other - on the other. The design allows you to collect canvases of any size from them.
Siding is assembled on site, which is convenient and practical. The panels are light in weight, so it is easy to lift and carry them. In principle, it is possible to work alone, but for large areas with long panels, an assistant is needed.
The birthplace of siding is Canada, where it was first produced.
The first samples were wooden, today there are different types of material:
- (PVC, acrylic, etc.)
The most common are plastic (PVC) and metal types of siding, which have the best performance or the most successful combination of quality and price.
In addition, there are many profile options:
- Timberblock.
- etc.
Mounting direction:
- Horizontal.
- siding.
Some types allow installation in both directions at the request of the owner.
Developers are constantly supplementing the lineup, so there can be no exhaustive list, the list always remains open.

Siding kit
In addition to panels capable of forming only planes, additional elements (additions) are produced that serve to decorate the joints of different canvases at an angle or in the same plane, for finishing window or door openings, etc.
to standard types can be attributed:
- Simple and complex angle (external and internal).
- H-profile.
- J-bar.
- Starting bar.
- Finish plank.
- Platband.
- Soffit.
- Circumferential profile.
All additional elements are fully consistent with the main panels in terms of material type, color or type of protective coating.
Attention! Sometimes, as a decoration, extensions of a different, contrasting color are used, which gives the sheathing an elegant and original look.

The choice of crates - which is better, wood or metal?
Sheathing is a system of planks arranged in a certain order perpendicular to the direction of the panels and serving as a support for them. As a material for the crate, it is customary to use wooden bars or metal guides for drywall.
Disputes about that have been heard from the very first days of using the skin. Wooden planks have low thermal conductivity, while metal planks conduct heat very well and need to be insulated.
At the same time, wooden parts have a common disease - they are subject to warping, deformation during shrinkage and decay. The metal profile does not create such problems; it is protected from corrosion by a layer of galvanizing.

Another problem with wooden bars is curvature. Picking a perfectly straight piece from a stack of timber is a difficult task, as wood is highly susceptible to warping or screwing. The metal profile is almost perfectly straight.
Thus, a metal profile seems to be a better option for creating a crate, but the cavity formed by it should be taken into account and filled in parallel with the installation of insulation.

Installation of the selected crate
Installation of the crate begins with the installation of extreme strips (if you plan to install vertical siding, then the upper and lower ones). They are attached to the wall in the corners, the position is checked by a plumb line. Then a cord is pulled between the extreme strips (at least two), which serves to check the position of the intermediate strips of the crate and ensure the plane.
Intermediate strips are installed with a step that allows you to tightly lay insulation boards between them. To ensure a plane, pieces of wood, plywood, etc. should be placed under them in the right places.(for wooden crates) or adjust the height of the metal profile above the wall plane when using a direct (U-shaped) drywall hanger.
After installing the first layer of planks and carrying out intermediate operations, a counter-lattice is installed, which will directly serve as a support for the siding. It is installed perpendicular to the planks of the first layer (and, accordingly, to the siding panels), with a step that provides optimal fastening of the sheathing (40-60 cm, in some cases - 30-40 cm).
The counter grill performs an additional function of providing a ventilation gap between the skin and the wall cake, which ensures the removal of steam.
NOTE!
If it is not planned to install an external insulation, then the carrier layer of the crate is immediately mounted (perpendicular to the siding panels).

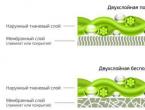
Warming and waterproofing
During the installation of the crate, external wall insulation can be performed. As a heater, a material with a vapor permeability higher than that of the wall material is selected.. This moment is very important, otherwise water (condensate) will accumulate on the border of the two materials, which will sooner or later cause the destruction of the wall.
Therefore, the most preferred insulation will be slab mineral wool, which freely passes water vapor. To cut off the ingress of moisture from the outside, a layer of hydroprotection should be installed.. This is done at the stage of finishing the installation of the first layer of the crate and insulation.
A layer of a waterproof membrane is installed on top, a material that facilitates the removal of steam, but prevents the ingress of moisture from the outside. The counter-lattice is installed on top of the waterproofing layer.


Installation of the starting bar (J profiles)
The starting bar is the support for the bottom row of siding panels. To install it, you need to draw a horizontal line along the perimeter of the house, which is 40 mm above the intended bottom edge of the panels. Then the starting bar is applied with the upper edge to this line and fixed with self-tapping screws on the crate.
CAREFULLY!
Self-tapping screws should not be tightened tightly; a small gap should be left for the bar to move freely. The self-tapping screw is screwed exactly in the middle of the elongated holes, so that during temperature shifts the part can move and compensate for dimensional changes without deformation of the skin plane. This rule applies to all siding elements.
The next bar is not fastened closely, but at a distance of 6 mm from the previous one to compensate for thermal expansion.

How is siding installed?
The siding panel is inserted with its lower edge into the lock of the starting bar, snapped into it, and the upper edge is fixed with self-tapping screws on the crate. The following panels are attached in a similar way, the sheathing "grows" from the bottom up (or sideways if a vertical siding type is chosen).
Attention! In some cases, top-down installation is used. It is believed that this option is less successful due to the possibility of rainwater penetrating into the lining space, but in practice no problems have been found.

Installation of internal corner strips
The installation of the corners is carried out before the installation of the main panels, immediately after fixing the starting bar. The inner corner profile is fastened with the lower edge at the level of the starting bar, the density of the self-tapping screws is recommended to be 25-30 cm.
If the starting bar prevents the profile from being positioned in the right place, the nail strips should be cut from the corner profile to a length equal to the width of the starting profile plus an expansion gap.
If necessary, increase the corner strip, cut off the top nail strips by 30 mm and overlap the top one over the bottom one for proper water flow. The overlap is not more than 25 mm, so that the temperature gap is observed.
You can make a corner connection using a J-strip, which is cheaper than a corner one. This can be done with one plank, when it is tightly adjacent to the outer edge of the row of panels on one side, and the panels on the second side are installed in it.
The second option is to use two planks on each side of the corner, while there is a danger of water penetrating into the gap between the planks, since the absolute tightness of the connection cannot be achieved here, in addition, temperature gaps are necessary in any case.

Installation of external corner strips
External corner strips are installed in a similar way, adjusted for the element's reverse geometry. The same method of overlapping, temperature gaps are required, etc. As a replacement for a complex corner, you can use two J-bars located at the corners close to each other.
For outside corners, a simpler design is possible - with a simple corner that is installed on top of the panels. In this case, the siding is installed first without a corner, so that the junction of the planes is the most accurate, after which a simple corner is screwed on top. Often this option is the most preferable, because it is simpler and for unprepared people, this option seems to be optimal.

How to lengthen siding strips
If it is necessary to end-join the panels, an H-profile or a simple overlap joint can be used. The size of the overlap is 25 cm, for its implementation it is necessary to cut off the nail strip from the top and part of the lock from the bottom from one panel to the length of the overlap and plus a temperature gap of 12 mm. Overlapping is best done at random - in each row of panels in different places, so as not to weaken the entire canvas.
H-profile installation
The installation of the H-profile is carried out simultaneously with the installation of the corner strips (immediately after the starting strip). The same rules apply as for corner profiles - trimming nail strips for joints and mandatory temperature gaps. The use of the H-profile makes the longitudinal joining of panels more aesthetic, allows you to immediately cut the required number of panels to the length for a given section.

Installation of ordinary siding panels
It starts immediately after the installation of the starting strip and the corner and H-profiles. Siding can be immediately cut to the desired length, not forgetting the need to leave temperature gaps, which for panels are 12 mm.
The starting bar has a lock, the same as the panels. The first lower strip is inserted into it until it is completely connected and fastened along the upper nail strip with self-tapping screws.
The usual rules for siding apply - the self-tapping screw is screwed exactly in the middle of the oblong hole and loosely fixes the part, leaving room for free play. The next panel is attached in the same way. By itself, the process of creating a plane is simple and does not require special knowledge, except for those indicated.
Every 3 rows, a horizontal check is made and measures are taken to eliminate distortions if they are found.
Loose connections or other causes may prevent the panels from being properly positioned, causing slight misalignment. If you do not make constant control, then by the end of the installation, the changes may become noticeable and the whole work will be spoiled. Therefore, periodic monitoring and correction of the accuracy of the location of the lamellas to the horizontal is necessary.

How to siding around windows and doorways
They are made in almost the same ways, the only difference is the presence of rain tides on window openings. The method of tying the opening depends on the depth of planting the block in the plane of the wall.
For the design of openings that are in the same plane with the wall, platbands are used. They have grooves for the end placement of the siding, so the installation of the trim is done before installing the main panels.
If the openings have a depth of up to 20 cm, then a J-bar is used. Its installation is carried out on top of the finished panels, on the window frame around the perimeter it is necessary to fix the finishing bar.
For large depths of openings, sets of the same siding panels are used, cut off taking into account the temperature gap along the length of the slope and recruited according to the usual principle. A universal bar is installed along the perimeter of the window block, and a complex angle is mounted on the outer junction of the planes. In this case, it is also necessary to install extensions before mounting the main panels.
To finish the slopes on them, it is necessary to first install the crate, which is usually done during the construction of the main one, since the openings need to be insulated along with the plane of the walls. Regardless of the angle of the slope, the lathing of the openings is set perpendicular to the main one, and the angle is provided by the position of the finishing or universal strips.

Siding finish strip
The finishing bar forms the upper (final) edge of the last panel and fixes its position. installation is carried out almost simultaneously with the top panel. The plank is fastened strictly horizontally at the desired height, the nail plank on the last panel is cut off.
The panel with a cut edge, on which the locking profile remains, is inserted into the slot of the finishing bar and snaps into it. The shape of the profiles is such that the size of the required gap is observed, the lock securely fixes the panel in the plane of the web.
NOTE!
For the correct installation of the finish strip and the last panel, an accurate calculation is made in advance, or the possibility of some level discrepancy if a separate gable sheathing is planned.

Gable siding installation
Either in the same way as the facade, or using a vertical arrangement of siding panels in contrast to the main canvas. It will require a fairly accurate trim in length and at an angle.
A feature of the design is the need to provide a temperature gap in combination with cutting panels at an angle, at which errors are possible, so careful measurements will be required. It is recommended to start the installation from the back sides of the house, so that before moving to the front side there is some experience.

Useful video
In this video you will learn how to install siding:
Conclusion
Do-it-yourself siding installation is a simple and quite affordable procedure that you can do yourself. The main condition is the looseness of fastening parts and compliance with temperature gaps, all other subtleties are comprehended intuitively along the way. To successfully complete the work, you should abandon the haste and act deliberately, then the result will become the pride of the owner of the house.
In contact with
Siding - decorative metal panels that imitate plank sheathing, designed for cladding. Panels can be made with or without wood embossing
Facade panel — smooth facing metal panels. Three types of profile are produced. Wood embossing is possible.
2. Specification
RAW MATERIAL– rolled galvanized steel with a polymer coating of various colors.
3. Accessories

4. Leveling system
To create a mounting plane for metal siding and facade panels, a leveling system is used.
The leveling system is mounted from brackets and galvanized profiles or from brackets and wooden bars with a thickness of at least 40 millimeters.
The design of the brackets allows you to adjust the size of the offset of the vertical guides from the bearing wall, thus making it possible to equalize the actual deviations of the wall plane from the vertical. The design of the bracket allows you to level the plane by 30-40 mm. The increase in the offset is solved by choosing brackets of different lengths. Leveling brackets are attached to the base of the load-bearing wall using anchor and frame dowels.
To eliminate cold bridges, when insulating the facade, thermal break gaskets (made of paronite 3-5 mm thick) are installed under the brackets. All other elements of the leveling system are attached to the brackets.
For sheathing the house with metal siding and facade panels, depending on the direction of installation of the facing elements, two leveling systems for mounting guides are distinguished: vertical and horizontal.

Vertical alignment mounting system. For horizontal installation of facing materials (metal siding, facade panel), vertical guides (U-shaped profile) are attached to the brackets with galvanized steel rivets 3.2x8mm or self-tapping screws 4.8x16mm, at least two rivets (self-tapping screws) on each side (Fig. 23). After leveling the plane, bend the protruding shelves of the bracket to the sides (Fig. 23). Conjugation of vertical
for guide profiles to produce with a gap of 5-10 mm, to compensate for temperature deformations (Fig. 24) The maximum overhang of the guide from the bracket is 150 mm.
Horizontal leveling mounting system. For vertical installation of facing materials (front panel, siding), vertical guides (U-shaped profile) are fixed to the brackets with galvanized steel rivets 3.2x8mm or self-tapping screws 4.8x16mm, at least two rivets (self-tapping screws) from each
sides. Horizontal guides from a U-shaped profile are attached to the vertical guides (Fig. 25). The fastening between the vertical and horizontal rails is carried out "overlapping", with trimming the side shelves at the horizontal rails, using galvanized rivets 3.2x8mm or self-tapping screws with a press washer 4.8x22mm. Pair the vertical guide profiles with a gap of 5-10 mm to compensate for temperature deformations (Fig. 24).


4.1. Cladding plane control
During the installation of the leveling system, check the plane of the cladding using a level, a standard rail-rule, laces.
Permissible deviations in the position of guide profiles:
- vertically (horizontally) in the plane of the wall - 5mm;
- vertically (horizontally) perpendicular to the plane of the wall - 3mm;
- from a given distance between adjacent profiles - 10mm;
- alignment (coincidence of the central axis) adjacent in height
profiles - 4mm;
- ledge of profiles adjacent in height - 3mm.
5. Warming
The walls of the constructed house, which do not provide an adequate level of thermal protection, need to be insulated.
Installation of insulation boards is carried out after the brackets are attached to the load-bearing wall. The thickness of the insulation boards is determined by heat engineering calculation. The density of the insulation must be at least 80 kg / m3. With a significant thickness of the insulation (from 150 mm), they are divided into two layers. This is done to be able to bandage the joints of the layers of insulation. For the inner layer, it is possible to use a heater with a lower density of 40 kg / m3.
The insulation is fastened to the base with dish-shaped dowels with spacer elements made of carbon steel with an anti-corrosion coating, corrosion-resistant steel. Sleeves - made of polyamide, polyethylene, modified polypropylene. The length of the dowels depends on the thickness of the insulation. For the first and second layers of insulation, use dowels of various lengths to ensure a tight fit of the insulation. Consumption - at least 5 pcs. per 1 sq. m of the facade surface with a single-layer arrangement of insulation boards, in the extreme and corner zones 8 pcs. per 1 sq. m. The insulation plates of the lower support row of the first layer are fixed to the wall with three dowels, the plates of the subsequent rows are attached to the wall with two dowels, and each plate of the second layer is fastened with five dowels.

To protect the insulation from weathering and moisture, a wind and hydroprotective film is installed. The slabs of the outer layer and single-layer insulation are fixed together with the wind and hydroprotective material with five plate-shaped dowels.
For weathering of water vapor and condensate, it is necessary to provide a ventilation gap between the outer surface of the insulation layer (wind and hydroprotection) and the inner surface of the cladding plates. The gap should be 40-60mm. The maximum size of the ventilation gap is 100mm.
6. Horizontal mounting
Before installing metal siding or facade panels with your own hands, you need to check the plane of the leveling system using a standard rail-rule and install:
- initial bar (when installing metal siding);
- corner elements - outer or inner corners (Fig. 29);
- Framing elements of window and door openings - sloping strips, platbands (Fig. 30-32).
- flashings are installed in the places of planned joints (Fig. 29).


6.1. Installing the starting bar
The initial bar, which secures the first panel of metal siding, is installed along the lower edge of the cladding. It is necessary to install the initial bar strictly horizontally using a level of any type or geodetic instruments (Fig. 28). The distance from the blind area or plinth to the initial bar is at least 40 mm.
6.2. Installation of corners and flashings
Install external and internal corners according to a plumb line or level, fix them to the horizontal profiles of the leveling system, then install metal siding or facade panels (Fig. 29).
In places of planned joints, an additional vertical guide is installed or horizontal guides are mounted between adjacent vertical profiles. The flashing is installed according to the level and attached to the guides with a step of 600 mm (Fig. 29).

6.3. Cladding installation
6.3.1. Installation of metal siding
With a horizontal version, the installation of siding is carried out from the bottom up. Hook the first strip of siding with the base to the initial plank, fasten the top edge with self-tapping screws, starting from its center. Before attaching the siding, make sure it is firmly hooked along its entire length. All subsequent facings are hooked onto already mounted ones and fixed in the same way.
Be sure to check the horizontalness of the mounted cladding. To avoid deformations during thermal expansion, it is necessary to leave a gap of 6-9 mm between the end face of the cladding panel and vertical components.
6.3.2. Front panel installation
In case of horizontal execution, the installation of the facade panel is carried out from the top to the bottom. Fix the first front panel into the U-shaped part with a self-tapping screw. After horizontal alignment, fasten the lower edge with self-tapping screws (fixing S-shaped part). Fasten the top of the panel to each crate profile. The second panel is inserted into the first, while it is necessary to control that the second panel is firmly inserted into the groove of the first along its entire length. Then mount the second panel. Avoid uneven preloading of the panel, this can lead to a violation of the flatness of the facade. All subsequent facings are inserted into the already mounted and fixed in the same way. Be sure to check the horizontality and flatness of the mounted cladding. To avoid deformations during thermal expansion, it is necessary to leave a gap of 6-9 mm between the end face of the cladding panel and vertical components.
6.4. Framing doors and windows
Window and door openings can be framed by: sloping plank, aquilon, platband. A window drain is usually placed on the window sill.
When installing door and window frames, you must first install the top parts, then the side parts.

6.5. Fitting siding around windows
First try on the siding panel so that the edges protrude from both sides of the window opening. Then mark the width of the window on it by adding 6-10 mm. The resulting marks will show the places of vertical cuts. Make a pattern of the horizontal cut. To do this, reinforce a small piece of metal siding near the window and make marks on it 6 mm below the sill on both sides of the window opening, since it is not sure that the level of the window is ideal. Transfer the markings from the samples to the metal siding panel. After that, make the necessary cut.
Similarly, the siding is adjusted to the door frame.
For the facade panel, window framing is carried out in the same way, only the installation direction changes.

6.6 Finishing the installation
The final touch of finishing the house with siding is the framing of the upper edge of the cladding. It can be performed, depending on the situation, with an inner corner (85 * 85; 50 * 50), an upper tide or other components. All of these elements are fastened with visible self-tapping screws or rivets, preferably with fasteners painted to match the closing element. Screw pitch 400...500 mm.

When finishing with a facade panel, the connection to the plinth is made by the upper tide. The top tide is inserted under the front panel or inserted into the panel lock, after which it is attached to each crate profile. If the end of the finish falls on a non-whole panel, the panel cut is closed with an additional element.
7. Vertical arrangement of panels
Depending on the situation, the starting element in the case of a vertical arrangement of metal claddings can be: initial strip, fastening strip, located vertically, corner, as well as slope strips.
The starting element is set according to the level and fixed to the frame of the U-shaped profile. Carry out the frame of the leveling system as shown in fig. 30 and 31.
The final horizontal elements can be: a platband, a slope angle, an upper drainage system. To avoid deformations during thermal expansion, it is necessary to leave a gap of 6-9 mm between the end face of the cladding panel and horizontal components. Framing of door and window openings is carried out in the same way as described in the "horizontal installation" section.


Siding installation video
8. Necessary tools and fasteners for the installation of metal siding or facade panels
For fixing the cladding, depending on the type of leveling system, self-tapping screws with a diameter of 4.2 mm and a length of 16 mm for metal are used; wood screws with a diameter of 3.5 mm and a length of 40-50 mm - for a wooden subsystem.
Mounting of leveling brackets is usually carried out with dowels or anchors, depending on the specific conditions of the object. The rails are fastened to the brackets with rivets or self-tapping screws 4.8*16 mm.
Required tool:
- screwdriver
- Perforator
- Die-cutting scissors
- Scissors
- mallets (wooden, rubber)
- rule
- Level
Installation of metal siding does not require special skills or the use of sophisticated equipment. The process consists of successive stages, in order to achieve a high-quality result, it is necessary to take into account some rules and recommendations. If the sequence of actions is followed, the cladding of the house will turn out to be reliable and durable, and the facade will acquire an attractive appearance.
There are a number of factors to consider when framing:

Necessary materials and tools
To install metal siding, you will need the following:

 The tool needed for wall cladding with siding
For best results, a metal siding subsystem may be used. It is designed specifically for fixing panels and includes a number of elements: a bracket, an L-shaped strip and a Z-profile used for horizontal cladding.
The technology of working with such a subsystem: brackets are fixed to the wall, on which the G-profile is fixed. The design is suitable for vertical installation, for horizontal installation Z-bars are mounted on top.

Preparatory work
Before installing the main coating, it is necessary to perform a number of previous steps:

In parallel, the missing tools and materials are being prepared.
The construction of the crate
When deciding how to properly sheathe a house with metal siding, they take into account that the simplest and most affordable option is to create a frame from standard elements.
Wooden
Due to the fact that a properly fixed crate is a guarantee of the reliability and durability of the coating, the work must be approached very responsibly. Step-by-step algorithm of actions:
- To install the frame, a beam with a section of 50 * 40 or 50 * 50 is used. The material is pre-treated with antiseptics and fire retardants.
- Surface marking is in progress. The main posts must be placed perpendicular to the cladding panels. Lines are drawn in increments of 50–60 cm.
- After drying, the beam is drilled under the screws. The pitch of the mounting holes is from 20 to 40 cm. These fixation points are transferred to the previously marked lines. Holes for dowels are drilled according to the marks with a perforator.
- Racks are exposed and pre-fixed, after which the beam is leveled and substrates are placed under it. Final fixing is in progress.
- For greater convenience, corner posts are set using a plumb line and level. A cord is stretched between them, allowing you to quickly align the remaining elements.
 For the device of a wooden crate, carefully processed and dried timber is used.
 The resulting gaps between the wall and the beam are carefully filled with mounting foam. This will eliminate the appearance of "cold bridges" after laying the heat-insulating material.
metal
Do-it-yourself crate of metal profiles is erected according to the following scheme:
- Marking is in progress. Installation lines are drawn in increments of 50–60 cm. When working with a base - 35–50 cm.
- Fastening of the suspended frame elements is in progress. To do this, holes are drilled according to the marking at a distance of 35–45 cm, suspensions are fixed to the screws and dowels and bent to the desired shape.
- The corner segments are first exposed and carefully aligned along the plane. A cord is stretched between them to align the remaining racks.
 Alignment of the metal frame racks is carried out using a cord that is pulled between the corner profiles
 The assembly of the frame requires accuracy, all parts must be placed exactly on the level and form a single plane.
On a note! Regardless of the method of creating the crate, windows and doorways are lined separately. Racks are placed along their perimeter, forming a closed system associated with the main fragments.
VIDEO:
Hydro and thermal insulation of walls
Sheathing a house with metal siding often involves additional insulation. Various materials are suitable for this, but the most affordable and preferred for self-laying are mineral wool or foam plastic (an improved version of foam).
Thermal insulation and waterproofing are performed as follows:

On a note! If a facade with a ventilation gap is being arranged, then a rail of the required thickness is mounted strictly along the timber frame, and a Z-profile or a similar element is mounted on a metal frame.
Panel mounting
Step-by-step instruction:
- The tide is installed. It is necessary in the presence of protruding sections of the base.
- The starting profile is laid down. If the part is located together with the drain, then it is leveled and fixed directly above the ebb.
 Installation of the starting bar: with and without a low tide
 - When fixing from below, the initial fragment must be installed according to a certain scheme:
- Leave a small distance from the ground or blind area. The initial line is marked, from which 40 mm recede upwards (for standard planks).
- Corner pieces are attached. The starting part should be at a distance of 5–10 mm from them. If it is supposed to be mounted flush, then internal sections are cut out in the corner segments.
- Screws are screwed in the center of the existing holes. The profile is carefully checked for level.
- Docking of fragments is performed with a gap of 6–10 mm.

- Exposed external and internal corner. Since such parts are not always available, a J-profile can be used as an alternative. You can trim the corners with simple decorative overlays.

- If the size of the siding is not enough or decoration is being performed, connecting strips (H-profile) are used.

- The edges of the panel are led around the corner or the corner and the connecting profile and lowered to join the starting element. The part is fixed through the existing holes. Similarly, sheathe the entire area. Each connecting node is checked by level.
- At the final stage, a finishing bar or J-profile is installed on top, depending on the situation. If the panel is cut, then notches are made along its edge that go into the installed profile and ensure the reliability of fasteners.
 The final stage of sheathing the house with metal siding is the installation of the finishing bar, into which the last panel is inserted.
 If it is required to sheathe the roof overhangs, then a soffit is used.
Should know! Finishing the house with a metal L-beam, the components are placed the other way around, since the installation is carried out from top to bottom.
VIDEO:
Decoration of windows and doors
It is possible to clad window and door openings from the outside in several ways, identical for all structures.
The first option is the simplest: the siding is trimmed and fixed along the edge of the installed frame parts, solid strips are attached above and below, a low tide is installed, and slopes of a suitable material are set.
You can make such a design with the help of accessories for siding. To do this, first a profile is laid on the inside, and a near-window bar on the outside.

Similarly, work can be done with the help of platbands, which are installed with a shallow opening. They must be fixed on the outside, after cutting off the corners at 45 degrees. Then you should assemble the structure framing the opening.
Metal siding is a cladding panel made of high quality alloy steel and decorative polymers.
Installation of metal siding is a completely standardized process, carried out according to the instructions and can be done by hand, without resorting to the services of specialists.
Today, this material is very often used for finishing the facades of both residential buildings and industrial or commercial buildings.
Its widespread use is due to the high bar of technical characteristics and ease of installation on the surface.

Standard Finishing Kit Set
There are three main types of panels:
- perforated;
- smooth;
- curly.
A popular variety of curly type is, which has an attractive appearance, good technical characteristics and a fairly high service life.
In addition, siding can be installed in both horizontal and vertical orientations, depending on how the technology for installing a particular finishing material provides.
Any panel of metal siding, regardless of its shape, is equipped with a mounting (joining) bar with special technological holes for self-tapping screws. Another fastening element are locks for docking with nearby planks.
In addition to the main siding panels, the finishing kit may include the following elements:
- start and finish bars;
- profiles for installation around windows and doors;
- ebbs and slopes;
- corner panels.
The technology for their manufacture is similar to the technology for the production of conventional panels.

Facing coating consists of the following technological layers
Each canvas consists of the following layers:
- Base made of stamped galvanized steel, up to 0.7 mm thick.
- Protective anti-oxidation and anti-corrosion coating.
- Primer layer.
- Polymeric protective and decorative coating - can have both a uniform color and a natural texture of wood or stone.
- Lacquer coating - can be matte or glossy, applied over a polymer coating.
Preparation before installing metal siding
Do-it-yourself metal siding installation begins with preparatory activities, which include the following steps:

Do not cut metal panels with an angle grinder. Heating the disk will lead to the destruction of the polymer and protective layers, as a result of which the metal will corrode.
Next, the preparation of the facade and the installation of metal siding with your own hands follow - the instruction involves a detailed description of each stage. Preparation of the facade includes cleaning it from plants, mold, as well as removing all structures and old cladding. After cleaning the facade, everything is ready for the installation of the crate.
Installation of the carrier lathing on the surface of the facade
To perform high-quality installation of metal siding, it is necessary to properly equip the carrier crate. For its installation, you can use wooden slats, or a metal profile.
The wooden crate is exposed to moisture - the damage is caused not so much by the direct effect of water, but by the subsequent drying of the wood, which can occur with a change in the size of the laths. As a result, the entire structure can lead, as a result of which the facing coating is deformed.
The use of a metal profile avoids such consequences. The profile for metal siding is installed using a building level and a plumb line - all elements must have a strict horizontal or vertical orientation.

Bearing frame for metal profile cladding
The revealed differences in the facade are eliminated by installing special metal brackets. Ultimately, it is necessary to achieve a flat plane of the crate. The largest step of the crate is 400-600 mm. The deviation in one direction or another in this gap depends on the location of the facade - for example, near door and window openings, the step should be smaller.
When choosing a specific step, one should also take into account the fact that a heater will be installed in the crate, the plates of which have a certain size - therefore, it is important to take this moment into account so that the installation of one of the standard sizes of the heater is possible. A border is mounted around doors and windows, to which additional elements will be attached.
Insulation bookmark
If metal siding is carried out in a region where cold winters prevail, the installation of insulation under the siding is mandatory.

General scheme for installing metal siding on the surface
Finishing with metal siding is not complicated by this - the insulation is simply laid between the elements of the crate. Do not forget to attach the insulation to the walls with self-tapping screws or dowels.
On top of the insulating material, waterproofing must be applied. The latter is attached using a construction stapler. At the joints of the film, it is desirable to place strips of adhesive tape to reduce the likelihood of moisture penetrating inside.
Features of metal siding installation

Trimming of the cladding should begin from the side of the perforated holes for fastenings
Having carried out all the preparatory measures, you can directly proceed with the installation of components and metal siding sheets.
The installation scheme is not particularly complicated and consists of the following steps:

Usually, whether it is the installation of metal siding with your own hands or with the involvement of third-party workers, there should be no problems. The installation technology prescribes the strict implementation of a certain set of actions. It is only important not to forget about some of the nuances and carefully monitor the finishing process.
Siding is the most common facade material and has several varieties. One of them is metal siding.
Peculiarities
Metal siding is a facade cladding material in the form of panels used to protect and decorate exterior walls. The basis of the material is alloy steel, and the weather resistance and attractive appearance are provided by a special polymer coating. An obligatory element of the material is an anti-corrosion layer, thanks to which the material does not rust and does not collapse under the influence of moisture.

Metal siding is weather resistant, it has high frost resistance, and is not afraid of exposure to UV rays. Compared to the vinyl counterpart, it is more durable and resistant to mechanical damage, has a longer service life (50–70 years).
The material is bioresistant, non-combustible, environmentally safe. It has more weight compared to vinyl, so in some cases it is necessary to pre-strengthen the walls, as well as search for assistants for installation.

Kinds
Currently, there are several types of metal siding on the construction market.
- "Ship board". The panels have a smooth wooden surface similar to that of a ship's deck. Decorative cracks can go along the tree, textured pattern, which makes the imitation more realistic.
- "Herringbone". Smooth siding that has a slightly protruding and curved bottom. Visually, it looks like a wave running on the shore (a flat surface and a bend bent downwards). There can be from 1 to 3 such “waves”, which affects the appearance and width of the material.


- "Block house". The metal in this case imitates a log, that is, its outer surface is convex, represents hemispherical elements. It can also have various shades, ranging from light (for example, “bleached wood”) to dark, almost black (“cherry”, “wenge”).


- Stone siding. Represents the panels imitating a natural stone surface. The most popular models have gained such models as imitation of slate, pebbles, marble, granite.


- Brick siding. Such panels imitate brickwork. As a rule, the size of the "bricks" corresponds to the real one, so the surface looks as natural and spectacular as possible. The imitated brick can be smooth or textured, have a slate coating, as well as a glossy finish. Separately, it is worth mentioning panels with imitation of aged brick.


Depending on the place of application, siding is divided into wall and basement. The latter is used in the basement area - the part of the house between the foundation and the facade. As you know, this zone is most susceptible to mechanical damage, freezing, exposure to moisture and chemical components, soil heaving.

All this leads to greater strength and thickness of the basement siding. Its height usually corresponds to the height of the plinth (typical dimensions 40-60 cm), outwardly the panels are rectangles. This form is most convenient for installation in this part of the house.
For covering horizontal surfaces, a special type of metal siding is used - soffits. Such panels can be perforated (provide additional ventilation and moisture removal) or be smooth.


To simplify the process of building a warm facade allows the use of insulated metal siding. Such panels have a metal base, to which the required layer of insulation is fixed at the factory, on top of it - an inner protective layer, the outer part - a polymer layer. The use of heat-insulating panels eliminates the need for additional installation of a layer of insulation and wind protection.


Depending on the features of the formed pattern, horizontal and vertical siding are distinguished. The latter allows you to achieve the original appearance of a sheathed house, but is used infrequently due to a possible violation of the tightness between the joints and moisture getting into the gaps. If vertical siding is used, then it is combined with horizontal.


Preparatory work
To cover the facade with siding, you should prepare in advance the required number of panels, additional elements, as well as fasteners - usually these are galvanized self-tapping screws.


If you have to fasten the elements through the panel (which is not recommended, because it leads to cracking), you should use galvanized self-tapping screws with a seal. In this case, a rubber seal will prevent moisture from penetrating through the space around the screw. Instead of self-tapping screws, you can use nails, but only galvanized ones.
Finally, you should purchase repair paint for metal siding in advance. It will provide anti-corrosion protection of the material in case of damage to the outer layer, and will also be needed to process the places where the panels are cut.


Proper installation involves pre-cutting profiles and additional elements - this will speed up and simplify the direct fixation of the siding. You can cut the panels with scissors or a metal saw. But the use of a grinder, even with a special nozzle, should be abandoned, since its use often causes damage to the front layer and, as a result, increases the risk of panel corrosion.
In the process of work, it may be necessary to create additional holes, so it is logical to prepare a puncher. A screwdriver is needed for screwing in self-tapping screws. If nails are used, then a hammer is indispensable. You can screw in self-tapping screws with a seal using a drill with a special nozzle.
You can align profiles and other elements using a level. In addition, you will need a square, a plumb line and a tape measure. To prevent scratching of the outer layer of the material, the use of a fabric or silicone tape measure, as well as a plastic or wooden square instead of a metal one, will allow.

The surface of the facade itself does not need much preparation. It will be enough to remove the old coating (you can not remove the "contact" coatings), close up large gaps and reinforce crumbling parts. Since the installation is carried out on a subsystem, it is possible not to carefully align height differences and minor defects.
At the stage of preparation for installation, it is necessary to mount the crate on which the wall panels will be attached. Such a base is assembled from galvanized profiles, which are laid in horizontal and vertical directions with the help of anchors.
There is also an option for a lighter but less strong and durable wood frame. It is made of dry (moisture content not more than 14%) wooden blocks measuring 50 by 50 mm. Before the logs are mounted in the subsystem, they are impregnated with flame retardants and antiseptics.


Installation
Installation of metal siding does not differ in increased complexity - it is quite possible to do it yourself. In this case, you do not need to have the skills of a professional builder: step-by-step instructions for the material usually quite clearly outline the general principles for installing siding.
You should start from the starting bar. It is mounted at a height of 30-40 cm from the lowest point of the object in relation to the horizon. The location of the remaining elements depends on how even the starting bar will be. In this regard, it is better to spend more time carefully leveling this element than to try to correct the skewed wall panels in the future.
The starting bar is fastened in increments of 30-40 cm. Further, panels can be mounted on these guides. However, professionals advise first to fix the components (additional elements) for the design of complex corners. At the same time, the distance between the self-tapping screws is reduced to 20-30 cm, which is a guarantee of high-quality fixation of more complex configuration elements of the system.


After complex corners are framed, you can immediately mount the profiles framing window and door openings. It is more convenient to do this also with the help of special additional elements: low tide strips (platband), slope strips. The first is selected taking into account the width of the opening, the second is attached at the bottom of the opening.
After all the complex elements are mounted, they begin to install wall panels on flat sections of the facade. The installation step is 20–30 cm. Unlike vinyl siding, joining metal siding does not imply maintaining gaps, since it has an insignificant expansion coefficient. The butt joint is sometimes left only in order not to damage the front layer of the material during laying, as well as in the case of installation work at zero or negative temperatures.


The hardware should be inserted into the middle of a hole specially designed for it. Fastening should be carried out from top to bottom, from the center to the edges. Adjacent panels are joined by means of a locking mechanism. Connect them until they click. If necessary, the lower part of the panels can be slightly knocked out with a mallet until a characteristic click is heard.
Every 3rd row is recommended to be checked with a level. The permissible deviation should not exceed 2%. The installation of the last panel is carried out using the finishing strip. It is attached above the penultimate row of siding, after which the wall panel is cut to the desired size. On one side, it joins and snaps into place with the penultimate row, the other side is wound into the bend of the finishing bar.
Installation work is being completed by installing spotlights on the area of cornices, overhangs, gables of the building.

In the conditions of the domestic climate, metal siding is combined with thermal insulation of the facade, the technology of a ventilated facade is used. In this case, a layer of insulation is laid on the surface of the walls between the frame elements. Its edges should fit snugly against the elements of the frame, otherwise the formation of "cold bridges" in these places cannot be avoided.
Mineral wool insulation is usually used (it is better to give preference to more moisture-resistant stone wool) or polystyrene foam (here it is preferable to make a choice in favor of extruded polystyrene foam, which has higher performance properties compared to polystyrene foam).

In the case of laying insulation in 2 rows, it is necessary to ensure that the joints of the first row do not fall on the gaps of the second row. In other words, the second row should be laid with a slight offset in order to eliminate the risk of the formation of "cold bridges".
The next layer is waterproofing and windproof. For it, a superdiffuse membrane or a conventional waterproofing film is used. It is sold in rolls and overlapped. The joints, as well as accidental damage, should be glued with adhesive tape.
The insulation is first fastened with temporary plastic dowels, after which, together with the waterproofing film, it “breaks through” with a plate-type self-tapping screw. Enough 2-3 screws per sheet of insulation, one of which should be installed in the center.

The work is completed by installing siding panels on the battens. At the same time, an air gap (3-5 cm) should be maintained between the insulation layer and the cladding. You will see how to sheathe a house with metal siding with your own hands in the next video.
- When sheathing a brick building, it is important to ensure that the dowels do not fall into the masonry joints. It is unacceptable to drill hollow blocks and bricks.
- Soft insulation (mineral wool, for example) is better to take 0.5-1 cm wider than the pitch of the crate. Excess material will easily bend, “fit” to the existing width. Share with your friends