How to make mushrooms for the garden with your own hands. Mushroom from plastic bottles and papier-mâché The easiest crafts in the kindergarten fungus
Do-it-yourself "mushroom" craft is suitable for landscape design, decorating playgrounds and corners. Installed on a suburban area, it allows you to feel a special closeness to nature. Such “mushrooms” are made from various materials, and people of different ages are fond of such creativity. The shape of the craft is suggested by nature itself, but you also need to show imagination when choosing a method for making it.
Crafts for suburban areas
One of the most popular areas of decor in landscape design is the creation of various compositions from artificial mushrooms. Individual figurines or mushroom families are suitable for giving, for a garden — whole mushroom fields. Crafts can be of different sizes and colors. It is important that they harmoniously fit into the concept of the overall design of the site.
tree stumps
Often, stumps located on a suburban area create problems for the owners, violate the harmony of the appearance of the territory. However, with a special creative approach, they can become additional design elements. The final compositional solution depends on the size of the stumps and their location. You can offer the following options:
- Fly agaric from birch stumps. White bark naturally imitates a leg. It is enough to fix a red plastic bowl on top and draw white circles on it.
- From a large stump, you can make a funny mushroom, which the child will undoubtedly like. It is necessary to remove the bark as much as possible and clean the surface with sandpaper. A laughing muzzle is drawn with a brush (no special artistic skills are required for this). It is important that a cheerful character appears. A basin is put on top of the stump, it is painted with brown acrylic paint.
On a stump of a sufficiently large diameter, a mushroom family can be located. Its cut is painted with green paint or covered with moss. Small mushrooms from rounded stones are planted on a mini-clearing. For the legs, pebbles of a light shade are selected. Hats are best painted in a bright color.
"Concrete Mushrooms"
Country crafts can be made of concrete. For this, a solution is prepared from a mixture of cement, sand and gravel in a ratio of 1: 3: 3. With water, it is brought to the consistency of thick sour cream. A mushroom is assembled from 2 parts - a leg and a hat. Both parts are made by pouring mortar into molds.
When making small mushrooms for a hat, you can use bowls of different depths, halves of rubber balls and other hemispheres. For very tiny products, a cup is suitable. Large hats are made using basins. The most common stem shape is a plastic bottle with a cut neck. When pouring the leg, a metal rod should be placed in the center, the end of which emerges from the concrete from above. A hat is then attached to it. Such reinforcement increases the strength of the product. The final operation is painting. Usually the leg is painted white, and the hat is painted brown, red, orange, etc., depending on the type of mushroom.
The use of mounting foam
Mounting foam is widely used in the manufacture of crafts. Mushrooms can also be made from it. The photo shows a simple version made without casting molds. The mushroom is simply molded from numerous layers of foam, with each successive layer applied after the previous one has cured. A knife is used for shaping. The surface even after working with a knife remains uneven. This disadvantage is covered by applying a laughing face with a large nose and large eyes to the leg.

The primer of the workpiece allows you to create more attractive forms. First, with the help of a knife, the excess mass is cut off and a characteristic shape is cut out. Then putty and primer are applied to level the surface and ensure the correct geometry. Finished with acrylic paint.

wooden crafts
Almost any type of mushroom can be made from wood. The photo shows mushrooms. To make them, you need a hacksaw, a chisel, an ax, a knife, a hammer, a file. If you use a grinder and a grinder, the work will be greatly simplified. The base for the mushroom can be made in the form of a saw cut 3-5 cm thick. The legs and hats are rounded with an ax, a knife and a file. Details are painted and fastened with wood glue. You can securely connect them with nails or screws.


Bright chanterelles made of wood look spectacular on the site. Each mushroom is assembled from 3 parts:
- A short leg is a cylindrical segment of a tree trunk of small diameter.
- cone part. It doesn't have to be symmetrical. Usually the mushroom has a displaced axis, which should be reproduced. Longitudinal grooves are made on the surface of the cone.
- Hat. It is made in the form of a saw cut of the trunk of an arbitrary shape.
Completes the coloring process. The leg and cone are painted orange, and the hat is yellow. Chanterelles can also be made by combining wood and polyurethane foam. A leg is made of wood, and a cone and a funnel-shaped hat are formed from layers laid in a circle (with a gradual increase in diameter upwards).

home crafts
At home, the “mushroom” craft can be done with the child. It is characterized by simple design and simple manufacturing technology. Children's mushrooms are small in size and are made from affordable, pliable materials.
plasticine mushrooms
A child can take a plasticine craft to an exhibition in his kindergarten. A flat cake made of green plasticine is used as a base, grass is imitated on its surface (it should go on the legs of mushrooms). 3 cylinders of white mass are rolled - legs. Round lumps of brown plasticine become hats. All parts are connected, and the mycelium is ready.

Teenagers can also do this kind of work. At the exhibition at the school, you can imagine a whole "fabulous mycelium". In it, each mushroom is a fairy-tale hero. The main thing is to be able to create the faces of the figures. The craft requires certain skills and accuracy, and if you approach the process creatively, the result will be very original.
Mushroom made of cardboard and paper
A simple fly agaric is made from a disposable paper plate, cardboard and cotton wool. Production order:
- A cylinder is rolled up from white cardboard - a leg. The ends are neatly glued together.
- The plate is cut from the edge to the center, a cone shape is created.
- From below, the paper cone is filled with cotton wool, it is glued to the paper.
- The hat is painted red, and then white paper circles are glued onto it.
- The base is made of thick cardboard. A layer of cotton wool, painted green, is glued to it (you can use green paint).
After gluing all the details, see the result of the work. 
Mushroom from a jar
An original children's craft is obtained from a small glass jar. It is made as follows:
- The glass jar is painted white or beige.
- A strip is cut out of green fabric. On one of its edges, cloves are made. The strip is glued at the very bottom to the bank. You can attach paper flowers to it.
- A red cloth is stretched over the lid of the jar. A synthetic winterizer or cotton wool is placed under it until a characteristic rounded shape of the hat is given.
If the mushroom should become a fly agaric, then white circles are glued to the hat.

nature tells
Elementary crafts can be made from acorns and chestnuts. They will need large acorns and ripe (brown) chestnut fruits. Hats are separated on acorns, and a chestnut is glued in their place. Several of these mushrooms create a beautiful mycelium. It can also include very small fungi. They can be imitated by an acorn with a completely removed branch. The hat can be tinted with brown paint.

Making crafts in the shape of mushrooms is a fascinating art. In addition, these simple figures are able to transform the space around, for example, the landscape of a summer cottage, a playground. Such a craft can be the first step to mastering useful skills. And will give the opportunity to present their abilities at exhibitions in kindergarten or school.
Dear friends, we invite you to make your garden plots even more attractive. If you like to create interesting products, then this article is made for you. Today we will talk about how you can make mushrooms with your own hands. It is worth saying that this craft is very simple in its execution. And landscape design thanks to such products will become even more beautiful.
Ideas for mushrooms to give
But now it's time to show you craft mushrooms for summer cottages. There are several options for creating them. So, the first option for creating a mushroom is the simplest. Surely, on your site there are stumps that were left after you cut down the trees. So, hats are worth adding to such stumps. Basins can be these hats. Of course, they must have the same size as the penalty. Additionally, stumps can be decorated with bright colors. And if there are no such stumps on the site, then use the log cabins, which are placed in those places that require decoration.


Mushrooms can be created from other handy materials. In this case, pots and pieces of pipes will fit. Such materials can be searched in your attic or in the barn.

Another option for creating mushrooms is concrete mushrooms. This option is difficult. To create such a work of art: you need to prepare a solution that will contain sand and cement. You will also need forms in order to make these mushrooms. It's not worth buying them. For example, to create a hat, use a basin. You can also use half a ball or a construction helmet. In order to make a leg, use a plastic bottle. And with the help of a metal pipe, you can connect the hat together with the leg.

Mushrooms can be decorated, and not left in their original form. For example, a hat can be laid out with mosaics or pebbles.


The third option for creating a mushroom is its creation from polyurethane foam. Garden crafts are often used to create country crafts. For such a fungus, a base is required. However, to create mushrooms, you will need all the same elements: a bowl and a plastic bottle. Although the form in this case does not play a significant role. In order to get a mushroom, you will have to use more than one layer of polyurethane foam. 

There should be a lot of foam layers. But before applying the next layer, it is necessary to allow the previous layer to dry well. Then, with the help of a clerical knife, the already dried foam should be formed into a mushroom. And at the final stage, the bend is primed and painted.

Option four is a mushroom craft made of wood. In this article, we list mushroom crafts for you and offer their photos. As you can see, you can easily make them yourself. With a little effort, a piece of wood or an ordinary log will become a beautiful craft. To process a wooden surface you will need: a grinder and a chainsaw. Nor does it require skill. But if you do not work hard, you get an unusual product.


DIY mushroom crafts
Fungus.
Now you know how to make a mushroom with your own hands. But the mushroom craft for the home also looks interesting. And you can involve children in its creation. To make such a mushroom, take:
- Scissors, PVA glue;
- Popsicle stick, as well as colored paper.
Progress:
- From a red sheet of paper it is worth folding an accordion. Each step in this case should have a size of 5 mm.
- The top is cut off from the top of the accordion. As a result, you should get a dome.
- The leaf is straightened and the stick is glued to its reverse side.
- The piece is flipped. Circles are cut out of white paper. These circles are glued to the cap of the fungus.
- To make the fungus funny, you need to cut out eyes for it. Then a mouth is cut out of red paper.

Mushroom from a plastic plate.
Children's crafts mushrooms also look interesting. The materials here may be as follows:
- Disposable paper plate and cardboard sheet.
- PVA glue, brushes and paints, cotton wool and a clothespin.
Progress:
- From the plate it is worth making a small fold. At the same time, it is worth giving it a slightly convex shape.
- The fold is smeared with glue. Then it is fixed with a clothespin and wait until the plate is dry.
- Make a roll out of cardboard, which will be the leg of the mushroom. The glue should dry on a plate and on a roll.
- The plate is painted with red paint.
- Now it’s worth tearing the cotton wool into pieces of different sizes and sticking it on a plate that has not yet had time to dry. As a result, you will get a hat that will resemble a fly agaric with all its appearance.
- At the next stage, a cardboard roll is painted. Then the top of the roll is smeared with glue and glued to the plate.
- Now the fungus just needs to dry.

Clothespin-mushroom.
The next craft is not only a decorative element. Turns out it can be useful. For example, from such fungi you can make a garland and attach photographs to them. So, to make it, take:
- wooden clothespins,
- glue gun,
- white beads,
- white fleece,
- thick rope.
Progress:
- A figurine is cut out of the fabric, which in its shape will look like a mushroom cap.
- Mushroom caps are decorated with white dots. You can glue beads or cut circles out of fabric.
- Finished hats are glued to the part of the clothespin that everyone is holding on to open it.
- Pass the thread through the holes in the clothespins.
- The bows are tied at the ends of the thread.

Plasticine mushroom.
If you decide to make a mushroom craft, then use plasticine. This craft is a great option for competitive crafts in kindergarten.
To make a mushroom, plasticine is taken and softened in the hands. Then the plasticine is rolled into a tube. Further, a ring is cut off from the material with a knife, which will be 1 centimeter. This circle is rolled into a pancake. A little more plasticine is cut off from the tube. Roll up the leg, which is further attached to the hat. In order for the craft to look finished, you need to make grooves on the inside of the pancake.

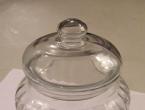
Glass mushroom.
DIY mushroom craft for kindergarten looks bright and original. To make it, take:
- Glass jar with a lid of any size.
- Felt fabric in different colors.
- PVA glue or cool gun.
- A synthetic winterizer or cotton wool, paints and a brush, as well as scissors.
Progress:
- The jar itself is painted in beige or white.
- The bank is wrapped with a green cloth from below. Blades of grass are cut out on one side of the felt. After that, the grass is also glued around the jar.
- A red fabric is laid on top of the lid. A synthetic winterizer comes up under it in order to form a tubercle, like a fungus. It is worth making sure that the edges of the felt fabric are wrapped under the lid.
- Figures are cut out of felt of various colors. They may look like flowers.
- It is worth cutting out a few more circles that will serve as cores for the flowers.
- Strips are cut out of green felt, which should be thin. These are blades of grass.
- To make a caterpillar, circles of different colors are cut out of the fabric.
- At the next stage, all the elements are glued to the bank.

How to make mushrooms from natural material.
In our article you can see a photo of mushroom crafts. Indeed, we have prepared a lot of interesting things for you. In addition to all those products that we offered you to make mushrooms, you can make them from natural materials, which you can meet very, very much in the fall. In order to build mushrooms, you need: chestnuts and acorns. They are connected to each other by means of a cool gun.
Progress:
- The acorns are separated from the caps.
- And in place of the hat, a chestnut is glued in the middle.
- In order for your fungi to gain stability, attach the back of an acorn cap to them. The resulting mushrooms are installed on a plate or plank. And they scatter straw around them.

Finally
As you can see, there are a lot of mushroom crafts that you can simply make yourself. Just turn on your imagination and stock up on what you need. Involve the kids in this activity and create wonderful products with them.
Mushroom crafts for children's creativity. Step-by-step ideas on how to make mushrooms out of paper, rolls, chenille wire and other materials.
The best options for mushrooms in different techniques, collected in the TOP with links to detailed step-by-step reviews. All works within the site.
DIY mushroom crafts for children's creativity
Fly agaric mushroom in the technique of trimming

A useful technique for children, although a little time consuming. But the mushroom is obtained with a beautiful voluminous hat of interesting texture.
Paper fly agaric with a voluminous hat

Another interesting technique for creating a mushroom cap. Consists of several circles folded in half and glued together. The mushroom is supplemented with grass and eyes, which will especially appeal to children.
Fly agaric from paper tubes

The whole mushroom craft is essentially strips of different widths and lengths. The hat is filled with small strips twisted into a tube. The work is painstaking, but the result is worth it.
Mushroom made of paper with a cone hat

Great craft for kids. Various techniques useful for children are involved here: rolling a roll, creating a wide cone, paper grass with a fringe.
More:
Fly agaric accordion

A simple craft, maybe an applique. The mushroom cap is made using the paper accordion technique, which is popular in children's art. A rectangular piece of paper is turned into small folds, then the halves are glued together to make a hat.
DIY mushroom crafts using origami technique
Boletus origami

Simple, fast and interesting. Exactly what you need for activities with children. The main thing is to stick to a step-by-step review with a photo and you will get a pretty mushroom.
origami fly agaric

Classes with children on the autumn theme can be exciting if you fold such a bright fly agaric using the origami technique. It is not difficult at all, especially with the presence of step-by-step instructions.
More:
Fly agaric from fluffy wire

All children like to work with chenille fluffy wire. It is a pleasant to the touch material, malleable and colorful. Check out the detailed photo review to make such a bright fly agaric.
This is not all do-it-yourself mushroom crafts. The collection will definitely be replenished with new ideas in different techniques.
Master class with step by step photos. cotton mushrooms
Chernikova Natalya Valentinovna, educator of MBDOU d / s No. 24 "Polyanka" of the combined type, Kstovo, Nizhny Novgorod RegionThe master class is designed for teachers and parents.
Purpose: as visual material for demonstration in class; as attributes for attractions or when decorating for the autumn holiday.
Target: making dummies of mushrooms with your own hands.
Tasks:
- arouse interest in the manufacture of mushrooms in this technique;
- develop creative abilities
I was born on a rainy day
Under the young aspen
Round, smooth, beautiful,
With a thick and straight leg (mushroom)
What is there in the toy store! But buying mushrooms is a problem. This means that they must be made by hand. Let's try.
To work you need:
Sheets of cardboard
Gouache
Brush
Scissors
cotton wool
long nails
Starch
Tea bags
Universal varnish for wood

Step by step workflow:
1. We take cardboard and cut out circles of the desired diameter. The size of the mushroom cap depends on the size of the circles.

2. Take a nail and pierce a circle in the middle. Depending on the length of the nail, the length of the leg will be determined.

3. Take a bag of starch, a bowl and prepare a starch paste. Dilute the starch with slightly warm boiled water to the consistency of thick sour cream. We boil water in a teapot and pour it into the starch “dough” in a thin stream, intensively stirring clockwise. We get a liquid homogeneous mass. As it cools, the mass thickens.
Advice- it is better not to take a lot of starch so that the paste is watery. Such a paste is more convenient for work.

4. We take a lump of cotton wool, dip it in the finished paste and put it on a circle with a nail.

5. Then we take cotton wool, grease it with plenty of paste, put it in layers on top, forming a mushroom cap and, gradually moving to a nail, forming a leg.

6. We try to express in each mushroom its characteristic features by smoothing, leveling irregularities, thickening or building up the necessary parts.
Advice- adding each layer, cotton wool should be carefully lubricated with a paste.

7. Leave to dry near the battery. We make sure that the mushrooms dry evenly. Mushrooms are very heavy and under weight can deform the hat.
Advice- so that this does not happen, every now and then we turn them over from one side to the other.
For complete drying, 2 days is enough. At the end of drying, the mushrooms become light.

8. We paint with gouache and a brush.

9. Lubricate the legs of the mushrooms from below with a paste and sprinkle with tea leaves, imitating the earth.

10. We cover the mushroom caps with a universal varnish for wood.

Finished result
You can use riddles about mushrooms, mushrooms themselves will serve as clues.

Come on guys
Solve riddles!
About interesting gentlemen
In beautiful fashionable hats,
who live in the forests
And they love the pine scent!
Look how good!
Red hat with polka dots
Lace collar -
He is not new to the forest! (fly agaric)
Strong, dense, very stately,
In a brown and elegant hat.
This is the pride of all forests!
The real king of mushrooms! (White mushroom)
I do not argue - not white,
I, brothers, are simpler.
I usually grow
In the birch grove boletus)
White column under the aspen,
Yes, a barrel of oranges.
And you don't take it carefully
And leave traces of stains (boletus)
Mushrooms can be used for viewing with children, identifying the parts of the mushroom, naming the color of the cap, and introducing the names. Give the concepts of "edible" - "inedible mushrooms." Can be used as part of GCD or entertainment, as a game exercise "Collect mushrooms", "Find an extra mushroom."
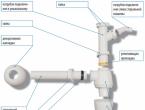
How to make mushrooms from polystyrene foam and polyurethane foamDo you want to make a decoration for your garden with your own hands, which you can then move to the windowsill? I suggest you make mushrooms in one of the ways described below: from polystyrene or polyurethane foam. And also, below there is useful information from which you will learn how to clean your hands from mounting foam
And here are foam plastic hedgehogs, with needles from barbecue sticks


So, we are watching two master classes on creating decorative mushrooms from polystyrene foam and polyurethane foam. By the way, mushrooms can also be made of concrete, then they can be safely left in the garden. Making mushrooms out of concrete is as easy as shelling pears, a solution is prepared from sand and cement, in proportion, as usual for construction, then the concrete is poured into molds. For a hat, you can use a basin or a rubber ball, and for a leg - a plastic bottle. Concrete mushrooms can be painted, it is good to use spray paint, you can decorate with mosaics. And yet, useful information for those who are engaged in construction and concreting. You can purchase all kinds of additives, synthetic fiber and polypropylene fiber for concrete from the manufacturer from the Alliance company. On the company's website alliance-ltd.narod.ru you can learn about the ways of using polypropylene fiber and read reviews from consumers.
How to make mushrooms from polyurethane foam. Master class from Elena Shlyapchenko

We will need a plastic bottle for the leg of the mushroom (you can pour water or pour sand inside the bottle, for stability)), the author used a candy box for the hat. We foam the mounting foam in layers so that each one dries well

I "planted" the hat on 4 nails and foam (everything is holding). We shape it with an ordinary clerical knife. Then I foamed all the holes that appeared and cut them off again.

First, I primed it with wallpaper glue (there was nothing else at hand), then with facade plaster (I didn’t find putty).

The top is dry, we process the lower parts

Now acrylic primer

First covered with white acrylic paint for facade work.


Mushrooms can also be cut out of foam

The easiest to process is polystyrene (unfortunately, not very durable), it is better to make it from polyurethane foam, but .... these are blanks

More like mushrooms.

For the first time, we cover with putty - carefully hide the foam. With toothpicks we attach the fallen off hats, on the putty - it holds well!

The next day, we sand with sandpaper and putty clean


Let's go paint - legs, the paint is still the same - acrylic

Once again I was convinced - you don’t have to throw anything away - how useful the egg packaging was!

We direct all colors with colors for whitewashing

Give natural shades


And this is a reminder - you can not cover the foam plastic with nitrolac !!! Oil only!


And some more useful information: how to wash mounting foam by hand
Instruction
1 If the foam has not yet had time to harden, then it will be quite simple to remove it. Take a special solvent, which is usually offered by the same suppliers whose production you bought the foam or regular acetone. Carefully remove the foam with a cotton or soft cloth until all residues are washed off. It is important not to miss any contaminated area, as the dried foam will be very difficult to clean off.
2 If the foam has already hardened, then neither acetone nor solvent will help you. The manufacturers themselves write that the frozen foam can only be cleaned mechanically. Thoroughly smear your hands with a greasy cream to reduce the aggressive effect of cleaning as much as possible. Take a stiff brush, lather it up and scrub the lather from your hands. If this does not help, then scrape off the foam with a pumice stone or soft sandpaper. Remember - despite the cream, you need to rub very carefully so that you do not remove the skin along with the foam. Before rubbing off the foam, hold your hands for 10 minutes in warm (almost hot) oil or steam it properly in hot water. This will speed up the foam removal process.
3 Small pieces of mounting foam, which in any case still remain after all the above procedures, pick off the skin by hand, with your own nails. Nothing more effective than this has yet been invented! Keep in mind that the process of removing dried mounting foam is a long and dreary procedure and can take up to an hour. The main thing is not to overdo it, and after cleaning is completed, be sure to once again lubricate the skin with a fat cream or make an oil bath.