Formwork for pouring between floor slabs. Concrete floors.
Filling a monolithic interfloor overlap is not the easiest, but really universal and time-tested method. In this article we will talk about the main structural features and stages of the flooring device, as well as the types of formwork, including non-removable.
Typology of buildings and scope
Main scope monolithic floors are buildings with load-bearing walls of brick, block masonry or concrete panels, as well as domed houses. The requirements for the monolithic overlap may be due to:
- non-standard floor plan;
- the need to significantly increase the bearing capacity of the floor;
- increased requirements for hydro and sound insulation;
- the need to ensure free layout;
- reduced interior decoration costs.
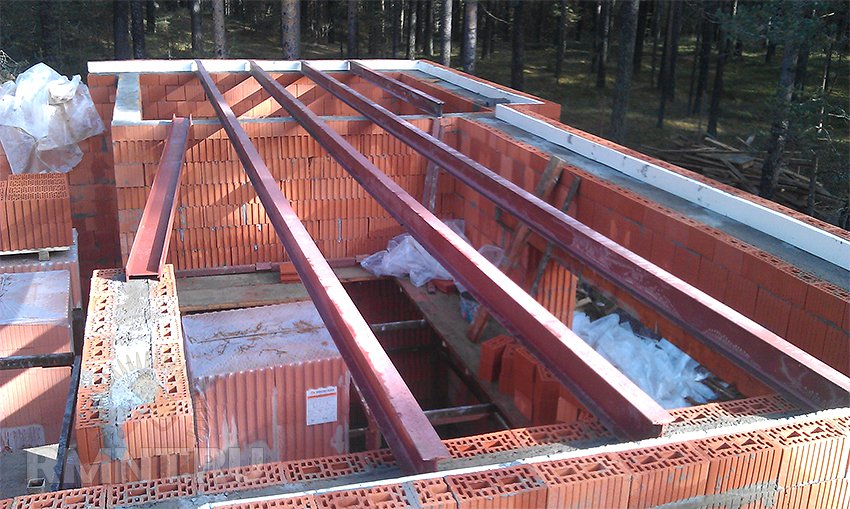
Filling is carried out, as a rule, after the completion of the walls of the first floor. However, it is possible to pour monolithic ceilings already in buildings with a roof, if required by weather or other conditions. In this case, I-beams are mounted on the bottom floor masonry and around the perimeter bearing walls fill the crown to the height of the overlap. Also, to strengthen mechanical ties, 40-50 cm of embedded reinforcement is produced from the inside of the crown. Its total section cannot be less than 0.4% of the section of the longitudinal section of the crown.
Design calculations of the supporting structure
When choosing the span length, you should correlate it to the plate thickness as 30: 1. However, with self-designing, it makes little sense to make an overlap thicker than 400 mm, since the bearing capacity of a structure increases along with its own weight and static stresses. Therefore, the allowable load on self-made floors rarely exceeds 1500-2000 kg / m 2.
The situation can be corrected by the inclusion in the supporting structure of I-beam steel beams laid on the concrete surface of the masonry of the bearing walls. Another way to increase the span while maintaining relative freedom of layout is to lean the ceiling on the columns. With a thickness of a monolithic structure of up to 400 mm and a span in four directions from columns to 12 meters, the cross-sectional area of \u200b\u200bthe support is 1-1.35 m 2, provided that the cross-section of the embedded reinforcement in the column is at least 1.4%.
Calculation of reinforcement of a monolithic plate
In general, the thickness of a plate is determined by the amount of reinforcing steel that is embedded in it. The reinforcement density, in turn, depends on the maximum permissible load and resistance to cracking. Avoiding special cases, we can give a general example of a design that demonstrates full compliance with regulatory requirements with a sufficiently high margin of safety.
In private construction, reinforced concrete is reinforced with reinforcement with a periodic profile of class A400, aka A-III.
Diameter of rods in plates thick:
- up to 150 mm - not less than 10-12 mm;
- from 150 to 250 mm - not less than 12-14 mm;
- from 250 to 400 mm - not less than 14-16 mm.
The reinforcement is laid with two grids with a mesh size of 120-160 mm, the thickness of the concrete protective layer from the edges of the slab is at least 80-120 mm, and at least 40 mm above and below. The laying direction of the four rows of reinforcement, starting from the bottom: along, across, across, across. For dressing, galvanized wire with a thickness of at least 2 mm is used.
Installation of formwork of various types
The formwork must withstand a load of 500-1100 kg / m 2, including the dynamic effects of falling concrete. To create the formwork plane, the following can be used:
- Reusable formwork plastic sheets.
- Moisture resistant plywood 17-23 mm thick.
- OSB with a thickness of 20-26 mm.
The edges of the plates should fit snugly against the walls, it is not allowed to use formwork with gaps at the joints of more than 2 mm, if it is not planned to cover the surface with a waterproofing film.
Sometimes it is reasonable to make the formwork non-removable, using profiled sheets for this, orienting them with a narrow shelf down. They are placed along the slab so that the waves during filling form numerous stiffeners. Calculation of the thickness is carried out from the lower rib, thus saving concrete mix is \u200b\u200b20-25%. Moreover, the height of the ridge should not exceed one third of the total thickness of the plate. If it is not planned to remove the formwork, screws with a rubber washer are screwed into it and they are tied with a thin wire to the reinforcement.
The installation of formwork begins with the placement of racks: it can be either steel telescopic racks with a tripod and a univilka, or wood without defects with a cross section of at least 100 cm 2. Each post must be connected to two adjacent slanted ties from an inch board. The racks are mounted along the lines of the beams, the distance between which, depending on the thickness of the plate 150-400 mm, is:
- 190-240 cm with a plywood thickness of up to 20 mm;
- 210-260 cm with a plywood thickness of 21cm.
The distance between the uprights of one beam, depending on the gap between them, is:
- from 140 to 200 cm when flying up to 150 cm;
- from 120 to 180 cm with a span of 160-210 cm;
- from 100 to 140 cm with a span of 210-250 cm.
The main beams are usually made of 100x100 mm timber. Secondary beams, which have a cross section of 50% of the main ones, are laid across them across with a step of 500-650 cm. If the formwork is from a profiled sheet, the pitch of the secondary beams is equal to 3.5 distances between the waves.
Vertical formwork is mounted from retaining panels attached to the external wall of the building. Often blocks of aerated concrete with a thickness of 80-100 mm are often laid around the perimeter to hide the overlap belt.
Reinforcement and strapping
After installing the formwork, it is lubricated with a release compound and the installation of reinforcement begins. On the crowns and supporting ribs, the rods are tied into a square, while maintaining on all sides the minimum permissible protective layer. The main array of overlap is reinforced with a mesh. The lower layer is laid on plastic "crackers" that control the preservation of the lower protective layer. The net is tied at the intersection of every third rod.
After tying the lower mesh, intermediate clamps are installed on it after 100 cm in a checkerboard pattern. To strengthen the support on the walls, end clamps are mounted. These elements help maintain the design distance between the two reinforcement planes.
The mounted upper mesh is connected to the lower connecting brackets. After completion of installation, the reinforcing structure should be as a whole and easily perceive the load from people walking on it.
Pouring concrete
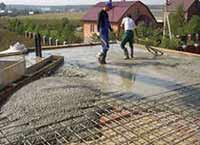
Monolithic floors are poured with concrete of grade B20-B30, prepared in the factory. Filling of monolithic ceilings should be carried out in one step, so filling the space with small doses is not recommended. If it is impossible to complete the whole amount of work at once, the sections of the slab must be cut with a grid with a cell of 8-10 mm.
The supply of the mixture to the ceiling can be carried out by a concrete pump or a volumetric bucket lifted by a crane. After feeding up the mixture is evenly distributed, seated with vibration and left to solidify.
Further actions
Concrete gains sufficient strength after 4 weeks, all this time it needs to be periodically wetted and protected from rain for the first 2 days. After drying, the formwork can be removed and the construction of walls started.
Concrete floor beams, as well as slab and other structures, are used to form horizontal surfaces of a building under construction. They must be strong enough to effectively transfer loads to vertical load-bearing structures, and therefore they are almost always reinforced either with steel reinforcement or other elements.
Below we will talk about the features of these architectural details, as well as a series of tips for their independent arrangement.
Overview of building floors
Design requirements
Overlap is a horizontal structure that separates among themselves various rooms - basement, floors, attic, etc. Besides the fact that they perceive and transmit static loads, these parts also act as horizontal screeds of the entire building.
The requirements for overlapping are quite serious:
- Firstly, they must be sufficiently strong and durable.
- Secondly, their rigidity and lack of deformation are extremely important.
- Also, for these elements, high fire resistance, water and air tightness are desirable.
- Additional wishes include sound and heat insulation characteristics, but they are usually implemented only in low-rise construction. In other cases, additional insulation of concrete floors is required.
From this point of view, structures made of reinforced concrete using monolithic or prefabricated technology seem preferable. Wooden beam ceilings also have a right to exist, but their bearing capacity is insufficient for use in conditions of high weight and operational loads.
Monolithic Varieties
According to the type of arrangement, basement, attic and floor floors are divided into two groups:
- Monolithic, which are poured directly at the facility.
- Prefabricated, which are mounted from individual elements.
Below we consider the features of the construction of both varieties.
The instruction for pouring a monolithic structure is as follows:
- Reinforcing bars with a diameter of 10 to 20 mm (depending on the rated load) are welded to metal mortgages in the so-called reinforcing belt around the perimeter of the building.
- We connect rods with wire or weld honey by ourselves, forming a reinforcing mesh. For most buildings, the optimal cell size will be 200x200 mm.
Note!
When forming the frame, places for laying communications are provided in advance, for example, the passage of a chimney through a concrete ceiling, etc.
- Next, from the OSB boards or thick boards, we mount the formwork. Wooden parts to avoid swelling should be wrapped with dense polyethylene. We fasten all parts of the formwork together, stuffing wooden beams on the outside.
- We assemble the assembled panels to the reinforcement using a sufficiently thick wire. During installation, we make sure that the formwork is located below the metal parts by 30-50 mm. To facilitate positioning, special remote inserts are actively used today.
- In order to avoid sagging of the formwork, we props up the parts with wooden beams or telescopic rods, and then proceed to pouring.
- It is advisable to fill the floor in one go - so stress zones will not form in concrete. To do this, you need to prepare a large amount of solution, which is problematic at home.
- The solution is simple: you need to buy ready-made concrete in the required volume. Of course, the price will be higher, but you don’t have to bother with combining several sites by installing mortgages.
Since concrete in this case will be held exclusively by reinforcement, formwork can only be removed after the cement has completely hardened. The optimal exposure time is about 28 days.
As a result, we get a monolith with excellent mechanical characteristics. It perfectly resists loads, and to remove even a small part of it (for example, when building a hatch), reinforced concrete cutting with diamond wheels should be used.
Prefabricated Varieties
If the dimensions of the opening allow, then you can equip a prefabricated structure of reinforced concrete slabs:
- We select the dimensions of concrete floors in such a way that the slab or module overlaps all the free space.
- Using a truck crane, we lay the details on a reinforced belt, connecting them together with cement mortar.
Note!
The edges of the slab should go to the support at least 12 cm along the entire length.
- To increase the strength of the connection, we weld the metal parts of the plates to the mortgages in the walls of the building.
This method has several advantages:
- Firstly, the speed of installation work increases significantly.
- Secondly, the standard sizes of slabs and their load-bearing abilities are unified, which greatly facilitates the calculation of concrete floors.
- Thirdly, hollow products provide better thermal insulation than reinforced monolith.
At the same time, this technique can only be implemented for small spans. In addition, when laying slabs, it is difficult to pre-arrange the necessary openings and communication passages, therefore it may require very laborious cutting of concrete floors using expensive tools.
If you carry out all the work yourself, then you should definitely take into account such a parameter as the thickness of the concrete floor between floors.
Here you need to focus on the following numbers:
- In the case of slab overlapping, everything is simple: for flights up to 4 m we take parts 16 cm thick, for flights over 4 m - 22 cm. Deviations from this rule are found, but in housing construction they are quite rare.
- When erecting a monolithic structure, it is necessary to take into account the own weight of the floor and the capital base, the mass of the load with a margin of safety, etc. Knowing these data, as well as the opening area, we can calculate the specific load on the monolith in kg / m 2.
Note!
According to SNiP, the normative value of this indicator is 150 kg.
However, the safety factor (1.3) should be taken into account, so ideally we should work with values \u200b\u200bof the order of 195 - 200 kg / m 2.
- Based on these figures, we select the thickness of the plate, as well as the cross section and configuration of the reinforcement.
Without the appropriate skills, performing such calculations at the required quality level is quite difficult. That is why we strongly recommend either using special calculator programs (Lira, SCAD, STAAD and analogues), or contacting professional designers.
Self-made plates
A description of the technology for arranging such structures would be incomplete if we did not tell how to make a concrete floor with our own hands. In fact, if you have certain skills, everyone can fill in some fairly strong plates.
It is done like this:
- From boards up to 50 mm thick or plywood reinforced with wooden ribs, we collect the bottom for the future shape. We make the side walls of the board 25-30 mm.
Advice!
The dimensions of the formwork are selected in accordance with the dimensions of the span.
- We cover the bottom with roofing material or plastic wrap: we will also avoid leaks, and the process of excavation will be facilitated many times.
- Then we assemble the reinforcing cage. Since the welding machine is quite expensive, with self-production, the wire is most often knitted with thin wire.
Advice!
To facilitate the design and improve its operational properties, longitudinal polypropylene pipes with a diameter of about 60 mm can be laid in the reinforcement.
- The frame is lowered into the formwork, installing at a distance of 30-50 mm from the bottom. To do this, you can use both special gaskets and improvised material - pebbles, debris of dense brick, etc.
Small slab in plank formwork
During drying, we maintain the surface of the plate in a wet state, covering it with burlap or polyethylene. We carry out the formwork at least two weeks later, after which we dry the product in the open form. The total recruitment time should be at least 28 days.
Conclusion
Steel concrete floors, despite the relatively high cost and complexity in the construction, today have virtually no alternatives. Moreover - in most cases it is advisable to involve professionals for their design of the arrangement, since the cost of error in this matter is very high. In more detail, the nuances of the topic raised are covered in the video in this article.
Which you can make yourself. In addition, it is one of the most durable, as it is a monolithic reinforced reinforced concrete slab. In this article we will look at how you can make a monolithic ceiling with your own hands and what is needed for this.
How to make a monolithic reinforced concrete floor with your own hands
In order to build a monolithic floor during the construction of a private house, the following materials and tools will be needed:
- For the manufacture of formwork:
- waterproof plywood or a board 40 mm thick;
- board (50-70x150-200 mm) or timber (80-100x100 mm);
- telescopic racks, univilki and tripods or home-made supports made of timber, round timber, pipes or channel.
- For reinforcement:
- reinforcement with a diameter of 12-20 mm;
- knitting wire;
- stands for fittings (protection);
- bulgarian.
- For the preparation and pouring of concrete:
- cement, crushed stone, sand or screenings;
- concrete mixer;
- concrete pump or pouring crane;
- ready-made concrete can also be used, but only if a “mixer” is accessible to the construction site.
- -device formwork;
- - laying reinforcement;
- -preparation and pouring concrete.
Now consider them in more detail.
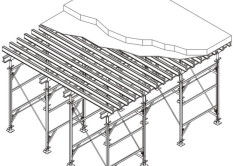
Formwork
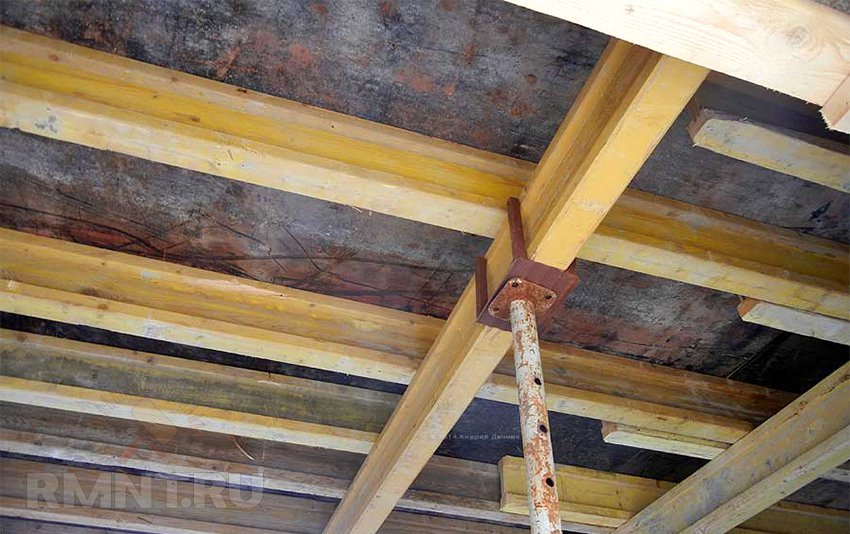
The formwork for monolithic overlapping is a horizontal “deck” of moisture-proof plywood, 18–25 mm thick or 40 mm thick edged boards, which is installed on supporting horizontal beams of wooden beams (80-100x100 mm).
Horizontal beams are supported by vertical posts, which can be finished, special (telescopic), or made independently of a bar 100x100 mm, round timber, with a diameter of 80-100 mm, as well as metal pipes or channels.
In order to determine the necessary amount of formwork materials, it is necessary to calculate the floor area and its thickness, which can be from 10 to 20 cm, depending on the span and the load that it will experience during operation.
The formwork for monolithic overlapping must have strength in order to easily withstand the weight of concrete and reinforcement without deformation. It should be noted that 1 m 2 of concrete with a thickness of 20 cm has a weight of up to 500 kg. It is better to make it from plywood 20 mm thick, from ordinary or laminated. In order to determine the height of the formwork installation, it is necessary to beat off the horizontal level corresponding to the bottom of the future ceiling along the span of the span over which it will be installed. This can be done using a water level or level.
In the case of using telescopic racks, they are first installed at the edges, with tripods and universils (crowns). On them, longitudinal beams are installed with a distance between them of about 2 m. After that, all intermediate racks with and without tripods are installed. Usually tripods are mounted on 30-40% of racks. The distance between them depends on the power of the racks themselves and the thickness of the floor. On average, one rack, designed for a load of 900-1200 kg, should fall on 1 m 2 of formwork.
Fig. 1Formwork for monolithic overlapping of plywood: 1 - stand; 2 - tripod; 3 - a longitudinal bar; 4 - transverse beam; 5 - univilka; 6 - sheets of plywood; 7 - side of the board.
When using home-made racks, their length should be adjusted to the height of the bottom of the longitudinal beams. They must be installed in increments of at least 1 m on a flat and solid base or on trimmed boards 50 mm thick.
Transverse beams are laid along the longitudinal beams, in increments of about 0.5 m, and plywood sheets are laid on top of them. The upper plane of this structure must be strictly horizontal and correspond to a previously marked level.
When using plank formwork for the “deck”, they must be fitted closely, and a dense plastic film or roofing material is laid on top of them.
Along the perimeter of the formwork from the boards, a side of the same height is set, corresponding to the thickness of the floor. At the corners, it must be securely connected.
Reinforcement
 After the formwork is ready, we proceed to the manufacture of the frame from the reinforcement. The frame can be from one layer of reinforcement or two. In the first case, it is necessary to use reinforcement with a large cross-section (16-20 mm), in the second case, reinforcement with a diameter of 12-14 mm can be used.
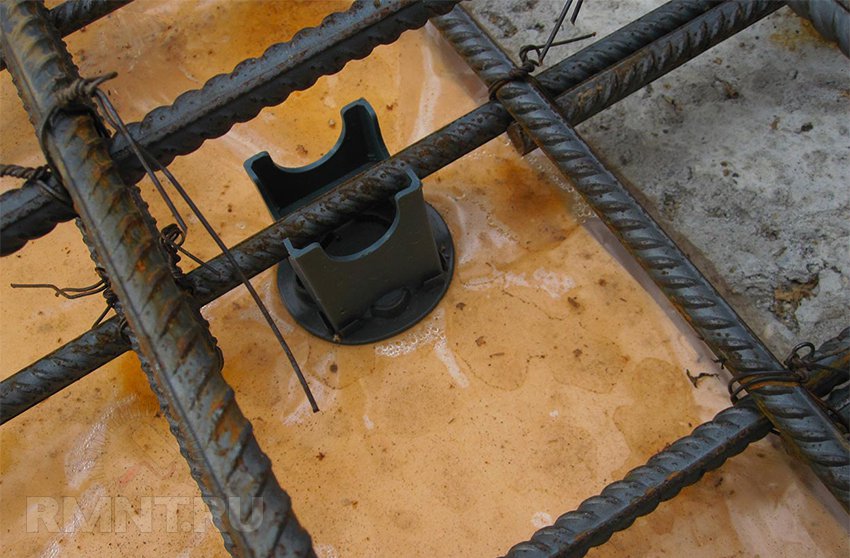
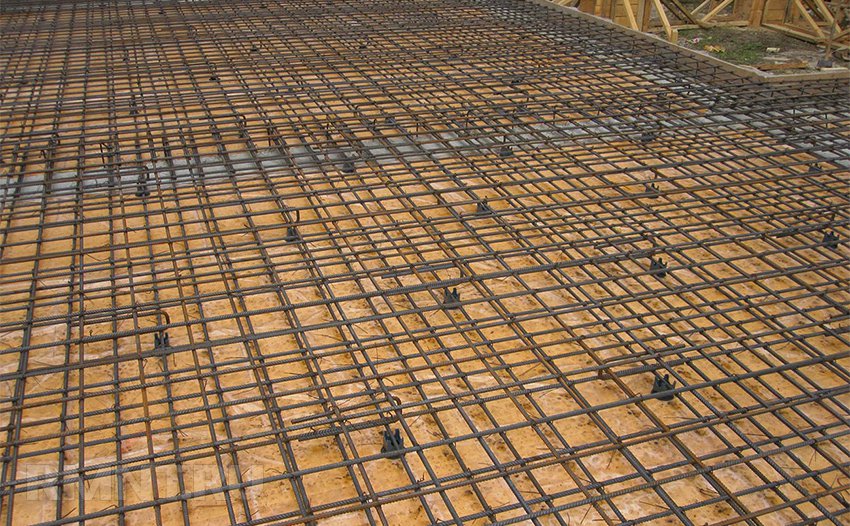
In any case, the reinforcement is laid in the form of a grid with cells of 20x20 cm. In this case, first on the plastic crackers-supports (protection) the first row of reinforcement is laid in increments of 20 cm. Plastic supports with a height of 25-30 mm are necessary so that the concrete, when pouring, closed the bottom of the armature and it did not corrode during the operation of the ceiling. The fittings are laid so that there is at least a distance of 25 mm to the side - the same protection against corrosion.
If it is necessary to merge pieces of reinforcement (if their length is less than the span to be covered), then to ensure the reliability of the frame in this place, their overlap should be at least 70-80 cm. It is connected with knitting wire in 2-3 places.
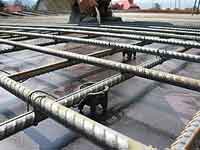
The second row of fittings, perpendicularly, fits the second one, also with a pitch of 20 cm (see the first photo). At the intersection, the reinforcement is connected with a soft steel knitting wire. Best of all, do this with a special hook for knitting reinforcement.
 If the frame is two-layer, then special supports - “chairs” from the reinforcement (in the photo on the left) are laid on the reinforcement of the first layer and tied with knitting wire and the second layer is laid on them similarly to the first. Such supports can even be made independently from pieces of reinforcement. The height of the "chairs" should be such that between the upper row of reinforcement laid on them and the level of concrete pouring there should be a distance of at least 2.5-3 cm.
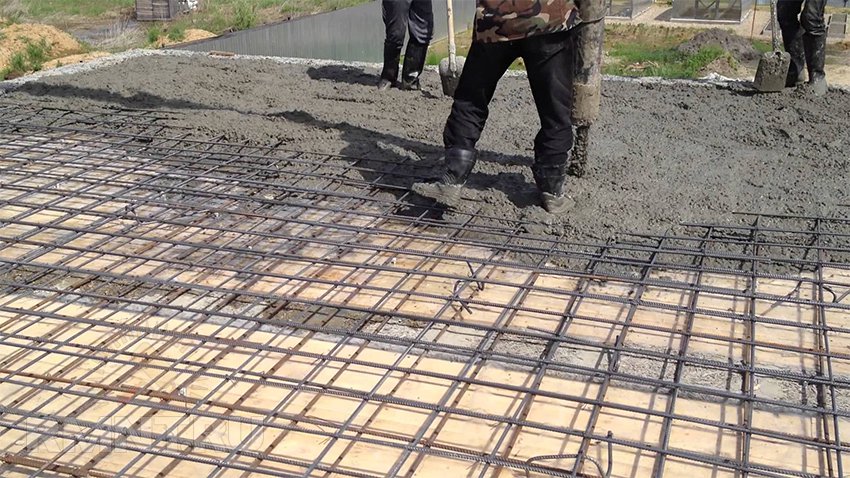
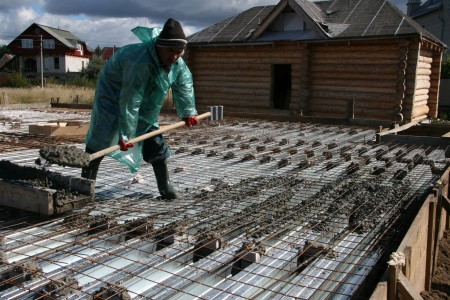
Concrete for pouring cast-in-place floors can be ordered ready-made (M400 grades) or prepared with your own hands using a concrete mixer. Finished concrete can be fed manually, using a concrete pump or using a crane, depending on its volume and the height of the ceiling.
Before pouring concrete, plywood must be treated with formwork oil or at least mining, so that formwork can be removed more easily. A polyethylene film or roofing material spreads along the board formwork.
 Concrete must be poured at a time for no more than three hours.
After pouring, the concrete is stretched and leveled with a squeegee (squeegee) so that it evenly covers the frame from the reinforcement from above and below. In this case, the concrete should be laid tightly. Best of all, use special vibrators to compact the concrete. In their absence, you can use an ordinary bayonet shovel or a wooden block, piercing and compacting with them freshly poured concrete.
Depending on the air temperature, the formwork is not removed until the concrete has hardened, within 20-30 days. The concrete is covered with a film on top, and in sunny hot weather it is periodically wetted with water so that the monolithic overlap gains strength gradually.
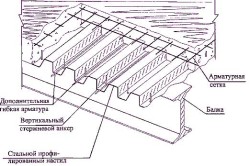
With your own hands, you can arrange another type of reinforced concrete flooring - a monolithic flooring on corrugated board. At the same time, corrugated board plays the role of both fixed formwork and external working fittings.
This overlap has the following advantages:
- -decrease in the complexity of work on the construction of the floor;
- -the ability to reduce the height and mass of the floor;
- -reduction of terms and cost of work.
For the device of a monolithic flooring on a professional flooring, the following types can be used with their own hands:
- -with a span of up to 5.7 meters - corrugated sheet H75-750-0.8;
- - when flying over 5.7 m - corrugated board H114-750-0.9.
Installation of formwork and frame reinforcement
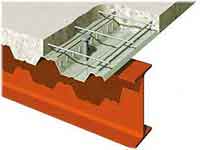 The installation of the formwork for the manufacture of a monolithic flooring on the corrugated board is carried out almost the same as usual, but instead of plywood or boards, sheets of corrugated board are laid on the transverse beams. In this case, after hardening of the monolithic plate, the corrugated board is not removed, that is, it acts as a fixed formwork.
Such ceilings may be supported by load-bearing walls or columns. In brick or stone houses, monolithic ceilings on corrugated board can rest on walls with the subsequent monolithic support part. At the same time, a “mortgage" from a metal corner is installed at the place of support. Decking is attached to it with dowels.
There is not a single person who during construction would not encounter ceilings for the first floor.
Monolithic overlap scheme.
At the moment there are 3 types of them - these are wooden, plate and monoliths. Each of these options is divided into deeper levels, which gives a significant choice in approaches.
The most perfect is a monolithic overlap, which can be done with your own hands. Here you will need to invest a considerable amount of financial resources, time and effort, but even the grandchildren will be able to see the result later. it will be almost eternal. But for everything to be just like that, you should consider both of its options - is it a full monolith or half on metal beams.
Tools and materials
We will need:
- sheet A3;
- pencil with an eraser;
- roulette.
At this stage, a complete calculation of all the tools and materials that will be used in the future. If you wish, you can correctly calculate everything to the smallest detail.
Scheme of formwork monolithic overlap.
- Initially, you should make a plan of the surface of the first floor, on which the floor will be filled. With an open surface of 10 * 10 m, you can do without additional load-bearing walls, but if the area is larger, it is advisable to have at least one load-bearing partition, because the mass of the plate will be very large. The perimeter of the building takes the outer wall, because the carrier should be the entire wall, and not part of it.
- Plywood is being calculated, which will be used to make the formwork. To do this, you need to know a simple formula: area + perimeter * height of the formwork. For a full monolith, it is 0.3 m, while for a half-monolith it is 0.12-0.2 m. So for a house with a perimeter of 10 * 10 m, 100 m² of solid and 12 m² of sawn 0.3 m of sheet will be required.
- The next step is to calculate how much you need to put cement mortar. Here the formula will be a simple area * height-5% (which will go to reinforcement). Thus, for the same house, 28.5 m³ of solution will be required. And taking into account the fact that the average mixer contains 8-9 m³ of solution, you will need to order 4 cars.
- Reinforcement is also worth calculating in advance. Given the standard pitch of 0.5 m, the formula will look like this: length * width * 4 is the size of one layer. With a maximum plate without I-beams there will be two such layers. Those. for the same house you will need 800 m of reinforcing rod + 2% for staples.
- Beams (I-beams) are calculated according to the simplest formula: width / 2. This is their number. As a rule, their length is enough for one floor.
It is not worth initially calculating nails, polyethylene, roofing and other materials, because the number of nails can vary, and roofing and polyethylene are equal to the perimeter + 5%.
Preparation for construction

The structural scheme of precast-monolithic overlap.
- hammer with nails;
- wooden beams (100 * 100) or metal struts (2.5 and thicker);
- only;
- polyethylene;
- reinforced rod A500C;
- the wire is soft.
- Do-it-yourself formwork installation between floors. Formwork is installed immediately on the floor where the work will be done. It is important here that the entire area be done in good faith and that all joints correctly match one to one. Walls should be nailed vertically to the bottom, as if they are nailed to the rib, there will be a chance that nails can not withstand the pressure of concrete (exceptional cases, but there are).
- Under the formwork do-it-yourself mounts a support system consisting of wooden beams and metal struts. Beams are installed on each m², while spacers can be set in a ratio of 1 to 2, i.e. 2 times less. Absolutely each should be perfectly installed, and then three times tested for stability. The pressure from the concrete side will be 500 kg each, and at the same time they should not even move. Otherwise, all the work may be nullified.
- Once the system has been correctly installed and tested from below, you should climb up and check everything again. Just a walk from above with a heavy step will be enough. If everything is solid under your feet and there is no more doubt, the floor for waterproofing will be properly laid with your own roofing paper or polyethylene, after which the material is compressed with something heavy and you can proceed to the next stage of work.
- Reinforcement is performed as follows: the rods are laid along the entire length in increments of 0.5 m, after which a similar layer is laid on them with a cross. All ligaments at the joints occur through soft wire. As soon as the lower crate is ready, you should begin to manufacture the upper. It is done in a similar way, but they should not be connected with each other in any case.
- Staples are made with your own hands using the same reinforcing rod. They are bent with the letter U (naturally, inverted) and installed with a frequency of 1 pc. Per 4 m². The upper level is mounted at a height of 25 mm from the ceiling of the casting, and the lower level is mirrored from the formwork. Everything is tied with soft wire and tested for strength. If the valve does not have a free play, then this is a qualitatively completed work, but if there is a free play, then you should find the reason and redo it. During concrete pouring, nothing should be damaged due to such defects.
The bulk of the work
- bayonet shovel;
- shovel;
- polyethylene;
- 500 grade solution.
The scheme of arrangement of the overlap.
- When ordering an auto-mixer, it is important to consider that it must have a special hose for supplying concrete to the height of the floor. Doing it yourself is not advisable, because even with a concrete mixer, making the right amount in a short time will be simply impossible. And if you do not fit into a tight time frame, then freezing will be uneven, which is fraught with fragility. It would be right to fill in all the overlap between floors in one daylight.
- During pouring, you should take the help of at least one other person, otherwise everything can significantly stretch in time. During the pouring process, you should never stand in one place. It is always necessary to move so that the pressure on the formwork support system is uniform. The solution pressure itself is 500 kg, but when dropped, the weight can increase quite seriously. The ideal option is a uniform filling of the layers, which will allow everyone to clearly do their job, and then affect the strength.
- While one person is holding a hose with a solution, the assistant (s) are working with shovels and mix the solution to release air from it. The only thing worth considering at the same time is that there is a waterproofing insulator on the bottom, which in no case can be damaged.
- When filling is completed, the resulting result should be covered with plastic wrap for a period of 28-30 days. From time to time, it is necessary to wet the top layer with water so that the concrete gains the required strength. Everything will harden in a month, then it will be possible to continue construction further.
- A month later, with your own hands, you must dismantle the entire supporting system, remove the polyethylene from the concrete and remove the plywood with a crowbar.
The result is a wonderful overlap for the first and second floor, which is not so easy to do, but when you see the result, it becomes clear that the game was worth the candle.
Erection of a monolith between floors on beams
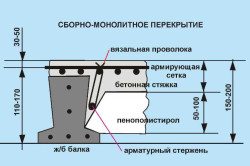
Scheme of precast-monolithic overlap.
- steel beams (I-beams);
- laminated plywood 20 mm and thicker;
- hammer with nails;
- either metal struts (2.5 and thicker);
- only;
- polyethylene;
- reinforced rod A500C;
- soft wire;
- 500 grade solution;
- bayonet shovel;
- shovel;
The main part of the work here is no different, but the thickness of the future slab (1.5-2 times narrower), the amount of cement, as well as the supporting system, differ. Putting such a concrete floor will be even easier in time.
- Before starting the installation of formwork, beams should be laid. It is ideal to stack them along the width of a narrow wall, but if all are equal, then it is desirable to parallel to the wall at the front door.
- The formwork and all its components are mounted on top. It is important to consider that the reinforcement is not made in 2 layers, but only in 1 (in the middle). All formulas remain the same, only the coefficients change.
- As a support system, it is better to use metal spacers, which will not require much, because beams give an additional margin of safety. One spacer is enough for 2.5-3 m² in length.
- After completion of work, everything is disassembled in the same way.
There are additional aspects that extol this concrete floor in relation to a conventional monolith.
- The monolithic floor, laid between the floors on the beams, has an increased margin of safety, because from below it is held by a steel frame.
- Concrete leaves 1.5-2 times less, respectively, and the price is lower.
- It is convenient to conduct wiring through the beams, as this will not affect the state of the ceiling at all. And the installation of a false ceiling will be a joy to the worker, because almost the entire construction is ready from the start.
Summarizing
Do-it-yourself monolithic overlapping can last more than one century if everything is done according to the technology described above. There is nothing complicated or unusual here, but patience and zeal are needed, only in this case you can be completely sure that the work done will bring joy to the grandchildren as well.
Before pouring the concrete slab, it will be correct to familiarize yourself with the weather forecast for 1-2 weeks in advance, because if there is rainfall, it will be simply impossible to lay the material.
- How to complete the final fill using the “beacons”?
- How to ensure the solidification of concrete?
Building your own home is an expensive and troublesome undertaking. One of the stages of construction will be the manufacture or roof of the building.
In a non-residential building concrete floor 12 cm thick is enough, but if the rooms are still residential, then it is worth increasing it to 15 cm, as well as additionally provide sound insulation.
Prices are very high, and the inability to use a crane and non-standard sizes of the ceiling make you make a plate yourself.
How do you fill the slab with your own hands? Can home-made formwork be used?
In low-rise construction, the practice of self-reinforcing and pouring do-it-yourself floor slabs has become widespread. Monolithic plates floors have several advantages in comparison with other technologies of floors:
- The pressure on the walls is the same around the perimeter if a single ceiling is used.
- There is no need to use hoisting mechanisms (crane).
- Monolithic overlap is much stronger than wood, it is fire resistant.
- Overlapping can be made non-standard in shape and size.
The sequence of work is as follows: the manufacture and installation of formwork, and pouring it with a solution of concrete, waiting at least 30 days for the concrete to dry completely.
How to make and install the formwork with your own hands?
For fixed formwork, either slabs or reinforced concrete frames are used in ceilings. The space between them is filled with hollow elements - blocks (ceramic, light concrete, etc.)
Formwork for manufactured by industrial enterprises of our country. But the price of such a professional design is very high - about the same as how much the stove itself will cost you along with the work.
The solution is simple: it must be made with your own hands. To do this, you need to prepare:
- wooden boards 50x150 mm;
- thin plywood;
- wooden beam.
A special tool is not required, but you must have:
- wood hacksaw;
- hammer;
- ax;
- level;
- level;
- nails.
Boards and plywood after use for pouring floor slabs can be used for roofs. The formwork will last for about a month, then it will be disassembled. Experienced builders strongly recommend using telescopic racks when pouring floor slabs with your own hands. They are very convenient, very easy to work, it is a reliable tool.
The formwork is strong, because the stand is designed for a weight of 2 tons. It is very important to firmly and reliably connect and fix the corners. The board does not withstand any competition, because knots and microcracks are not always taken into account. It is not necessary to buy a tool, numerous construction companies give formwork and racks for rent. You can take only racks, the price of their rent will be 70-100 rubles. per m area.
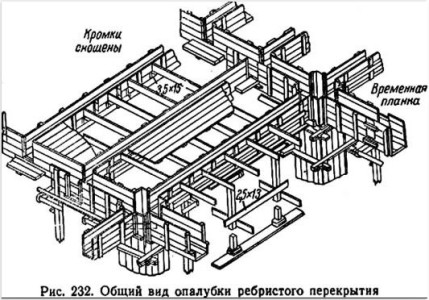
Scheme for the design of formwork ribbed flooring.
The formwork is mounted during the do-it-yourself work after the walls of the basement or first floor are raised to the required height. Installation is carried out in stages:
- Racks with tripods need to be arranged in rows in increments of 1-1.2 m.
- The longitudinal beam must be laid on top of the racks, pull the racks to the required height.
- The transverse beam is laid on the longitudinal beam. After that, the beam must be knocked into a single grid and lay thin plywood.
- Only after fixing the plywood should the entire board be leveled with the help of a level.
The next stage of work will be reinforcement.
Back to the table of contents
How to do the reinforcement of the floor slab with your own hands?
It is very important to correctly calculate the reinforcement and the required plate thickness. Depending on the calculated loads, the diameter of the reinforcement is selected. More often it is in the range of 8 to 14 mm. It is recommended to use class A3 hot-rolled steel reinforcement to ensure the proper strength of the floor slab.

Plate reinforcement is made in order to add rigidity. As improvised materials use an iron rod, a fine grid for plastering, as well as old iron pipes (can be found at the nearest scrap metal collection point).
Do-it-yourself plate reinforcement is made in 2 layers. The first grid is laid in the lower part of the plate, the second will be laid in its upper part. After pouring concrete, the mesh should be inside with a protective layer from the formwork of at least 1.5-2 cm.
The fittings in the mesh must be connected using knitting wire. In the grid, the reinforcement itself must be integral. Breaks are not allowed. Cells often have a size of 150x150 mm.
If the floor slabs are small in area, then the cells make 200x200 mm. In case of shortage of the reinforcement length, the additional one is tied so that the overlap is equal to 40 reinforcement diameters. Joints of a metal bar are preferably staggered (apart). The ends should lie on the supporting beams.
Back to the table of contents
How to do concrete pouring slabs with your own hands?
To prepare concrete, you will need:
- crushed stone;
- sand;
- cement grade 400, 500;
- water;
- shovels;
- buckets - 3 pcs.
Recommended proportions when preparing the mortar: 2 buckets of sand, 1 bucket of crushed stone and 1 bucket of cement. It is very convenient to use a rented concrete mixer. The solution is mixed in a concrete mixer with the addition of water to a consistency resembling liquid sour cream. Such "liquid" concrete is made to perform "spilling". It is a thin solution that will well fill all the cracks and internal cavities of the plate.
When pouring large slabs instead of crushed stone, you can take expanded clay, which will maximize the weight of the structure itself. The cost of such material is very high, therefore it is better to use crushed stone in small-sized products (it costs much cheaper).
"Spilling" is the initial pouring of mortar into the formwork. The solution should be poured evenly and slowly, sharp movements should not be allowed to prevent distortions in the formwork itself.
After making a “spill”, essentially filling the first layer, you need to “move” the laid layer with a shovel or other tool. This should be done carefully, with smooth movements along the entire surface of the first layer. These actions will allow you to remove unfilled cavities, go out with air bubbles.
Next, we repeat the operation of filling the floor slab with our own hands with thicker concrete to a level of 10-12 cm, leaving a margin of approximately 2-3 cm to the calculated thickness of the floor slab. Again, you need to use a special vibrator or an improvised tool to achieve uniform filling of the formwork with the solution. Concrete needs to set, it will take a couple of days, only after drying and setting it is possible to perform the final pour.