Do-it-yourself wood-burning mini fireplaces for summer cottages. How to lay out a fireplace with your own hands How to build a small fireplace with your own hands
The appearance of the fireplace is greatly benefited when there are special decorative elements on its facade. Shelves, niches and various locks can be considered as such elements.
In order to make a wedge lock for our fireplace, we take 6 full-fledged bricks and lay them out on a flat and horizontal surface at an angle to each other (without a central element).
Lay out the bricks, laying out the corner, mark them and be sure to number them.
Then make the middle of the castle structure by sawing a wedge out of a single brick. These works are best done with a “grinder” with a power of up to a kilowatt, cutting off a brick with a cutting wheel with a diamond coating on ceramics.

The castle is ready, it remains only to install it in the right place in the masonry.
Before “seating” into the masonry, we install it in the place where it will be installed, and without the use of a solution. Everything should be installed smoothly, and the slope in both directions should be symmetrical.

We install the wedge lock “dry” - without a solution for fitting.
Then we measure out two bricks on each side in order to cut off their ends and make them fixing from the edges. And then we “seat” the entire structure of the castle onto the solution.

The lock is in place.
After the lock is installed, our task is to raise the walls of the fireplace insert to the desired level (1 row above the fireplace door).
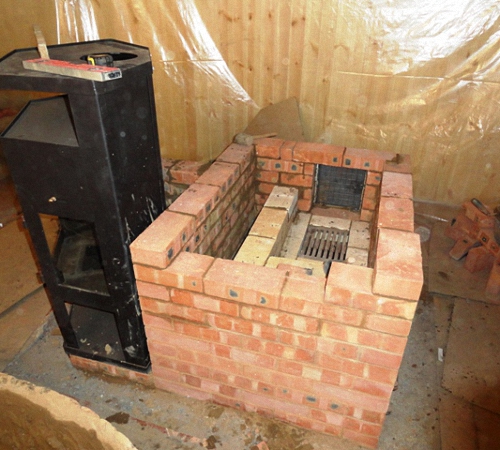
Step 7 we make the overlap of the combustion chamber of the fireplace and install the heat exchanger
It is very important to lay out fireplaces (stoves) and at the same time use metal objects as little as possible to create ceilings in places where there is a possibility of high temperatures. The highest temperature is observed near the roof of the combustion chamber. In this regard, it is necessary to make the vault in such a way that it does not have to be used to cover it with metal corners. The easiest way is to make the vault of the firebox narrow and close on the third row of masonry. To do this, we use the scheme - the first row of overlap - we use a brick long = ¾ of a brick, the second row of overlap is a solid brick, and the third row is a strapping one, for a lintel.

We lay the bricks of the first row of the lintel. We cut off the lower edge of the bricks both in length and from below at an angle. To make them fall inward, we press their ends with bricks.
We make a heat exchanger for a home heating system from a corrugated pipe made of stainless steel. At this stage (let's call it "fitting"), our task is to prepare a place in which the heat exchanger will be installed in the future. Our task is to place it in front of the hood opening in the chimney. Here the highest speed of convection flows, and hence the heat transfer will be the highest. It is imperative to use high alloy stainless steel pipe for two reasons.
- The temperature in this part of the furnace can reach up to 700 degrees, which means that ordinary steel will give scale from interaction with oxygen, gradually collapsing. Typically, the service life of devices that use heat exchangers placed in an open flame is no more than three years, then they have to be dismantled. In our case, we would have to disassemble the fireplace masonry.
- The second condition why a stainless steel pipe is used is a highly aggressive environment during the “inactivity” of the fireplace. The fact is that the composition of the smoke is active substances that, interacting with water droplets that have fallen in the form of condensate on the heat exchanger, turn into carbonic acid and gradually corrode the pipe made of ordinary steel.

This is what the groove for the heat exchanger looks like.
In order to avoid additional heat loss from the heat exchanger to the brickwork, it is necessary to make thermal insulation. The best option is to make it from 5 mm thick basalt cardboard.

We prepare the heat exchanger for wrapping with basalt cardboard.
When performing such work, it is necessary to take into account the factor of the total thickness, which will be after you perform thermal insulation. It should not be more than the thickness of one brick. This is necessary in order to ideally place this device in the fireplace masonry. The second prerequisite is that when wrapping, this procedure must be performed separately for each branch of the heat exchanger.

By winding the basalt cardboard in the form of a “roll”, be sure to wrap it in such a way that there are no waves and irregularities, this is very important when installing the device in the masonry so that it sits firmly and does not “dangle” after the start of operation of the fireplace.

Many years of experience in installing such devices has shown that the most reliable and functional device for fastening basalt cardboard is the usual twisting of copper wire with a diameter of 1 mm.
First, we finish the work on thermal insulation of one branch, then proceed to the same procedure on the second part of the heat exchanger. It is necessary to make at least four twists per 50 cm of thermal insulation.


If you see defects in the laying of thermal insulation, it is better to redo this part of the work.
After both parts of the heat exchanger are thermally insulated, we need to tie them together.


The heat exchanger is ready, it remains to place it in the prepared groove of the furnace.
We place the heat exchanger in the masonry. We make sure that it lies vertically, and its thickness is not more than the thickness of the brick row of masonry

If everything is fine, we seal it with a solution and press it with the next row of masonry. Thoroughly coat with a solution all the places where the rows pass so that the tightness of the combustion and convection chambers is not broken.

A well-sealed seam will give you a reliable guarantee that the oven will not smoke into the convection chamber, and therefore into the room.

The heat exchanger is ready for operation - the tightness of the seams is not satisfactory!
The efficiency of fireplaces is always a sore point for their owners, usually up to 75% of the heat flies into the chimney. In winter, such devices heat the street, not the house. To increase the usefulness of fireplaces, various tricks are used. The simplest thing is to change the vault of the combustion chamber, to make it not exactly rectangular, but in the form of a trapezoid. To do this, the first row of the overlap of the combustion chamber is cut at an angle, and then a jumper is made over it with the upper row. This method creates additional areas of turbulence in the firebox and thus improves the efficiency of the fireplace.

The first row of the jumper above the firebox is made of bricks ¾ long and at the same time its lower edge is cut off. Above it is a row of strapping. A heat exchanger is placed in the outlet of the exhaust gases.
The entire firebox, including the rows of jumpers, must be made of fireclay bricks. The fact is that the M-150 ceramic brick used does not make it possible to operate the fireplace for ten years without any repair, unlike fireclay bricks.

The combustion chamber is ready. The rows of binding of the firebox securely fix the bricks of the vault. The chimney opening must be at least 300 cm2.
Step 8 - Mounting the Walls
We proceed to the installation of the walls of the fireplace. It is very important to observe the verticality of the fireplace design and its linear dimensions. Two stretched threads fixed at the base can be considered a very reliable assistant.

There is a very subtle technique when laying fireplaces at this stage of work. Usually the fireplace is designed in such a way that its upper part is hollow. This is usually a sheet of drywall over the casing of the fireplace insert cassette and that's it. The main heat transfer occurs when the fireplace is heated. As soon as the fire goes out, there is a very rapid cooling of the rooms that it heated. Therefore, many homeowners often consider fireplaces in their home interiors more as a decoration than an element of the heating system. Let's do a little trick to get away from this stereotype. Our fireplace has two convection chambers. They work on the principle of natural air movement (when heated, it expands, becomes lighter and rises, it is replaced by cold, heavier air from below). Our task is to make this process last as long as possible. To do this, we must increase the mass of heated bricks in the fireplace masonry.
The easiest way to do this is to increase the volume of masonry above the firebox so that at the time of the combustion process this part heats up and then gives off heat for a longer time to air flows passing through the convection chambers. We need to raise eight rows of masonry around the chimney above the combustion chamber. This will ensure the accumulation of heat by the masonry for at least 6-8 hours of space heating.
On the outer part of the masonry we display a decorative element. It complements the lower shelf above the blower door and organically completes the top of the fireplace.
What a fireplace without decorative elements, we proceed to the laying of a decorative ledge.
We make a ledge according to the principle of pushing the brick outward along ¼ of its width. We make a ledge along the entire length of the perimeter.

Initially, we lay out a solid brick on the ledge. We fill all the incomplete parts of the brick with cut-off "grinder" bricks.
If you feel that the masonry is falling outward, then try placing a metal corner under the base of the row that has begun to move.

A metal corner is placed under the upper row of the protrusion. It will remain in the masonry until the next row of masonry is laid.
After two rows of the ledge are laid out, we proceed to narrow the masonry by ¼ of the brick.


Ventilation hatch of the convection chamber, from the side of the living room.
Above the decorative ledge, we must finish the convection chambers, because higher up to the chimney outlet, the temperature of the masonry drops again and the efficiency of the system will noticeably decrease. You can conduct an experiment - light a match and bring the flame to the convection hatch while stoking the fireplace. If the flame is “blown out”, then the convection chambers work perfectly and they can heat up a large room. If the flame fluctuates, but continues to burn, then the exhaust hatches are made high, or the thickness of the walls between the convection chamber and the firebox is very thick and the air does not have time to warm up from passing through this section of the fireplace.

We lay the exhaust hatches located on the side of the bedroom. There are two of them, one for each convection chamber. To make laying easier, we put a brick in each exhaust hole without mortar, and then go up the rise of the masonry rows.
On the third row above the decorative ledge we make a jumper over the convection chambers. It makes no sense to raise them higher. The jumper is made by the method of conducting masonry "poke". Bricks in it are installed across the air channel. Then another continuous row is laid out above it, and then only the chimney and the outer part of the brickwork are carried out.

Raise the outer wall of the fireplace. We track its verticality and linear dimensions. The interior of the masonry is hollow.

Before laying the chimney casing, we make another decorative ledge.
In order not to damage the masonry, let the mortar stand for a couple of days, then we make a plank platform so as not to damage the masonry of the rows, and only then we continue to work.
To perform the overlap, we used a 50 mm metal corner. The mistake of many is that they set the thickness of the casing overlap in one row of masonry - at least two rows are needed to make a reliable strapping of this masonry step

The ceiling is ready, we track the masonry defects and prepare the material for laying the pipe.

If overlap defects are found, then the easiest way is to fill the horizontal surface with mortar.
Then we begin the process of lifting the pipe laying. On the second row we build in a view to regulate the pipe duct. The process of laying the pipe itself has been described in previous works and is standard. You can get acquainted, for example, in the work "
What to prefer for installation in the country: a fireplace or a stove? Many will choose the first option. Let's figure out how to build a fireplace with your own hands.
One of the indisputable advantages of a private house is the possibility of creating your own home there. Despite the fact that practical and functional boilers, heaters and stoves are increasingly replacing fireplaces and stoves, fireplaces and stoves remain popular.
And although not every stove or fireplace can compete with modern devices, nevertheless, they can be a worthy addition to the existing life support system, creating a special cozy atmosphere in the house. So, let's try to understand the features of fireplaces, stoves and their combined options, as well as how to build a fireplace, doing all the work with your own hands.
Before you build a fireplace in a house or in a country house with your own hands, you should familiarize yourself with the requirements for the premises for installing this design. It is best to provide for the possibility of installation at the design stage, and it will be possible to build a fireplace with your own hands later.
It is necessary to take into account some features:
- Furnaces are massive, and therefore they require a reinforced foundation.
- If the oven is full, it is useful not only for cooking, but also for heating the room. It is desirable to have enough space for the oven.
- It will be very expensive to carry out work if in the finished house you have to disassemble the floors to create a chimney.
- A fireplace is easier than a stove to build in a finished house. However, although it is lighter than the stove, it may require a reinforced foundation.
- Structurally, a fireplace insert is simpler than a furnace one, requires less space and is mounted faster.
fireplace stove
This design is a combination of a fireplace and a heating stove. It combines the advantages of both types of devices. The fireplace is able to quickly heat the room, and the stove allows you to keep warm for a long time. Such opportunities appear as a result of equipping the fireplace with two fireboxes in the body or with a glass door.
Another subclass are cast iron or steel stoves lined with ceramics. These are stand-alone systems, they are sold ready-made. Structurally, they resemble potbelly stoves, but are more thought out aesthetically and technically. Fireplace stoves have minimal room requirements and can be installed almost anywhere.
Fireplace masonry
The question of how to build a fireplace in the country is not so simple, since not everyone can do the work with their own hands, but controlling the process, understanding what is happening, is a very real task.
fireplace base
Lightweight fireplaces, which are often installed in the country, are placed directly on the floor, large ones (more than 700 kg) are built on a foundation with a depth of about 0.5–0.7 m. In the construction of fireplaces, there are two types of foundation:
- Filled foundation, which uses concrete with fillers (crushed stone, crushed brick, etc.) or liquid concrete. For especially heavy fireplaces, reinforcement with fittings can be used. The surface of the flood foundation is usually made at floor level or 10–15 centimeters lower. Formwork is used for pouring.
- brick foundation, which is designed for small fireplaces. It is laid out in the form of bricks placed on the ribs. High-strength cement (M300 grade or higher) is used for mortar. Rows should be from 4 to 6.
To protect the foundation from moisture, roofing material is used, for which the bottom and walls of the formwork are covered with roofing material, and the joints are covered with bitumen. We coat the attachment points, and fill the bottom of the foundation with a thin layer of expanded clay.
If a heavy fireplace is placed on the second floor, the foundation is built anyway, except for the presence of a wooden floor. In such a situation, a 15 cm layer of refractory material covered with a sheet of iron is placed on the floor. The lower brick layer is laid on a cement-clay mortar.
After making the foundation, it is expected 5–6 days before it dries.
Chimney
Basic moments:
- The walls of the pipe must be thick enough to reduce heat loss. When the fireplace is located against the inner wall, the pipe is laid out in one brick. If the fireplace is next to the outer wall - one and a half or two bricks. Normal section of the pipe - 1/10–1/15 furnace opening width. The minimum pipe parameters are 14×25 cm.
- It is not safe to rest a heavy pipe on a light fireplace, so it is better to use ceramic or metal pipes in this case. They need to be insulated from the outside, lining the pipe with brick and filling the space between the brick and the pipe with expanded clay.
- The quality of traction directly depends on the height of the pipe. The optimal height 5–7 meters. On top of the damper, the pipe looks like a tapering pyramid, and the transition at the top into the chimney. The front wall of the smoke box is raised, tightly joining it with the chimney. The vertical back goes straight into the chimney.
- The chimney provides a damper (rotary or sliding), with the help of which the fireplace is closed for heating. It is also needed to adjust the traction force. The flap must be on 20–30 cm(maximum 80-100 cm) above the opening of the firebox, at a distance of about 2 meters from the floor.
- If the chimney is less than 5 meters, then without a damper, cold outside air will quickly fill the room. If the pipe exceeds 7 meters, the damper may not be installed, although in any case it will not be superfluous.
An example of a chimney
Before deciding how to build a fireplace, you need to choose a method of ordering (see). There are two variations of ordering: with and without a spark arrester. Fireplace draft is regulated by means of a gate valve. Efficiency equals 10–15% .
The first three rows or only the contour of the rows can be laid out according to the scheme, filled into the inner part with a backfill of sand and gravel. The fourth row is laid out with refractory bricks. Immediately, to fix the fireplace grate, embedded L-shaped pins are installed.


Materials for building a fireplace
Furnace masonry
As an example, consider a furnace with a large heat capacity. Its feature is a single firebox during the day.

Construction

Materials for building a furnace
As an example, a two-story, channel, single-turn furnace with one firebox on the ground floor is taken. The building is located on two floors. It is located on a separate foundation, built to floor level on the ground floor. The cross section of the fuel section has a size in plan 890×1150 m, heating shields - 770×1020 mm on the ground floor and 770×950 mm on the second.
The total height is conditional and comes from the height of the ceilings on the floors along 3.4 m. It can be easily changed, you just need to change the number of rows in the brickwork from 26 to 46 and from 60 to 82.

The size of the firebox is designed for simultaneous loading of about 50 kg of logs with a length 50 cm and a thickness of about 10 cm. The logs are stacked upright. The gases rise up the rising chimney. At a height of approximately 3.2 meters from the floor level, some of the gases are released into the smoke circuits of the heating shield on the 1st floor, and the rest rises to the top of the furnace, entering the smoke circuits of the 2nd floor.
The downcomer channels of the smoke circuits of the shields of both the first and second floors and the last lifting channel of the first floor contain special heat exchange nozzles protruding from the brickwork into the channel. This increases the heat absorption surface in the smoke circuits, as well as the rate of heating of the masonry.
The extreme smoke channels on both floors (60–88 rows) have a cross section 120×190 mm, ending in the upper level of the furnace of the common chamber (89–90 rows). In this chamber, control bricks are placed, which carry the function of distributing flue gases to the smoke circulations of the floors. These bricks are supported by ledges one and a half to two centimeters wide, which were made in the 88th row during the laying out of the channels.
Adjustment of the distribution of gases is done once during the first test fires, by moving the bricks. This achieves equal heating of the masonry on the first and second floors. Following the final fixing of the adjusting bricks, the chamber windows are tightly closed and smeared with clay.
Work methodology
The technology of how to build a fireplace in a country house provides that if the ceilings do not need to be strengthened, the system is installed on a site where refractory bricks, tiles or a sheet of metal with a thickness of approximately 1.2 cm(cm. ).
It is necessary that the platform extends beyond the device by 50 cm on each side. To the wall with combustible materials should not be less than a meter, and from non-combustible - about 20 centimeters. Before heating, it is necessary to have a free space from the stove of about one and a half meters.
Connecting a fireplace stove to a chimney
The sequence of do-it-yourself work:
- When there is a smoke channel in the room, which is laid from the inside of the wall, the distance between the fireplace and the channel can be minimal. Having decided on the installation site of the stone dryer, a place is marked on the wall where the device will be connected to the chimney.
- After that, the masonry of the wall or chimney breaks through and the hole expands in size and shape of the lining ring.
- Then ring is installed and the gaps are sealed with wet clay or refractory sand.
- After that connects the chimney and chimney of the furnace. If there is no chimney, a new one is built of brick or metal. The work uses full-bodied high-quality red brick. A metal chimney is attached to the wall with a casing, dowels and screws, which are usually included in the kit.
Important! The base of the chimney must contain a pocket with a door for cleaning. Cleaning should be carried out at least once every three months (in case of intensive use).
Note:
- The foundation of the stove masonry is laid out very carefully.
- The stove must be equipped with a closable firebox.
- To observe the flame, you can put a transparent door: they are commercially available.
- Pay attention to how the masonry looks inside: scuffs, cracks, sagging of mortar are unacceptable, as this will lead to a decrease in traction and a rapid accumulation of ash.
- Throughout the course of construction, control the horizontal and vertical laying of the fireplace or stove, as well as the quality of the installation of cast iron elements.
- The place where the chimney penetrates the wall must be insulated!
We hope this article has given you useful information on how to build a fireplace in your home with your own hands.
How much comfort a fireplace with fire and firewood creates in the house, especially on long and cold winter evenings! And romantic gatherings by the fireplace together with glasses of good wine ... Live fire has its own unique energy, and the heat from it is alive and real, as well as safe, subject to all necessary fire safety measures.
If you decide to build a brick fireplace for a summer residence, then the cost of such an occupation is most important to you. In addition, it is worth considering other features of the construction of such a device. Various design features allow you to choose the right option for any room and any environment. Just imagine how it will enliven your living room and become a favorite corner for joint photos. Of course, it is worth trying to do this on your own. Remember that you have to succeed.
Fireplace or oven
The fireplace is older than the stove, because it follows the contour of the fire, representing a kind of protection for the home from open fire. And accordingly, the space from it heats up only in the immediate vicinity, so its efficiency is not very good.
Further, such a fireplace evolved into a stove, which, in terms of heating efficiency, noticeably overtook its progenitor. But the fireplace has not lost popularity, in addition to a more advantageous decorative effect and the fact that it does not take up much space, it has a number of advantages associated with space heating, such as:
- At the fireplace, heat transfer begins immediately after the appearance of a stable flame, in contrast to the stove, which must be heated for some time.
- Fireplaces are much easier to clean and maintain than stoves.
- It is easier to build fireplaces, which means that professional stove-makers will not be required for this, which means that construction costs will be lower.
- Currently, there are fireplaces on the market that are comparable in safety to stoves.
Construction features
The question of how to build a fireplace is interesting to everyone without exception. And here is an important scheme of work, which must be followed. For a simple fireplace, ordinary high-quality ceramic bricks are suitable; they will perfectly withstand the small weight of the fireplace and its mild heat.
Building a fireplace is incredibly profitable. This process, in contrast to the construction of the furnace, is more economical. Modern technologies for the construction of fireplaces can easily compete with stoves of Swedish or Dutch designs. This was especially successful in the manufacture of finished metal fireplace structures. Brick chimney masonry does not yet allow this.
When planning to build a fireplace in your house, you need to think through everything properly to the smallest detail - the place, dimensions, model and material used for manufacturing. You can run a special program when calculating. As a fuel, it is better to opt for pallets or other similar ecological and slow-burning fuels.

Security measures
The construction of a fireplace in the country cannot be carried out without observing specific security measures. Classic-shaped fireplaces are practically prohibited by fire safety measures due to open flames.
Previously, developers took a big risk by making such fireplaces in their dachas. Now they are getting out of the situation, I use heat-resistant glass for protection. In addition, it still perfectly conducts heat, so you are guaranteed a natural fireplace effect.
Fireplace and its working principle
The first fireplaces were simply hearths with chimneys and three-sided walls. The heat literally flew out into the chimney following the rapidly burning logs. Everything changed with the appearance of a smoke tooth and a thermal mirror, which the stove-makers thought of making.
It turned out that with an artificial narrowing of the chimney at the junction and with an inclined rear wall, the effect of self-regulation of the slow combustion of flue gases is obtained. In a narrow place, the thermal plug becomes a choke, and the inclined surface creates a slow and rotating vortex of pyrolysis gases, they burn out slowly as they approach the fire.
Such a flow blocks the flow of fresh air to the place of combustion. When it burns out to the end and the temperature drops, the vortex flow will slow down, and the air will be able to pull up to the right place, and the flame with gas will flare up again.
This combustion principle allows the use of other highly efficient fuel options along with conventional firewood. The circulation time of gases is from 2 to 7 minutes, under such conditions even resinous pine logs, as well as coal, slowly burn out.
Thus, a hot whirlwind heats the walls of the fireplace, and the already cooled steam goes up. The task during laying is to make the back inclined wall of the fireplace as smooth as possible, because it is she, or rather, soot and soot that will reflect heat, the infrared thermal spectrum invisible to the eye. And a properly made fireplace, thus, can provide up to 50% of heat compared to other heat sources.

The principle of operation of the fireplace.
If you decide to build a fireplace stove, then you should familiarize yourself with its principle of operation. And that's what we need to talk about next.
So, the heat tooth takes heat from the gases, but this is not essential for the overall performance of the fireplace. In the furnace, the brick takes away heat quite intensively, reducing the overall efficiency, and in the fireplace, the hot water register, which is located above the thermal tooth, takes away all the heat that is released by combustion.
And you can also arrange vertical air channels above the thermal tooth, this is to increase heat transfer. Naturally passing through the channels, the heated air returns to the room.
Stove in the fireplace.
The pallet is furnace, or simply under. This is the name of the lower part of the firebox. It is formed by screens, as well as slightly inclined horizontal surfaces. There was no blower near the fireplace, and the first fireplaces did not have a hearth either. And for quickly taking firewood with fire, oh, how much traction is needed. Therefore, in modern masonry near fireplaces, a small blower is provided, which is closed after the fire is sure to flare up. Up to this point, all the heat flies into the pipe, and after closing, a vortex is already formed.
In England, in classic fireplaces, the hearth was tilted slightly towards the floor. For a heat vortex, this is very good, but the burning firebrands jumped right out. To prevent this, the fireplace was equipped with a low grate. Now this function has been given to glass doors, while the grille has remained as a decoration.

Calculations of the dimensions of the fireplace, based on the area of \u200b\u200bthe room
Here we are talking about how to build a fireplace in the country with your own hands. And, perhaps, now we have moved on to the important part. Fireplace inserts can be different, but they are calculated according to the size of the room.
- Fireplace elements The area of the room.
12 15 20 25 30 40 - Portal width A 500 600 700 800 900 1000
- Portal height H 420 490 560 630 700 770
- Firebox depth С 300 320 350 380 400 420
- Rear wall height 360 360 360 360 360 360
firebox G. - Rear wall width 300 400 450 500 500 700
firebox D. - Smoke chamber height 570 600 630 660 700 800
- Chimney section
(with wide walls) 140x270 140x270 270x270 270x270 270x400 270x400 - Chimney section
- (with smooth walls) 140x240 14x270 140x270 270x270 270x270 270x270
- the volume of the combustion chamber should be at least 1/50 of the area of the heated room.
- the fireplace portal area needs about 2% of the floor area of the room.
- the area of the hearth should be 0.7 of the area of the portal.
- the narrowest point of the chimney in cross section is almost 0.15 of the hearth area.
- the height of the combustion chamber is equal to 3/5 of its width. The depth of the firebox will be 3 times less than the height.
Fireplace drawings:

Examples and drawings of simple fireplaces
According to this scheme, it is much easier to navigate in fireplace calculations.
- Description Size Quantity
- Cleaning door 130x140 1 pc.
- Grate 250x250 1 pc.
- Stainless steel Sheet 2-3 mm 0.3 m3..
- Steel sheet ordinary 2-3 mm 1.15m3.
- Steel corner 32x32x4 0.7 m
- Steel wire 2-3 mm dia. 15 m.
- Asbestos sheet 1.5 m2.
- Ruberoid 2m2.
- Ceramic brick 250x120x62 320 pcs.
- Clay 0.1 m3.
- Sand 0.1m3.
The walls must be erected, minimizing the seams as much as possible, making strictly vertical masonry with strict observance of dimensions. When laying out the arches, the subsequent rows protrude 6.5 cm above the previous ones (a quarter of a brick). An inclined screen is best made from steel sheet to facilitate the task.
For thermal convection in the fireplace, there are air channels. Therefore, the room warms up much faster. With a small size of a simple fireplace, its efficiency is 20%.
Fireplace drawing:

conclusions
We hope that this article was able to tell you how to properly build a fireplace. The fireplace is the gathering point of the whole family, the center of the family universe. In our technical age, something living and natural is worth its weight in gold, and fire is a living element.
Watch the video
In a small room, a bulky stove that occupies several square meters of scarce space will look ridiculous. For a miniature living room of a country house or cottage, a small fireplace is more suitable. Best of all, a built-in, wall-mounted or corner model will fit into the environment. The compact dimensions of the equipment significantly reduce its weight, simplifying the requirements for the foundation. It's time to find out what mini hearths are and how to build a fireplace yourself.
Ready solution: compact metal fireplaces
The easiest way is to buy a mini-fireplace made of cast iron or steel with a closed firebox and install the finished appliance in the right place, taking care of the chimney. The glass door will protect against accidental sparks and excessive heat, which is especially important in rooms whose area does not exceed 20 meters.
Cast iron and steel fireplaces are attractive not only for their compact size, but also for their light weight. On sale you can find models whose mass is less than 100 kilograms. These miniature hearths are ideal for installation on the second floor or in the attic.
Compact model made of cast iron
Among small units there are heating and cooking stoves-fireplaces that can replace a stove. In size, these devices are no larger than a standard stove, but in addition to the "duties" of cooking dinners, they decorate the interior with a bewitching flame.
How to build a miniature hearth with your own hands
The advantage of a brick hearth is the ability to independently choose the shape, dimensions and design. When buying a finished product, you have to be limited to the manufacturer's standards.
Design features
Even a novice master who has basic knowledge of laying stoves can build this mini-fireplace with his own hands. A small hearth is designed for a room of 16-20 m2. Its height is 1120 mm and the base is 1020 mm wide and 510 mm deep.
Heater channels are provided on the side walls of the structure, passing through which cold air is heated, after which it exits through air vents located on rows 12-14. Due to this, the thermal efficiency of the equipment is significantly increased.
On the back wall of the firebox at the level of 11-12 rows there are protrusions that form a smoke tooth. To clean it from soot, a rear cleaning door is mounted. The flue of a fireplace has the sizes 260*130 mm. Pins are provided for hanging a metal screen.

Miniature fireplace for a room of 16-20 m2
Necessary materials
For the construction of a small fireplace, 300 bricks will be enough (this amount does not include the materials necessary for the construction of the chimney). For laying a fireplace insert, refractory fireclay bricks are used, and for the construction of other structural details, you can choose a different type of heat-resistant brick.
For laying furnace equipment, professional stove-makers recommend using clay mortar with the addition of sand. To obtain the thinnest seams, clay should be cleaned of large particles by sifting or washing. Sand also needs to be sifted - it should be clean and fine, with a grain size of no more than 1 mm. It is important to correctly proportion the components, taking into account the plasticity and fat content of the clay.
In addition to the basic materials, metal parts will be required:
- grate size 140 * 180 mm;
- cleaning door (160*270 mm);
- four air vents sized 130*130 mm each;
- smoke damper (130*260 mm);
- stainless steel for the screen (0.5 m2 sheet);
- pre-furnace sheet (500 * 700 mm).
Masonry mini fireplace
Before building a brick fireplace, you should make sure that the floor is strong. It may be necessary to strengthen the ceiling or build an additional foundation.
The first row of the hearth is laid out of 16 bricks. Then continue laying, following the ordinal pattern. The thickness of the seams should not exceed 5 mm - thin seams significantly increase the efficiency of furnace equipment. Experienced stove-setters apply clay with their hands, but you can also work with a trowel. Use a level to control the levelness of the masonry. The side walls should be rotated 25 degrees.

Brickwork scheme

The sequence of laying a mini-fireplace
Video: ordering with explanations
Quick fix: an alternative to a wood burning fireplace
If the room is very small, but the desire to spend evenings at the hearth haunts, it makes sense to look at alternative options. Modern electric fireplaces create the effect of a flame so reliably that it is difficult to distinguish an imitation of fire with the naked eye.

Electric fireplace with live fire effect
Real fire, but without smoke, is given to their owners by biofireplaces. It is not difficult to find very small fireplaces in the assortment of these wonderful biofuel fires that are allowed to be installed in the bedroom, kitchen or bathroom of any size.

Biofireplace in the interior of the bedroom
For an electric or biofireplace, you can build a plasterboard portal and decorate it with brick tiles or decorative stone - in appearance, the imitation will not differ in any way from the classic version. To save on the construction and decoration of the side walls, it is recommended to choose a corner fireplace - a small hearth will organically fit into any design style.
For those who do not want to give up the dream of decorating the house with a full-fledged wood-burning fireplace, but do not have experience in installation and masonry work, we recommend not wasting time, but turning to professionals. They already know where to start and how to quickly turn a dream into reality.
The presence of a fireplace in any home makes it cozy and fills with warmth. But, unfortunately, the cost of a purchased fireplace is too high, so it is much cheaper to make it yourself. During the manufacturing process, it is possible to choose the type of device that will be in harmony with the individual characteristics of the room and the overall style of the interior. How to make a fireplace for a summer residence with your own hands, we will consider further.
The classic version of the construction of fireplaces for summer cottages
This version of the fireplace assumes the presence of:
- chimney;
- furnaces;
- smoke chambers.

The initial stage of its construction is the determination of the location of the fireplace in the country. In this case, first of all, the convenience of its use is taken into account. In addition, one should proceed from the possibility of the location of the chimney. Also, the installation site should be convenient for maintenance both outside and inside the building. The chimney for the fireplace and for the stove should be 200-300 mm higher than the ridge. With the central location of the fireplace, the head of the pipe is located near the ridge. This option involves easy installation of the chimney, simple installation and dismantling of the air damper. In addition, in this case, the pipe is cleaned of soot easily and conveniently.
Installation of brick fireplaces for summer cottages near the central wall in the room, if necessary and desired by the owners, is possible. Although in this case, cleaning the pipe and installing the chimney is much more difficult. To solve this problem, temporary means of paving are installed during construction work. For example, a special ladder is mounted, which allows the fireplace to be serviced from the outside.
The next stage of construction is the choice of the appearance of the fireplace portal. It depends on many factors, such as the location of the fireplace, the general style of the interior and the general wishes of the owners.
A variant of the construction of wall, wall, floor fireplaces is possible. Each of them has its own advantages and disadvantages. The most common are wall fireplaces, in addition, they are the most convenient to use and take up little space. The finishing of the portal is the most diverse, ranging from brick or stone masonry to wood, metal or ceramic tiles. It all depends on what materials the walls in the country house are made of and how they are finished. In addition, quite popular fireplaces are corner ones for giving, with their help it is possible to save space. It is convenient to sit in a rocking chair near such a fireplace and watch out the window.

Please note that the materials used in the arrangement of the fireplace must be non-combustible and fireproof. Since at high temperature and in the presence of fire, there is a risk of fire.
When arranging a fireplace in a two- or three-story building, its weight exceeds a ton, so due attention should be paid to the arrangement of the foundation. The best option is the arrangement of a concrete poured foundation. This type of foundation is characterized by high strength and long-term performance.
When arranging this type of foundation, it is required to carry out work on reinforcing concrete using a mesh or reinforcement rods. The easiest option is to use a rebar with a periodic profile. To equip the foundation on solid ground, you will need reinforcement with a diameter of about one centimeter. When working on soft soils, the diameter of the reinforcement increases by 2-4 mm.
Start the procedure for building a fireplace with its design. Accurately measure all the components, details of the fireplace, transfer them to paper. Further, based on the measurements, you should buy the material.

For the construction of the foundation - the foundation will require the presence of:
- about 45 kg of cement, the amount depends on the size of the fireplace;
- sand about 90 kg, based on 45 kg of cement;
- crushed stone of a large fraction - 90 kg;
- reinforcing bars - the size of the structure affects the number;
- edged boards, 3 cm thick;
- hammer;
- grinding machine;
- nails 7 cm.
When constructing the foundation of the pedestal, you will need:
- sand and cement in a ratio of one to three;
- rubble stone, in relation to the size of the fireplace.

To make a fireplace for a wood-fired cottage, you should prepare:
- refractory type brick, its quantity should be calculated based on the design of the fireplace, keep in mind that it will be needed both for the construction of the fireplace and for the chimney;
- 50 bricks will require about one bucket of clay;
- about 10 kg of sifted sand, half a bucket;
- prepare the grate;
- air smoke damper installed in the pipe;
The classic manufacture of a fireplace involves the presence of two such dampers. They are located at the top and bottom of the pipe. The variety and shape of the damper is determined at the design stage and completely depends on the diameter of the pipe.
- take care of the presence of a decorative grill of the firebox;
- about the mantel;
- and a set of tools to help maintain the fireplace.
To lay brickwork you will need:
- a tank in which clay will be kneaded, with a capacity of 12 liters;
- plaster ladle, which will be used for kneading;
- trowels;
- rubber mallet;
- picks;
- plumb;
- building level.
The height of the chimney pipe is affected by the height of the building itself and the ridge on the roof. The size of the pipe should exceed the height of the ridge by several bricks. The inner diameter of the pipe is affected by the inlet located in the furnace. The inlet in the furnace should be five times larger than the diameter of the pipe, then the draft will be good. A brick fireplace assumes the presence of a constant section, that is, a passage size. With the help of specialists, or with certain skills in arranging chimneys, the pipe is made narrower at the top, this procedure helps to increase traction.
Before starting construction, care should be taken to check the availability of all necessary materials and their quality. Sorting the bricks, if there are small cracks in the material, put it aside, it will be used when you need to use half the brick.
Next, start preparing the clay-sand mixture. To check its quality, it is necessary to prepare seven bricks, connect them with mortar and lay them in a column overnight. In the morning, take the structure by the top two bricks, if the rest have not fallen off, then the mortar is of high quality.
Before laying bricks, the clay is soaked in water for 24 hours. If there is no time to soak, soak the clay in warm water for a shorter period of time.

To equip the foundation for the fireplace, you should disassemble the floor, determine the type of soil and the depth of the foundation.
In relation to the size of the fireplace, mark up for arranging the foundation. Please note that its size should be 15 cm larger on each side to ensure the evenness of the structure and the installation of the formwork.
It is forbidden to install a fireplace foundation next to or connected to the foundation of a building. This procedure will significantly degrade the quality characteristics of both foundations and reduce the life of the building.
If the soil is solid, then the foundation is laid at a depth of up to 80 cm, otherwise, a deepening of more than one meter will be required. To make a foundation on a solid grade of soil, you will need to build a formwork. For its design, you will need boards 20 cm high. This is followed by the process of laying reinforcement. The laying step is 50 cm.
The preparation of the concrete mixture is best done in a concrete mixer. Since in it all the ingredients are mixed and a homogeneous consistency will be obtained. This will significantly improve the quality properties of concrete. First, the first layer of reinforcement is poured, it is vibrated using a vibrator for concrete. It will help remove excess air from the solution and improve its strength.
Lay the second layer of reinforcement on the pre-poured concrete and proceed with the subsequent pouring. The surface of the foundation is covered with plastic wrap for 12 hours. Next, the film is removed and the formwork is dismantled. Please note that this procedure must be carried out with extreme caution, since the concrete is still quite soft. Next, install the formwork for pouring the fireplace pedestal, its size fully corresponds to the value of the width and length of the fireplace itself.

After the formwork is installed, the base should be filled with mortar mixed with rubble. Cover the surface with plastic wrap and wait for the foundation to dry.
The best option is to raise the cabinet a few centimeters higher than the finished floor. This process will help improve and simplify the installation of flooring and fireplace trim.
After twelve hours, the formwork is dismantled, the polyethylene is removed. All excess areas on the sides of the foundation are covered with soil and compacted. To improve shrinkage, it is recommended to pour them with water. After another twelve hours have elapsed, begin laying the bricks.
Use a plumb bob to check the corners and attach it to the ceiling with hooks. In the process of laying bricks, one should strictly adhere to the rule that says: the minimum amount of clay ensures the reliability of the masonry. The layer of clay mortar between the bricks is no more than 4 mm.
The main task of the fireplace is to ventilate the room, but not to heat it. Namely, due to the presence of ventilation, the fireplace is not able to fully fulfill the role of a heater. To remedy the situation, the installation of a heat-resistant door is required. With the help of thermal radiation, the room will be heated by the heat that radiates from the fireplace.
To increase the efficiency of the fireplace, you will need to install a boiler in the combustion chamber. This design is characterized by:
- boiler;
- pipeline supplying hot water;
- radiator for heating;
- warm air flow.

The boiler comes into direct contact with the flame blazing in the fireplace. From this device, water enters the radiator, thereby heating it. The cooled water again enters the boiler and heats up in it. Thus, the circulation of water in the system is obtained. It is possible to install a stationary boiler. To mount it, during bricklaying, it is necessary to provide for the presence of threaded pipes. Also, the water system is removable. Although the aesthetics and appearance of the fireplace will suffer a little, the efficiency will increase several times.
Cast iron fireplace for a summer residence: installation features
Before proceeding to the direct installation work on installing a cast-iron fireplace, we suggest studying its advantages and disadvantages.
The presence of a closed firebox in the fireplace ensures complete safety of its operation. Therefore, such a fireplace is most welcome in a house with small children.
The design of the closed furnace has the form of a cast-iron chamber designed for fuel combustion. One of the sides of this chamber has the form of a glass door through which the flame is viewed. The door, which is equipped with lifting parts, is distinguished by ease of use. With their help, the firebox acquires an open look, that is, it is universal. An ash pan is located below the combustion chamber, it is the place where air is supplied to the chamber. The top part of a fire chamber is equipped with a pipe for removal of a smoke. The installation procedure for a cast-iron fireplace consists in the construction of a portal that will give the stove a finished appearance of the fireplace.
Among the advantages of a closed cast-iron firebox, it is worth highlighting:
- the presence of heat accumulators, which significantly increase efficiency;
- the presence of a variety of models that differ in shapes, types and appearance;
- the possibility of replacing damaged parts;
- longer service life than brick fireplaces;
- a high level of fire safety is ensured by the absence of open fire;
- the cost of such a fireplace is much lower than a brick one;
- ease of installation.

Among the large number of advantages of such fireplaces, there are several of their disadvantages:
- visibility of fire is more limited than open fire models;
- care is required, which consists in the periodic cleaning of the glass door;
- the standard firebox is distinguished by the presence of black.
One of the main advantages of such fireplaces is the absence of the need to build a foundation. Therefore, they are easy to install in an already renovated room.
First, decide on the location of the fireplace. It should be convenient for the location of the chimney. For the installation of a fireplace, it is necessary to build a base, which looks like a concrete screed with reinforced elements. Next, waterproofing is laid, and when arranging a fireplace on a wooden field, it is necessary to carry out thermal insulation.
The thickness of the layer for screed equipment is 100-150 cm. To perform reinforcement, use a metal mesh. After waiting for the concrete to harden, start installing the structure that will hold the firebox. For its construction, brick, aerated concrete blocks or other alternative materials are used. It is possible to purchase a ready-made brick base made of natural stone.
In the presence of a not very strong overlap, it is better to give preference to aerated concrete, as it is highly durable, but at the same time very light. With its help, it will be possible to build a structure of any shape and size. Further finishing of the fireplace involves its plastering and cladding with ceramic tiles, natural or artificial stone.
The blocks are interconnected with a special adhesive mixture or a conventional sand-cement mortar. To level the surface, it is required to apply a layer of putty, up to two centimeters thick.
A heat-insulating layer should be laid on the base under the firebox, in the form of asbestos cardboard or steel roofing metal.

Tip: When choosing a place to install a fireplace, take into account the fact that there must be space between the firebox and the fireplace wall for installing a system that provides convection heating. In this case, the length of the chimney must be such as to bring this system to the outer part of the building.
To ensure the correct installation of the firebox, it is necessary to put wooden blocks in place for its installation, with the help of which the firebox will be leveled. After the installation work, the bars are removed. A metal sleeve or pipe is used as a chimney. They must be installed in a specially made hole through which the pipe is brought out into the street. In carrying out this process, all fire safety rules should be taken into account.
Please note: There are several limits on vertical deflection of the chimney. With a total pipe length of less than 500 cm, the maximum deviation should not exceed forty-five degrees, with a length of more than 500 cm, no more than twenty degrees.
To facilitate the finishing of the fireplace, it is necessary to build a frame on which any of the finishing materials will be attached, for this a series of actions should be performed:
- use a thin-walled steel profile or corners, use metal screws to connect them;
- thermal insulation is attached to the inside of the frame, and sheathing is attached to the outer;
- as thermal insulation, it is recommended to use heat-insulating mats, fasten them in such a way that the side with the presence of the foil faces the firebox;
- any material is used for sheathing the frame, in the form of drywall, wood, asbestos-cement slabs;
- the thermal insulation of the cladding must have holes in order for the heat from the fireplace to enter the room.
Options for finishing fireplaces for wood-burning cottages
1. An excellent option for decorating a fireplace that will fit into any style of interior is wood. Please note that wood requires pre-treatment with fire protection. The best option is to use MDF. The firebox in this case is equipped with a protective screen that protects the tree from possible ignition. The fireplace portal should be 10-12 cm larger than the firebox itself, this will help prevent it from heating up.
2. A tile is distinguished by a wealth of colors and shapes. Glazed tiles, terracotta tiles or porcelain tiles can be used to finish the fireplace.
3. Using tiles will give the fireplace a luxurious look. In appearance, they resemble tiles, and differ from it in textured surface and heavy weight. Technology and installation require their fastening with metal wire.
4. Heat-resistant mosaic is a great option for decorating a fireplace portal. With its help, it is possible to create incredible drawings that will complement any type of interior.
5. Marble, drywall, decorative plaster - perfectly decorate the surface of the fireplace. In this matter, fantasy is limitless. The main condition is the use of heat-resistant and fireproof materials.