How to fix a toilet with a button. Do-it-yourself toilet cistern repair: instructions for fixing typical breakdowns. Drain tank leak
Today it is unrealistic to imagine life without water supply and plumbing. Plumbing fixtures are used in everyday life very often. One such device is the toilet. Due to frequent use, it can fail, the drain button is especially vulnerable. Therefore, this article will discuss how you can fix the problems associated with it.
Toilet device with a button
The toilet cistern is a reservoir for storing water for flushing. In order for it to work, it has some reinforcement elements.
The flush tank mechanism with a button consists of the following two elements:
- Drain mechanism.
- Fill valve.
Drain mechanism directly connected to the button, and is responsible for draining the water. The drain mechanism has a hermetic membrane, which is located at the bottom of the device. It prevents the appearance of a gap through which water can drain into the toilet.
The device of the toilet cistern mechanism with a button
The drain mechanism can be equipped with:
- Single button. When pressed, the water descends all that is in the tank.
- Dual mode button. The button has several modes of operation, and is divided into two parts: large and small. When you press a large part of the button, the water will drain completely from the tank. When the water is drained with a small part of the button, the water flows partially, up to half of the available liquid in the drain tank.

Dual mode toilet button
Responsible for a set of fluid in the tank behindshower valve . This mechanism has a float, thanks to which the water level in the drain tank is adjusted.

Toilet fill valve
There are two options for supplying water to the tank:
- bottom supply;
- lateral supply.
When installing a valve with a bottom water supply, all connections must be made airtight. Tanks with a side set of water are more common than with a bottom one. A feature of this type is the appearance of noise when collecting water.

All parts of the fittings that are inside the cistern are fully interconnected. When the button is pressed, water starts to drain from the tank. Accordingly, the float of the filling valve descends to the bottom of the tank, thus opening the inlet valve. Water begins to flow into the tank, and with the water level the float rises until it is completely filled until the inlet valve is closed.
Types of breakdowns and their elimination
There are several common malfunctions that manifest themselves as follows:
- water continuously flows from the cistern into the toilet;
- constant flow of water from the water supply into the container;
- to drain the water, you must repeatedly press the button;
- the button on the drain tank does not work completely;
- the toilet is leaking;
- the collection of water in the drain tank is too noisy.
In any of the above cases, you can carry out repairs with your own hands, because the process of such work is not something very complicated. The most important thing is to determine the cause of a particular problem and eliminate it.
Drain tank leak
A cistern leak can occur for four reasons. The first and most common is due to the overflow of the tank, when all the excess liquid begins to leave through the overflow. This can happen for several reasons:
1. The gasket located at the outlet of the drain valve is not pressed. It is necessary that the gasket is securely pressed against the toilet part. After all, leakage can be not only due to loss of elasticity or deformation.

2. During use, the rubber gasket may deform and lose elasticity, so a gap appears through which water begins to flow.
3. A crack in the drain valve may appear inside the drain tank, through which water flows.

drain valve
4. There is a pin in the valve body that holds the float. Due to frequent use, it can rust, which also leads to water leakage.

Toilet float pin
The second reason is bolts that connect the toilet to the cistern . Bolts are either plastic or steel. In the case of the first, due to operation, it bursts and the liquid gradually flows. If we talk about steel, then the problem is that over time it rusts, and the effect is the same.

Connecting bolts
The third reason is defective rubber bulb . Any rubber part becomes less elastic over time than when it was new, a rubber bulb is no exception. It becomes rigid and does not acquire the desired shape, as a result of which water flows.

Pear drain valve
The fourth reason for the breakdown is the skew of the tank, or the shift of the float lever in the tank.
There are two main reasons for this device to skew: poor-quality plumbing parts, or the presence of a hole in the float where water flows. Another reason is the frequent use of a plumbing part.
Toilet cistern repair
If the water flows before reaching the overflow, then bolt problem . To solve this problem, you need to do the following:
1. Check if water only flows up to the overflow level.
2. Shut off the water supply and drain the drain tank.
3. Remove the hose that supplies water to the tank from the water supply system.

Dismantling the water supply hose of the toilet bowl
4. Next, you need to unscrew the bolts holding the shelf on the toilet, and pay attention to the fittings, inspect it in order to understand what condition it is in. If it is working, then you should simply replace a couple of bolts, or purchase a new set of fittings.

The process of unscrewing the toilet bolts
Old rusty bolts, if they interfere with the removal of the tank, must be cut with a hacksaw or other cutting tool.
6. After that, you should assemble the tank using new, preferably brass bolts and repeat the above steps in the opposite direction.
It will not be superfluous to replace all rubber gaskets.
How to determine the malfunction of the drain tank
It does not take much effort or knowledge to solve the problem, the most difficult thing is to determine the cause of the water leak from the cistern into the toilet. To find the problem, you should conduct the following experiment:
1. Remove the lid from the toilet.
2. Raise the float one centimeter. If the fluid stops flowing, then the cause is found. Water flows because the lever is slightly bent and does not shut off the water at the moment of reaching the edge of the filling.

4. However, if it is found that the stud is broken, it can be temporarily replaced with a thick piece of copper cable, and if the problem is in the deformation of the hole intended for the stud, then you just need to replace the valve itself.
5. If the problem is still not solved, then the last cause may be a loose gasket (diaphragm) to the valve opening. In this case, it should be adjusted, but if it is still leaking, then you need to purchase a new gasket and replace it.

Gasket (membrane) of the valve hole
If the problem is in the pear, then it makes no sense to repair it, it's easier to just replace it with a new one. However, when buying, you should choose the softest of all offered, because during operation they all become more rigid. The pear is fixed on the thread, so to remove it, unscrew the pear from right to left, respectively, to twist the new one, you need to turn in the opposite direction.

To temporarily solve the problem, you can use some kind of weight, it should be hung on the rod. Thanks to the additional load, the rubber bulb will be pressed against the saddle.

Siphon membrane repair
If the water drains from the tank only after repeated pressing or the liquid constantly leaks, the membrane should be replaced.

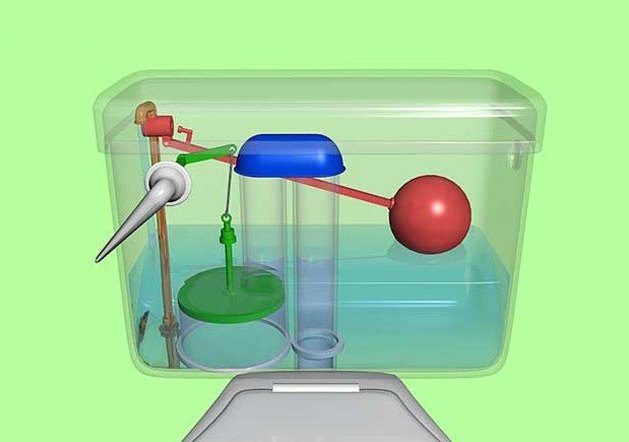
Side flush cistern device:
1 - overflow pipe; 2 - water supply; 3 - float valve; 4 - float; 5- float lever, 6- siphon; 7 - membrane; 8 - metal plate with holes; 9 - thrust; 10 - water release lever; 11 - gasket; 12 - siphon retaining nut; 13 - fixing nut; 14 - drain pipe.
Such work is carried out as follows:
1. Instead of a tank lid, put a crossbar; for this, you can use a small rail or tube.
2. Float lever (5) tie to the crossbar.
3. Completely drain the water from the drain tank.
4. The nut that connects the drain pipe to the tank (13) should be removed.
5. Siphon nut (12) just loosen it up a bit.
6. The siphon itself (6) must be disconnected and removed.
7. Remove the damaged membrane (7) and put in a new one, which should be exactly the same size and shape as the old one.
8. Install the cistern fittings in reverse order.
Defective waste tank button
If the drain button does not work, then in most cases it is necessary to repair the damaged traction (9), which connects the toilet button to the flush mechanism.

wire traction

Tubular push button
It is necessary to disconnect the mechanism and the broken element, remove and install a new one. However, for temporary use, you can make a pull with your own hands using a thick piece of wire. But for normal and long-term operation, you should purchase a new, serviceable mechanism.
Toilet cistern noise when filling with water
Sometimes the problem is the loud noise that appears when filling the drain tank. There are several ways to solve it.
You can try reducing the water pressure. To do this, simply tighten the water supply valve.
If this does not help, then you will have to disassemble the drain barrel and check all the gaskets. Perhaps one of them is leaky or very worn out, and it is its rubber that is the source of the noise. Then you should replace it.

Worn float valve gasket
If everything is in order here, then you should check all the hoses and pipes of the toilet bowl. Perhaps they are clogged with dirt or other deposits.
In extreme cases, you can make a silencer that will absorb excess sound. For this you need:
1. have or purchase a flexible plastic tube;
2. mount it vertically with respect to the liquid level at the inlet to the float valve;
3. Place the lower end of the plastic tube under water.
For more information about this muffler, see the video:
If such a home-made muffler did not solve the problem, you need to buy and install a stabilizing valve that will independently regulate the pressure of water entering the drain tank.
In rare cases, it is necessary to replace the entire drain system.
Bowl failure for toilet installation
Cup breakage is extremely rare. This is possible only if the toilet to the floor or to the wall was initially fixed incorrectly. Therefore, it is necessary to correctly install the device and carry out repairs in a timely manner, thanks to this, serious and costly breakdowns can be avoided. If a puddle appears on the floor around the toilet bowl, then most likely the breakdown will be in the tank itself. Here are some possible reasons:
- seat damaged due to corrosion;
- the pear does not stick tightly enough;
- the float valve is incorrectly adjusted;
- insufficient tightness of the nut connection.
When any gasket wears out, it should be replaced immediately with a new one.

Installation gasket replacement
In order to tighten the loose nut at the base of the overflow in the tank, it is necessary to remove it and tighten the nut. However, sometimes you can use a fixing collar. You can also replace a worn cuff.
Faulty intake valve
A bad inlet valve can also cause water to leak. To check, you must press the button to drain the water, and if at this moment the valve is not tightly closed or moved, then it should be repaired. A similar problem may occur due to clogging or due to a worn rubber gasket. To solve it you need:
1. close and drain the water in the tank;
2. remove the valve and check its gasket;

The inlet valve is removed by turning its entire body clockwise
3. if it is worn out, then replace it with the same one;
4. if it's not the gasket, then disassemble the valve and carefully remove all dirt from it and its parts (for example, with an old toothbrush).
5. collect everything in reverse order.
You can also watch a video on repairing the intake valve:
However, simple cleaning of debris or even replacing some part does not always help. In such cases, a new filling mechanism should be installed.
Toilet float repair
There are many reasons why water constantly flows. Perhaps the float lever has shifted or warped. In order to bring it into good condition, you need to put it in the correct position. Basically, it is located 2.5 cm below the pipe through which water is supplied. If necessary, it must be adjusted, as in the image below.

Toilet float adjustment
Also, to solve the problem of water leakage, you can pay attention to the float placed inside the tank. If, upon inspection, it is found that there is water inside, or damage is visible, this means that it has become too heavy and, accordingly, water is leaking. You can repair the float as follows:
1. Remove the float;
2. Completely pour water out of it;
3. Securely seal the resulting hole;
4. Put the float in its original place.
To seal the hole on the float, you can use heated plastic or a regular plastic bag, which must be securely fixed to the float. However, such sealing of holes will only allow temporary use of the float, because over time this problem will make itself felt. Therefore, in the near future it is advised to purchase a new float and put it in place of the old one.

Float drain tank
Based on the foregoing, the most important thing is to find the cause of the breakdown, then either repair it or replace it with a new part. When installing a new mechanism, it is important to properly adjust it. With a strong desire, all these works can be carried out without a specialist.
The bathroom is one of the most frequently visited places in the house. Contrary to popular belief, the toilet is not the dirtiest place if properly cared for. But one of the unpleasant situations that can happen to him is the flow of the tank. This leads to the formation of plaque on the inner walls of the toilet, which is not so easy to clean. It also increases the cost of water supply, which can result in a round sum for the year. Therefore, it is important to know how to fix common problems. The article is just devoted to their elimination.
How the tank works
Before you repair something, you need to find out how the mechanism functions. This rule also applies to the push-button toilet. It is important to understand how shut-off and storage valves work. The main task of the drain tank is to supply the required amount of liquid into the bowl for washing it. The material for the manufacture of the tank can be ceramic, plastic or metal. In some cases, stainless steel is used, which lasts a very long time. There are actually two mechanisms in the toilet bowl at once. One of them is responsible for ensuring that water enters the tank itself from the supply system. Another system regulates the release of accumulated water into the base of the toilet.
When the water level in the tank reaches the required level, the supply is interrupted by a float switch. It rises to a certain height and blocks the hole from which the liquid flows. The flush mechanism on push-button toilets can be of two types. The first is called siphon. It is more often used in plastic tanks with a button that protrudes above its lid. The essence of the operation is that when you press the button on the toilet bowl, a small vacuum is created. He makes the stream move towards the bowl. The second type of mechanism is also called a pear. The essence of its functioning is that a small rubber pear closes the drain hole. As soon as the key is pressed, the locking mechanism slightly opens the hole and the water leaves.
Additionally, an overflow mechanism is provided. If the water level in the tank exceeds the allowable mark, the excess water is discharged into the toilet. Most modern toilets have two buttons. One of them is slightly larger than the other. When you press them, a different volume of water is supplied, which allows you to save consumption while meeting different needs.
Common problems
Experience shows that tank failures concern the same nodes, so it is easy to distinguish several categories. They are:
- constant flow of water through the overflow;
- button failure;
- insufficient tightness of the shutter;
- tank skew;
If a problem is discovered immediately after the installation of the toilet, then most likely a mistake was made in the process. In the case when a leak or other malfunction is detected after several months of normal operation, then one of the nodes may have failed. Each of the special cases will be considered below.
Continuous set of water

Some users observe continuous and prolonged filling of the toilet bowl, which is accompanied by a leak of water. This indicates that the container is full. One of the causes of such a problem may be a leaky gasket on the intake valve. If it bursts or loses its shape, then it is unable to firmly close the hole and filling occurs through it. The gasket may be in excellent condition, but the problem is still there. A poor fit may be due to a bent float support or improper adjustment. If the float mounting bar is metal, then it may fail due to corrosive attack. The valve itself may fail. Often this happens when assembling products with plastic fittings. It is very easy to damage it with excessive force when tightening the nut.
How to eliminate
The first step is to carefully examine the external condition of the entire mechanism. To do this, carefully remove the cover. If we are talking about modern toilets, then you may have to first unscrew the button that locks the lid in place. Now you need to slightly raise the bar on which the float is located. It usually takes a little effort to do this. If after that the water stops filling the tank, then the problem is in the wrong position of the lever. To solve the situation, it is enough to bend the lever a little so that the float is lower. Most mechanisms have a special lamb that allows you to do this.

In the case when the leak does not stop after the actions taken, it is necessary to look at the place where the lever is connected to the valve, which should close the inflow. The problem may be in the fixing pin. If so, then it is enough to replace it with ordinary copper wire. But it may be in order, so it makes sense to inspect the hole through which the inflow occurs. Perhaps it is clogged, and does not allow the stem to close it completely. If the structure is made of plastic, then deformation is possible, which distorts the hole and the stem cannot move freely in it. If it was not possible to eliminate the deformation by loosening, then the valve will have to be replaced.

A leaky gasket could be the cause of the leak. This can be checked by pressing the stem harder against the hole. If the leak has stopped, then it makes sense to replace the gasket with a new one. In some versions of modern locking mechanisms, the valve is in a plastic casing, so it cannot be freely inspected. This can be done by completely dismantling the node. To test it according to the above scheme, it is enough to hold it over the tank with the hose connected.
Bolt loosening
In modern toilet bowls, the tank is located directly on the bowl, there is no pipe between them that connects them. The exception is those options in which the tank is mounted in a false wall. The tank is fixed to the bowl with bolts. Over time, they can loosen or fail due to rust. In this case, the tightness of the junction node is violated, and water can flow onto the floor through the gap. Such a leak can be difficult to notice, because water flows out in small portions.
What to do with bolts

To resolve the issue that arises from the bolts, you must first turn off the water supply. Do not immediately empty the tank, you must carefully examine the place where the leak is observed. After that, the tank is emptied and a complete set of bolts is purchased. It makes no sense to change only one, because after a short time others may be damaged. Bolts are unscrewed. You should be extremely careful not to damage the bowl and tank, especially if they are made of ceramic. If the bolts are metal, then they can be pre-treated with a special compound that will remove rust and allow you to unscrew the nuts without much difficulty.

The head of the bolt is inside the tank, so you have to remove the valves to get to them. With one key, you need to hold the head so that it does not scroll. The tank is removed from its place and the junction is cleaned of rust. The gum, if any, is carefully examined. When assembling the tank, it is advisable to coat it with silicone sealant. Rubber gaskets that are under the bolt heads are also replaced with new ones. The tank must be set absolutely level, so that there are no problems due to skew. The bolts are tightened with special care so that they do not split the toilet bowl and the tank itself.
Note! The problem may not be in the bolts themselves that attach the tank to the toilet, but in the sealing gum that is located at the junction. Therefore, it is advisable to replace the rubber bands together with the bolts, and vice versa.
locking bulb

The valve of the locking mechanism through which the flow of water into the tank is carried out may be in order, but water sometimes leaks anyway. The problem may lie in the pear, which is located on the locking hole between the tank and the toilet bowl. Over time, from exposure to water, the pear can lose its elasticity and become too stiff. It is no longer able to take the shape of the hole and leakage occurs. It is not possible to restore such an element, so it is better to completely replace it. When buying, it is better to take one that has a slight rigidity. It is she who will serve in the tank longer than others. Usually the pear has a thread, thanks to which it is screwed onto the stem. Sometimes it can be sold assembled with a stock. If at the moment it is not possible to buy a pear for the toilet cistern, you can go for a trick and tie a small load to the rod, which will put pressure on it, increasing the area of contact with the cistern opening.
Rod, locking mechanism

One of the troubles that can arise with a modern toilet is that the shutter button is not pressed. This is usually due to the fact that the traction is damaged. Often the locking mechanism itself fails. They cannot be restored, so you will have to replace part or all of the locking mechanism. Before you buy a ready-made one in a store, you need to know which one was exactly used, because there are many types of them. It is necessary to de-energize the toilet bowl, drain the water from it and remove it by unscrewing the bolts. The supply hose is unscrewed, as well as the nut that fixes the hose fitting. At the bottom of the tank there is a plastic nut that holds the locking mechanism. It must be unscrewed and all components of the locking mechanism removed.
It will serve as a model for the purchase of a similar one. It is better to take it with you to the store to check all the details. Often the new mechanism may be slightly longer than the previous one and will not fit in the tank. Some universal kits have special adjustment bars that make it possible to increase or decrease the distance from the release button to the base of the locking mechanism for the tank. When assembling, it is important to install all the gaskets in their place and, if necessary, process the joints with silicone.
Other possible breakdowns

The cause of the leak from the tank may be cracks in the body of the tank. They appear when used incorrectly. For example, you can move the tank back strongly while sitting on the toilet. Damage appears when the cistern and toilet bowl are tightly tightened with bolts. If such a problem is observed, then it is necessary to dismantle the tank, clean it well and dry it. After that, all cracks in the tank are covered with high-quality sealant. After it hardens, you can install the container on the toilet. If the leak is no longer observed, then it can be operated. The tank may need to be replaced.
Periodically it is necessary to carry out maintenance of the tank so that it lasts longer. It is important to regularly remove rust and plaque from it, which accumulate due to poor-quality tap water. To do this, you can use special cleaning products. But you should be careful, because some of them have a negative effect on the rubber components of the locking mechanism. It is important that there are no sudden drops in temperature in the toilet room, at which the water in the tank and toilet will freeze. This can lead to damage not only to the mechanism, but also to the toilet bowl. For more tank repair tips, watch the video below.
Conclusion
If in the process of repairing a tank with a button it is necessary to replace the entire mechanism, then for premium toilet bowls the price per set can reach 4 thousand rubles. You should be prepared for this when purchasing expensive plumbing. The article lists several main reasons that lead to leaks. Most often, they can be eliminated independently using improvised means. When using cistern wire, select non-ferrous samples rather than steel. Since the latter will become an additional source of rust in the tank.
For a comfortable stay of a person, water supply and lighting of the room are necessary, as well as properly working plumbing devices connected to the sewer system. One of the most popular plumbing fixtures are the toilet and cistern. Currently, cisterns are most often equipped with buttons that are responsible for the smooth descent of water into the toilet. The toilet bowl button becomes unusable over time or requires repair. How to do this, read on.
Tank device with a button
The drain tank is a container that stores water for draining. For operation, the tank is equipped with elements. Toilet cistern device with button:
- drain mechanism. The device connected to the button is responsible for draining the water. In the lower part, the drain mechanism is equipped with a sealed membrane that protects against the formation of water leakage into the toilet bowl;

The drain mechanism can be equipped with:
- single button. Descent of water occurs at the touch of a button. In this case, all the liquid from the tank enters the toilet;

- dual mode button. The button with several modes of operation is divided into two parts: small and large. When using a smaller part, half of the liquid in the tank gets into the toilet. When the water is drained by the greater part of the button, the water is drained completely.

Using a button with two operating modes allows you to save cold water.
- filling valve responsible for the collection of water in the tank. The filling mechanism is equipped with a float that regulates the level of water in the tank. The mechanism may have:
- lateral water supply. Most often found in Russian-made cisterns. A distinctive feature of the mechanism is the formation of noise when collecting water;

- bottom water supply. When installing a valve with a bottom connection, it is important to achieve complete tightness of the connection.

All fittings installed in are interconnected. After pressing the button, the water is drained. In this case, the float of the filling valve sinks to the bottom of the tank and opens the inlet valve. Water begins to flow from the water supply and raise the float to the set level. When the container is full, the inlet valve will be automatically closed.

Button repair
The fittings of the tank may become unusable for the following reasons:
- use of low-quality mechanisms. Professional plumbers recommend installing cistern fittings made by companies such as Cersanit, Vidima, Jika;
- natural wear. Any device is designed for a certain number of years of use or number of flush cycles;
- mechanical damage. Careless use may cause damage.
Button malfunctions and solutions
The most common button failures are:
- "sticking" of the button, that is, the flushing of water occurs only after repeatedly pressing the descender;
- failure of the button, that is, the button mechanism descends into the capacity of the drain tank.
Elimination of sticking
If the water is flushed after repeatedly pressing the button, then the malfunction is related to the rod connecting the drain device and the drain mechanism.

To fix the problem, you need:
- block the flow of water into the tank;
- remove the tank cover. To do this, first of all, the inside of the button is removed, and then the retaining ring located on the button is unscrewed counterclockwise and removed;

- the button is removed;

- stock is being repaired;
- the system is assembled in reverse order.
The stem is made of plastic. Therefore, repairs most often come down to a complete replacement of the product. For temporary troubleshooting, the stem can be replaced with wire.
Elimination of failure
If the toilet cistern button fails, then the causes of the breakdown may be:
- incorrect setting of the drain device (insufficient button height selected);
- failure of the spring that returns the button to its original position. The problem is solved by replacing the spring.
To set up the drain mechanism, you must:
- shut off the water supply to the container and completely drain the remaining liquid;
- remove the drain mechanism (the whole turns to the left until it clicks);
- press the clamps securing the glass;
- increase height;

- install the valve and cover;
- check if the problem is resolved and repeat the procedure if necessary.
How to adjust the drain mechanism is shown in the video.
Button replacement
If the listed actions do not help to eliminate the malfunction of the tank trigger, then the drain button needs to be replaced. You can work in the following way:
- remove the button, according to the scheme described in detail above;
- disconnect the button from the exhaust valve;
- install a new device.
The new toilet button must fully match the broken device. Otherwise, the drain valve will need to be replaced.
All troubleshooting work on the button must be done very carefully so as not to damage the rest of the fittings. If it is not possible to eliminate the breakdown on your own, then it is more expedient to seek help from specialists.
The most common problem in bathrooms is the malfunction of the toilet bowls. Buttons sinking, slow filling of the storage tank, incessant leakage of water from an overflowing tank. What kind of malfunctions do not happen.
These situations can arise for a variety of reasons. To reveal the true cause in each individual case, it is necessary to dismantle the cover. After determining the nature of the malfunction, you can perform a simple repair of the toilet bowl with a button with your own hands, without resorting to the help of plumbers.
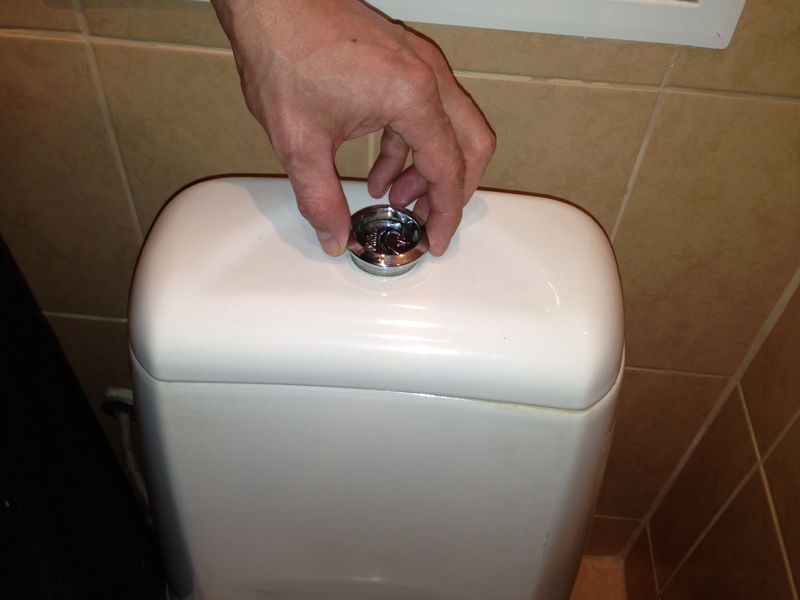
We unscrew the drain button by hand, rotating it counterclockwise. No tools are required for this operation. We take out the button and carefully remove the cover.
The push-button flush mechanism in the toilet bowl is located in the lid. In addition to the main function, it serves as an element for fixing the stable position of the lid
There are two mechanisms inside the drain tank, in the details of which there may be a malfunction that causes a leak:
- drain mechanism;
- a shut-off valve responsible for the flow of water from the water supply to the tank.
We carefully examine the drain mechanism, evaluating the height of the water level. If the water is in the overflow area, then this indicates that the locking device does not hold.
The water in it is above the float, and therefore reaches the drain channel, through which it drains into the sewer system.
If the water level is at the adjusted height in the locking device, then the leakage is due to a malfunction of the valve in the drain mechanism. These are the two main reasons.
Repair of the mechanism of constipation of the drain device
Water passes above the overflow device, which means that the drain valve is in working order, and the problem lies in the constipation mechanism. We drain, freeing the container from water. Close the water supply valve to the system. We remove the drain mechanism device by turning it slightly counterclockwise. We take out the removed part from the container, inspect the condition of the sealing rubber ring, which is the shut-off valve of the drain mechanism. We are convinced of its integrity. Put aside.
If this is not the case, then remove the ring and rearrange it with the back side, thereby ensuring a snug fit of the rubber to the surface of the bottom of the container. You can immediately put a new o-ring purchased at a plumbing store.
The second problem is the formation of plaque, the accumulation of mucus on the surface of the shut-off valve, which violates the tightness of this system. It can be eliminated by cleaning the part from layers. Changing the ring is very easy. Remove the plastic lock washer. They take a rubber part, wash it thoroughly, then turn it upside down and press it with a washer installed in its original place.

Schematic representation of two ways of supplying water to the toilet flush tank, showing the structural differences in the arrangement of fittings
We unscrew the water supply system and the locking mechanism. There are tanks with a lower water supply and with an upper one located in the side wall of the tank. The inlet hose is connected and the valve is on top. The type of connection does not play an important role, since the malfunction is directly related to the state of the shut-off valve. Grains of sand, rust from the water supply system can get under the valve, which violates the tightness of the locking ring.
In addition, the valve itself can be deformed during long-term operation. A manifestation of this is a specific recess formed on the sealing gum. A part with such damage can no longer restrain the flow of water from the water supply system.

A view of a torn valve gum that will have to be replaced with a new part purchased from a store or made by hand from suitable materials
- Remove the mechanism that controls the flow of water into the tank. To do this, unscrew the large nut by turning it counterclockwise.
- We take out the removed device from the tank, temporarily putting it aside.
- We consider a membrane that serves to reduce the pressure of water coming from the system.
- We wash the sealing ring, removed together with the membrane from the inlet pipe.
- Next, we proceed to dismantle the body of the shut-off valve, which was put aside for a while.
- First of all, we snap off the float, and remove it.
- Then we remove the body of the float itself, moving the tongue, which fixes the position of the part in the tank, to the side.
- Then we disassemble the installation site of the valve. To do this, take a screwdriver, pick it up on both sides, removing the valve with a “toward” movement.
- We examine the socket from which the valve was pulled out, and we see a small hole, which it should close tightly when the tank is full of water.
- The deformed valve looks like a miniature rubber band, in the center of which a recess is extruded, the size corresponding to the size of the hole that passes water into the tank.
- At the first repair, this rubber valve is turned over to the other side, which is smooth and even.
- When re-repairing, this gum-valve is cut with a sharp clerical knife strictly in the middle. First, the first deformed part is placed in the nest, and then the second - with a smooth cut side up. Thus, one valve can be used three times, each time turning the parts with a flat surface to the hole through which the tank is filled with water.
- You can strengthen the valve with an additional piece cut from dense foam.
- We install the valve back into place in the socket, fixing it in position with pressure until it snaps into place.
- We assemble all the parts in the reverse order: body, float, installation on the pipe, fixing the device with a swivel nut.
- The valve in the raised position should extend the float 1 cm above the body in which it is located. It is in this position that it is necessary to fix the position of the float by snapping the locking mechanism.
- We put in place the second part that closes the drain hole in the tank. With a sharp movement in a clockwise direction, we fix it in place. A characteristic click should sound.
Open the tap and start the water supply system. We monitor the process of filling the tank, paying attention to the moment of operation of the shut-off valve, which has been repaired. As soon as the water overflowed into the body of the float and raised it by 1 cm, the water supply to the tank stopped. We put the cover in place, and fix it with the water drain button, twisting it along the thread of the drain device part until it stops in the clockwise direction. We look at the result of the repair work. There is no uncontrolled flow of water from the cistern in the toilet bowl. The water meter froze, confirming that no water was being drawn from the system. We will make a control drain to once again verify the positive result of the repair. The problem was fixed by hand. Saved money by eliminating the need to purchase a new drain mechanism and shut-off valve.
You can learn more about repairing the flush mechanism of a toilet bowl with a button from the video.
Fixing leaks between cistern and toilet bowl
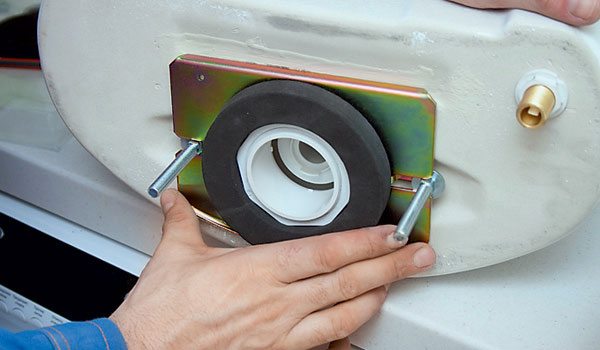
If during flushing, trickles of water appear from under the tank, then this indicates a depressurization of the drain hole. A gasket is responsible for the tightness of the connection of the parts of the entire structure, which can be round or of a different shape, depending on the model. To correct the situation with the flow of water can only replace the seal. Before going to the store, you must remove the drain tank and get the sealing gum. It is better to show the removed part to the sellers, who will help you choose a good replacement for it.
Sometimes it is better not to buy exactly the same seal, as it will fail again after a while. Manufacturers produce consumables using the latest materials that outperform previous products. It is these sealing gum that is worth taking. Having installed the purchased consumable in place of the old gasket, the tank is installed in the reverse order. We have already discussed above how to install the drain mechanism and inlet valve, as well as how to fix the tank on the toilet bowl.

Do-it-yourself replacement of the sealing gasket of the connecting assembly at home with the assistance of an assistant for convenience
Slow water filling
The low rate of water entering the toilet tank is associated with clogged filters. Repair work is carried out in the following order:
- turning the faucet handle, we turn off the water entering the toilet bowl from the cold water supply system;
- we unscrew the flexible connection from the water supply valve to the toilet, located either from below or from the side, depending on the model of the sanitary ware;
- in a clogged hose, we eliminate the blockage and check the water pressure in the water supply by lowering the end of the flexible hose into the toilet, if its length is enough;
- otherwise, we use a five-liter plastic bottle or canister to drain the water;
- turn on the tap, if the pressure is good, then proceed to clean the water supply valve from accumulated debris;
- this part is not available in all models of toilet bowls, but if it is, it needs to be cleaned;
- we pull out the filter from the valve with the help of pliers, grabbing the part by a small pin;
- we wash the removed grate in the sink under a stream of clean water from clogged solid particles and from accumulated mucus;
- then we put the washed filter in place, turn on the water and see if the problem is fixed or not.

View of a contaminated valve removed from the water inlet mechanism into the drain tank. After cleaning the part, water enters the toilet bowl at a faster rate
If the problem is not resolved after washing the filter and the flexible hose, then we flush the entire water supply valve by removing it from the tank, after removing the toilet lid.
After all the steps described above, the problem is usually solved. The algorithm for repairing a toilet cistern with a button in the case of slow filling with water is clearly shown in the video.
Replacing cistern fittings
In the old toilet bowl, we dismantle the old fittings that have become unusable and install a new water supply and drain system. We purchase universal fittings suitable for all toilet cisterns. For economical use of water, we buy a two-button drain mechanism that allows you to change the amount of drain depending on the type of human waste being washed off.
In such fittings, the manufacturer uses:
- dual-mode push-button mechanism;
- manual adjustment of the volume of small and large water discharge;
- drain mechanism rack adjustable to the height of the tank;
- changing the thrust by reinstalling the lever in one of the existing holes;
- clamping nut with rubber gasket;
- a valve that closes the drain hole in the toilet bowl.

The mechanism for economical draining of water from the tank, carried out using two keys, which are activated by a blue or white pin at the moment one of the buttons is pressed
We will replace the old fittings. To do this, unscrew the button holding the toilet lid and pull it out of the socket. Let's take the cover off. Turn off the water supply to the tank. Disconnect the flexible hose. Unscrew the screws holding the flush tank to the toilet bowl. Take the tank off and place it on the seat cover. Remove the rubber seal, and then unscrew the clamping plastic nut by hand. Then we remove the old drain mechanism.
Next, we put a new drain mechanism, after removing the rubber seal from it and unscrewing the clamping fixing nut. After installing the drain mechanism in the hole of the tank, we fix its position with the removed parts. When installing the tank on the toilet, do not forget about the sealing ring that is placed on top of the plastic nut. Then we insert the pins of the tank into special holes in the bowl, screwing the wing nuts on them from below. We tighten the fasteners evenly from both sides, avoiding distortion of the installed part. If necessary, replace the fasteners with new parts with sealing gaskets.

With the help of two fasteners, the tank is securely attached to the toilet bowl. From the bottom of the bowl, wing nuts are screwed onto the screws, thin gaskets are first put on
When connecting the water hose to the side inlet valve, we hold the part inside the tank from turning. Tighten the nut with a special wrench or pliers. Install the tank lid, tighten the button. If necessary, adjust the rack, rearrange the lever.
The two-button button has two pins, with which the desired drain mechanism is activated. The length of the pins reaches 10 cm. They are shortened to the desired length, depending on the height of the tank. Screw into a button. Insert into the cover and fix the position of the button from the inside with a nut. Install the lid on the tank. Turn on the water supply. Press a small part of the button, about 2 liters of water are drained. Press most of the button, about six liters of water are drained.
The button sinks or sticks: what to do?
To the listed malfunctions of the flush tank, you can add sticking or sticking of the button. This is when you press the button, release it, and it remains in the nest, so that the drain does not stop. You have to press the button mechanism several times to return the button to its original position. The problem is solved by cleaning the buttons themselves from rust and dirt. Monthly use of cleaning products when caring for the sanitary condition of the buttons allows you to get rid of this problem once and for all. Some simply pour a small amount of detergent directly into the button mechanism. Under the influence of special equipment, all the dirt dissolves, and the buttons do not stick.

The sinking button of the toilet cistern entails a large amount of water, which is unacceptably expensive for the family budget
As you can see, it is quite possible to carry out self-repair of a toilet bowl with a button. After spending a little time studying the device and the principle of operation of the valve mechanisms, you can fix the drain tank without outside help. Of course, if plumbing work does not bring you any pleasure, then you should turn to professional craftsmen who will cope with any malfunction of the tank and toilet bowl in a matter of minutes. It is enough for real masters to take a look at the toilet bowl with one glance to understand the nature of the problem. For troubleshooting, plumbers usually have everything they need always with them.
A functioning bathroom is what is required for a comfortable stay in a house or apartment.
It is extremely frustrating when the toilet breaks. If the water is constantly leaking, it is also expensive. Payment for water is by meter.
It is not always possible to replace a product.
In the case of a mechanical control system, the toilet cistern can be repaired independently. Before troubleshooting, you should decide on the type of drain and identify the cause of the breakdown.
Kinds
drain cisterns
The devices differ in several design details.

Drain mechanisms
- Lever. It is installed in separate products, where the tank can be located both above and below. Water is drained into the toilet bowl when the lever is actuated.
- Pneumatic. Water is drained after pressing the button of the pneumatic chamber.
- stock. The rod rises, the mechanism frees the passage for the liquid. The stem is always displayed on the tank cover.
- Button. The drain mechanism works by pressing a button, which is located on the tank lid. Models with two flush buttons are available. When one button is pressed, half of the liquid descends, when another button is pressed, the entire drive is drained.
The storage tank is filled with liquid to the required level, after which the water supply automatically stops.
valves
The type of valve depends on how the water is supplied to the tank.
Systems without a float are lower and side.
Such structures are equipped with a special camera. The system works according to the law of Archimedes. The tank is filled with water and the location of the chamber is changed, which stops the flow of liquid.
The side valve with a float is manufactured in two versions - diaphragm and piston. In each option, filling the tank stops when a certain amount of water is collected.
The drain mechanism may consist of interchangeable parts or be a single set.
Connection type
- Side. The tank has two openings on each side. A flexible hose is brought to one of the walls, a plug is placed on the second hole. The disadvantages of such an eyeliner are excessive noise when collecting water and the lack of aesthetics.
- Bottom type of eyeliner. The hose for a set of liquid is mounted in the bottom of the tank. Filling is almost silent.
One model can be produced with two types of connection. Three mechanisms that are present in each tank.
- shut-off or drain mechanism. Regulates drain, controls overflow.
- Bulk valve. The valve for filling the tank can be located both on the side and below. The float is always on top.
- Drain device and overflow.
The main breakdowns of the toilet tank are always associated with these three devices.
For your information. Mechanical damage to the tank itself (cracks or chips) cannot be repaired. The product will need to be replaced.
Drain tank malfunctions
Water from the tank flows to the floor
If dampness or a puddle of clean water appears behind the toilet bowl, this indicates that the gasket installed between the tank and the toilet bowl has become unusable and must be replaced.
To make a replacement, you will first need to purchase an o-ring. Then follow the instructions to fix the problem.
- Shut off the water supply to the toilet.
- Drain water from tank
- Disconnect the water supply hose
- Release the tank from the lid
- Dismantle the drain tank
- Replace gasket
- Reassemble in reverse order.
Waterproof silicone can be used to increase sealing.
No water is delivered to the tank
This error has several causes.

As soon as the water began to flow freely, we set the valve, the valve with the lever and the float to its original position. Sometimes cleaning the valve fails, in which case it should be replaced.
Water constantly leaks into the bowl
- The reason is the incorrect operation of the float. It does not stop the flow of liquid, and it constantly flows through the overflow.
- Lever changed position to inoperable
- Broken water supply valve
If the design of the tank of the Soviet era, you should start to identify the malfunction from the float. Perhaps it burst, water flowed into it and it can no longer rise and stop the water supply. If this is the reason, the part must be replaced.
In modern toilets, a drain column is installed, there is no float in them. This part is not repairable, just replaced with a new one.
Water may leak due to a broken inlet valve.
- Check the lever next to the valve for mechanical damage.
- We release the tank, we look at how water is collected
- Move the lever. He closes the valve. If there is a bend, straighten the lever.
- The lever does not move. A jam has occurred. We are replacing the node.
A failure of the inlet valve itself implies its replacement. The part is dismantled, a similar one is bought in the store and installed in the system.
Broken internal fittings
Sometimes there are several faults at the same time. The entire drain system should be replaced.
Replacing the drain mechanism with a lower set of water.
- Close the tap to supply water to the tank, free it from the liquid.
- We remove the cover.
- Unscrew the flexible hose
- Turn the top of the column and remove
- We dismantle the tank by first unscrewing the retaining bolts
- Dismantle the inlet valve and drain button
- We take out the old mechanism
- Installing new fittings.
- We put the tank in its original position.
Loud noise when filling water
This fact is not a defect. Noisy tanks with a top supply.
Models are available where you can adjust the diameter of the hole. It won't completely eliminate noise, but it will reduce its level.
In cases where it is not possible to make adjustments, there is a modification option.
A rubber tube with an inlet diameter up to 30 cm long is taken.
The tube is put on the inlet, fixed, the end is lowered to the bottom of the tank.
This eliminates the fall of water from a height, filling starts from the bottom, respectively, the noise disappears.
Sticky button or two buttons
The toilet model with two flush buttons is in demand. In such a product, sticking of buttons sometimes occurs. To make repairs, you need to remove the cover.
First, the nuts holding the buttons are unscrewed, after which you can open the tank. Pressing the buttons at the same time sometimes helps them fall into place.
If the manipulation did not work, you should check the button shaft. Sometimes she gets dirty. After cleaning the shaft, repeat the check. If there is no result, a new part must be installed.
The node is dismantled, purchased exactly the same and installed.
Results
In the event of a malfunction, it is far from always necessary to buy a new product; it is often very easy to repair it yourself.