So that the walls are smooth. How to properly level the walls in an apartment yourself How to quickly level the walls
We would like to express our gratitude to the FORUMHOUSE member for his assistance in preparing the material.
Probably, a house with initially smooth and straight walls never existed. One way or another, every homeowner had or still has to level the walls using “heavy plastering” and. Each of these methods has its own advantages and weaknesses, supporters and harsh critics. Based on the experience of users of our portal, we will analyze in which cases it is better to use drywall, in which plaster, and how to do it correctly, and we will tell you about tools that will help determine the degree of curvature.
How to measure the curvature of walls
First of all, it is necessary to determine the degree of unevenness of the walls. For beginners, the so-called “dummies,” the easiest way to measure unevenness is with a laser level, which you can “shoot for a day” from a friend.

Makinsk-KZ Member of FORUMHOUSE
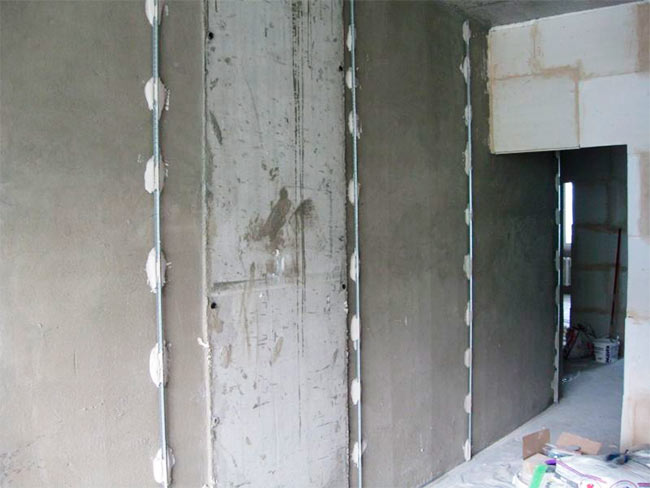
The laser level is installed parallel to the wall, at the most protruding point. The leveling beam draws the lines of the future wall. If you are going to install gypsum boards, then you need to retreat at least 30mm from the most protruding part (bump) of the wall, because guide profile 28mm wide.
The traditional way to measure the curvature of a wall is using a long level (2-2.5 m) - “pass” the level vertically over the entire surface at intervals of about a meter and find the most protruding place. You need to measure the horizontal curvature of the walls with a thread stretched over two self-tapping screws screwed into the wall at different ends of the room. The angle of the thread should be measured using a square.

Makinsk-KZ
You can take a short level, 50-70cm, and tape it to a rule or piece of profile with electrical tape.
How to measure the curvature of walls with a plumb line
Another way to determine the curvature of walls: using a plumb line or a nut tied to a strong thread.
 How to determine the curvature of a wall.
A nail is driven in near the ceiling in the corner of the room, which should stick out from the wall by about 3 cm. A plumb line is attached to the nail with a thread of such length that the load does not reach the floor quite a bit. Having stopped swinging, the thread forms a straight line. Another nail is driven into the lower part of the wall so that its head and thread are on the same line.

Such beacon nails, driven in along the entire perimeter of the wall, will give us complete information about the curvature of the wall. By pulling two threads, crosswise, from the upper right corner to the lower left and vice versa, we will make this information almost exhaustive.
Which wall leveling method should I choose?
Gypsum and cement mixtures for leveling walls are traditionally used with a slight deviation, and then plasterboard, but the experience of FORUMHOUSE participants shows that their capabilities are much wider. On our portal the issue was considered from different angles. Each method has both advantages and disadvantages.
Buryat User FORUMHOUSE
What’s not to like about ordinary plaster: one part cement + loosened lime for plasticity + 3 parts sand (relatively speaking)?
The following facts speak in favor of plaster: this method does not eat up the usable area of the room, it is cheaper, with the appropriate skill, the wall can be made smooth, “like the surface of a lake in calm weather,” plaster is a reliable and strong material; It is always possible to repair only part of the wall.
Disadvantages of this method: it is labor intensive and dirty, the plaster takes a long time to dry and slows down further puttying and painting processes, besides, without certain skills you cannot level the wall with plaster yourself, and most importantly:
Buryat
The cost of plastering materials greatly depends on the curvature of the walls.
Therefore, the crude method of leveling surfaces using gypsum or cement plaster is usually used when the walls are not particularly crooked and it is necessary to correct non-catastrophic defects. Otherwise, two problems are possible: too much material consumption (and therefore money) and the danger that an excessively thick layer of plaster will not stay on a vertical surface.
Buryat
With deviations of 2-2.5 cm, you can safely use plaster.
With deviations of up to 4 cm, there is reason to think twice.
If the walls are completely uneven, you can still plaster them - if operational considerations outweigh them.
The average thickness of the plaster layer is calculated depending on the unevenness of the structure.

Palych R34
We will determine the middle layer based on the minimum layer above the “belly” of 3 mm, and then add 3 mm to the thickness of the depressions.

Thus, if the depth of the largest depression is 10 mm, the layer of plaster above it will be 13 mm.

Palych R34
The approximate layer is seen as 8 mm.
You can find out more accurately the size of the middle layer by assessing which areas of the surface are larger: up to 6 mm (shallow) or more than 6 mm (deep). If it is small, we subtract and take the middle layer as 6-7 mm, if it is deep, then we add it, and the size of the middle layer will be 9-10 mm.
Depending on the size of the middle layer, we calculate the need for the mixture, taking into account the consumption of the dry mixture per 1 square meter. m.
The “average layer of plaster” is different from the thickness of the layer you will apply in reality: its thickness will vary throughout the wall.
Buryat
If there is a bulge on the surface, the plaster is reduced in places to 3-4 mm. If, on the contrary, there is a “bulge”, then the thickness of the mantlet increases to 3.5 cm. So walls with deviations of up to 2 cm can be safely covered with plaster and not worry about increasing the thickness of the layer. A particularly healthy bulge can simply be trimmed.
The dry method of leveling walls is carried out mainly using plasterboard sheets, which are either installed on a frame made of metal profiles, or simply glued to the surface. In the first option, centimeters of the house's area are lost, so it is used mainly in large rooms.
Advantages of plasterboard: it can be attached with an adhesive mixture directly to the wall (if it is fairly level), this method does not require complex preparation, and it is much easier for a non-professional to work with plasterboard than with plaster; there is no dirt. Another advantage of drywall: the ability to hide communications under it.
Disadvantages: the living space is “eaten up”. The common belief that plasterboard surfaces are not as durable and may not withstand the load of hanging cabinets, etc., is not true.

Makinsk-KZ
Walls made of gypsum plasterboard can withstand even a water heater, a wall-hung toilet, and even more so kitchen cabinets. It all depends on the correct installation.
And the most annoying minus of this material for FORUMHOUSE members, oddly enough, is the unpleasant sound when tapping.
TOHow to level a wall with plaster
The wet leveling method begins with preparatory work: the walls, if necessary, are cleaned of crumbling traces of the previous finish, and cracks are eliminated. The surface must be primed and dried well. Before starting the main work, it is necessary to protect the floor by covering it with something so as not to spoil it with the solution.
After this, we install beacon profiles.

AMK User FORUMHOUSE
To install the beacons, I used a thin-walled aluminum profile 25x50 mm, 6 m long, cutting pieces 5–10 cm less than the height and width of the walls.
Nowadays, construction stores sell special beacons for plaster.

The beacons are attached to opposite ends of the wall with mortar, checking their vertical position by level. Then they pull a cord between them in three places at equal distances and, guided by it, install the remaining beacons. How many beacons there should be depends on the size of the rule: it must fit between two beacons so as to rest on them.
For plastering residential premises, gypsum mixtures are often chosen for the bathroom, kitchen, etc. – cement-based mortars. But now there are gypsum mixtures suitable for important premises, just as cement-based plaster is used to level surfaces in residential premises.

Regulus User FORUMHOUSE
I would use cement-sand plaster because of the thermophysical properties of the resulting wall sandwich. The thermal conductivity coefficient is very high. The thermal inertia of the wall increases and the dew point does not approach as is the case with drywall with an air cushion.
To prepare such plaster yourself, sand is mixed with cement (usually 6:1, but the proportions can be different 3:1, etc.) and diluted with water to the consistency of sour cream.
It will be quite uncomfortable to live in a house plastered with cement-sand mortar, then cement-lime plaster is preferable. Here is an example of the composition:
Buryat
For 100 cubic meters of solution:
- Construction quicklime lump, grade 1 - 14 tons.
- Portland slag cement for general construction and special purposes, grade 300 - 20.4 tons.
- Sand for construction work for plaster mortars of the finishing layer is natural, very fine - 110 m3.
- Water - 66 m3.
Pour gypsum plaster into water and mix it in two stages with a construction mixer or a drill with an attachment: first just until smooth, then repeat kneading after five minutes.

Using a plaster falcon, we throw the mixture between the beacons and smooth it using the h-rule from bottom to top, evenly distributing the plaster over the surface, orienting the thickness of the layer along the beacons (and fill the resulting openings with mortar). A plaster square will help make the corners straight. The leveled surface is dried and primed after the primer has dried.
How to level a surface using drywall
The surface that can be leveled with drywall can be very uneven - an old brick wall. But if the differences on the surface do not exceed 40mm, then special glue can be applied to it
Modern requirements for renovation of premises have become much more stringent. Now, straight walls are an inapplicable attribute of an apartment or house. But even in new buildings it’s impossible to call walls even approximately that way, and even more so in old houses. Therefore, with almost any renovation, leveling the walls is an inevitable stage. How best to do this, about methods and technologies, the possibilities of doing it all with your own hands, and we’ll talk further.
How can I level a wall?
Although technologies in construction are developing rapidly, leveling walls is still done in two ways: plaster and plasterboard. Another thing is that there are different compositions of plaster - based on gypsum and cement, and you can install gypsum boards in two ways: on a frame and with glue. But that's all.
Smooth walls are a modern requirement
For some time, gypsum plasterboard sheets began to be replaced with gypsum fiber boards (GVL). They consisted of a mixture of gypsum and plant fibers, but they turned out to have poor impact resistance and broke even with minor impacts. Therefore, GVL leveling of walls using them is now rare (sometimes they are placed on the floor).
In Soviet times, the walls were lined with plywood. But this is definitely the last century. It is far from the best replacement for gypsum plasterboard, which in 100% of cases gives cracks at the joints, and even swells from humidity. So it turns out that there is nothing to use instead of drywall. So the choice is really not very wide.

Actually, there is still one way - . But it is used only on relatively flat walls with a difference of no more than 5 mm. Therefore, they usually putty on already leveled walls, bringing the plane to the ideal.
If we talk about how easier it is to level the walls with your own hands, then many agree that it is easier to work with drywall. But it’s also not difficult to cope with plaster on beacons. The main thing is to know the technology and not deviate from it.
Leveling walls with plaster
Plaster has two binders: cement-based and gypsum-based. Gypsum dry faster, but the maximum layer that can be applied is about 50 mm. Cement-based plasters can be applied in a layer of up to 10 cm, but they take longer to dry.

Beacon plaster is a reliable way to level walls
In addition to the thickness of the layer, when choosing the type of plaster mixture, it is necessary to take into account which of the finishes will be used later, as well as the conditions of the rooms in which you are going to level the walls. Gypsum is hygroscopic, so it is not used in damp rooms: the bathroom and kitchen must be plastered with a cement-based composition. Rooms and an entrance hall remain for plaster. That's basically what they do.
In our description we will use plaster plaster - Rotband - a popular brand that has good reviews from both amateurs and professionals.
Surface preparation
Removing everything that doesn’t stick well to the wall: beat it off, pick it out, clean it off with a spatula. If there are cracks, we repair them. Then we evaluate the degree of curvature. If there are very large protrusions that stand out too much, it is advisable to remove them (with a hammer and chisel or a hammer drill).

Often when starting to level the walls in an old house, they decide whether to knock down the old plaster if it does not fall off. In principle, the master should evaluate it, but you can try it yourself. Knock the wall. If there are places that differ in sound - they sound duller - then the layer here has moved away from the main wall. If you “hang” another layer of plaster on it, there is a high probability that the whole thing will collapse together. It will be much worse. So it is better to plaster previously plastered walls down to the base material.
If, during preparation, individual potholes that are too large appear, it is better to repair them separately. Putties have a minimum and maximum layer limit. Too much layer may fall off. Therefore, it is better to pre-fill holes or holes.

When leveling a concrete wall or a surface painted with a film-forming composition, another problem arises: it is too smooth, which is why adhesion to the plaster may be poor. This can be helped by treating a primer such as “Betonokontakt”, which leaves a rough film on the surface, improving adhesion.
Another way out is to make notches. Once upon a time they were made with an axe, now they often use a hammer drill or grinder. With their help, a notch is applied. According to the norm, there should be about 100 notches per square meter.
Primer
Depending on the type of plaster chosen (gypsum or cement), a primer is selected. Its main task is to improve the adhesion of the wall and plaster. Read the instructions for using the primer carefully. Some require the base to be moistened before application, some require dust removal, etc.

There are two favorites in this group: Cerezit 117 and Betonokontakt. There are others, but these are used more often: good reviews. The composition may be ready for use or require dilution (concentrate). It can be applied with a roller or brush, a spray bottle, or even a garden sprayer to speed up the process.
Until this moment, there were no difficulties in leveling the walls on your own. Everything is elementary. Next - a little more difficult, but also - not to build rockets.
Installation of beacons
If you want to achieve a flat surface, you can level the wall only along the beacons. These are supporting elements that are placed in the same plane. A layer of plaster is then leveled over them. As beacons, you can use special galvanized “T”-shaped beacons or even wooden planks.
It is more convenient to use metal beacons - they are installed faster. But the minimum layer of plaster is about 8-10 mm (6 mm of the lighthouse + the mortar on which it is placed). Another disadvantage is their cost: although not very much money, it is still an additional expense. One more point: galvanized plaster does not “contact” well, so after the initial drying, the beacons are removed from the wall and the holes are sealed.

Using wooden slats is a cheaper option, but finding a sufficient number of perfectly even bars in cheap material is problematic (you won’t use high-quality lumber). Even if this is successful, there is still a possibility that the tree will lead from moisture. As a result, the wall will no longer be level.
Some people make lighthouses from mortar. Pre-apply strips of plaster, leveling them. After they harden, they are used as beacons. The cheapest method, but the most labor-intensive, and requiring much more time.
How ideal the alignment of the walls will be depends on how correctly the beacons are positioned. We set it exactly - we got an excellent result. If you make a mistake, you will suffer, correcting the irregularities that you made with your own hands.
Read in detail about how to install beacons for leveling walls under the screed.
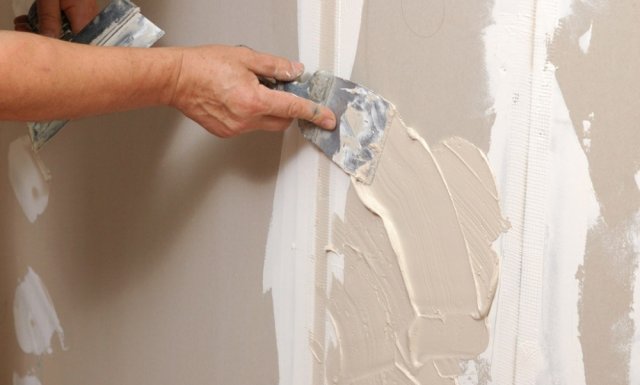
Throwing mortar
The selected plaster is diluted as indicated on the packaging. Then they throw it on the wall. Use a wide spatula or paint bucket. Start from the bottom, cover a piece of the wall with mortar from one lighthouse to another.

Beginning of plastering the wall along the beacons
Then they take the rule and set it below. Leaning on the beacons, pull up, slightly swaying from side to side. Several such passes are made until the solution is leveled. The compound adhering to the rule is removed with a spatula, again throwing it on the wall.

Again - a portion of the mortar on the wall, leveled with the rule. So all the way to the top. Having tightened one strip, proceed to another. This is how the entire wall is gradually leveled.
The first stage of plastering is completed. But this is only the first. The surface turns out to be imperfect: if you look closely, there are small irregularities. They are leveled with a more liquid solution, achieving a more even surface.
Leveling for putty
When the first layer has dried a little, but has not yet hardened (no later than 2-4 hours after application), leveling for putty begins. Existing imperfections are rubbed down with the same solution, which was diluted a little thinner than required according to the instructions. Since it is more fluid, it is applied with a wide spatula, then stretched along the wall, usually resting on the same beacons.

So they go through the entire wall again, leveling it to a perfectly flat plane. This is necessary in order to reduce the consumption of expensive putty mixture.
Removing beacons and trimming
When the solution has dried to the state of thick plasticine (press hard with your fingers, it bends), you can remove the beacons. They are pryed at the bottom with a screwdriver and pulled out.

They are removed very easily. Actually, the reason they are taken out is that they form heterogeneity in the plaster, and therefore reduce its strength.
Now we take the rule, clean it from the adhering solution and, stretching it in different directions, finally level the surface. This should be done at the initial stage of thickening, when the gypsum plaster is similar to plasticine: cutting it off is usually easy.

When the surface was leveled, diluted with Rotband. They are sealed immediately, without waiting for something: until the plaster has completely hardened, new layers stick to it well.

The solution is applied and removed with a spatula. At the same time, make sure that the surface remains level. At this point, leveling the wall for putty can be considered complete.
When leveling walls with plaster in apartments, the problem becomes the angle in which the heating pipe runs. You can't get there with a rule, but you can't get it straight with a spatula. If you are familiar with this problem, watch the following video.
Dry plaster: leveling the walls with plasterboard
Not everyone has the patience to level the plaster, in several layers, and then wait until it dries. It is faster to work with sheet material - gypsum board sheets (GCR). This technology is also called dry plaster, because there are a minimum of “wet” processes in it, and the result is no worse: if all the nuances are observed, the wall turns out to be perfectly flat.
But this technology has disadvantages. The first is that you can hang something heavy either on embedded bars laid ahead of time, or use special fasteners that will be held in place by the main wall, and not the finishing. So take this into account. The second drawback: such plaster eats up space. This is with the classic technology - installing gypsum boards on a frame. A simplified frameless design takes up much less space.
Drywall on frame
You can level any wall in this way. First, the frame is assembled. It is exposed in one plane and serves as the basis for attaching drywall. It is assembled according to certain rules:

At this point, the leveling of the walls is completed and it is ready for either wallpapering or plaster. As you can see, everything is much faster.
Gypsum plasterboard for glue
Everything is even simpler here. Since a sheet of drywall is initially flat (if it has not been stored standing up and is not bent), it can be used without any foundation.
Apply diluted glue to the walls (on brick, concrete) or gypsum plaster (on relatively flat ones). They throw small “bloopers” at him. The volume is chosen depending on how concave or convex the walls are in a given place.

Then they take a sheet of drywall, lean it against the wall, use a level to level it in the plane, pushing it in if necessary, using pressure or a fist (do not break it).


After placing the sheet straight, coat the edges with putty and apply glue to the next piece. This is how you assemble the wall. To make this type of plaster stick better, after the glue or putty has dried (24 hours or more), screw the drywall to the main wall (with self-tapping screws or dowels, depending on the type).
Everything is as simple as shelling pears, except that it is very easy to mess up. Everything is done with a minimum of emphasis, and getting changes with this method is really a piece of cake. However, if you need to quickly level the wall, you can try to do this.
Walls are leveled using gypsum or cement mortar only for small (up to 4-5 cm) height differences. In other cases, it is better to use cheaper drywall.
Surface preparation
Poorly secured layers of old plaster will fall off over time, and repairs will have to start all over again. Therefore, you should tap the walls with a hammer and remove all crumbling layers. Plaster that easily comes away from the wall is removed with a spatula. Problem areas are treated with a grinder or cleaned with a hammer and chisel.Removing old plaster
Using a grinder or a hammer drill, it is better to clean off too large deposits. If you leave them, you will have to apply too much plaster to level the wall with them. The cracks must be widened using a hammer and chisel so that the solution can be laid in them.

The cracks in the wall are widened
Sand and crumbling fine plaster are cleaned off with a brush with metal teeth. If left, the solution will not adhere well to the wall and may also crumble over time.

Cleaning the wall with a brush
Materials and tools
deep penetration primer;building mixture (cement mortar or gypsum-based putty);
finishing putty;
plumb lines (threads with a small weight attached to them);
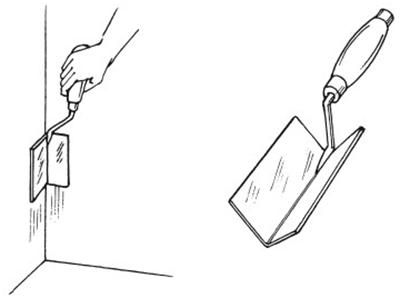
construction falcon for carrying mortar;
trowel for laying plaster;
wide spatula;
rule: a tool for leveling the solution in the form of a 1-3-meter strip of metal;
corner spatula;
grater for smoothing out unevenness;
ladder.

Wall Leveling Tools
Using Plumb Lines
To assess the degree of surface curvature, it is better to use plumb lines. To do this, take a small weight (for example, a nut) and attach a long thread to it. Such a plumb line is suspended from the ceiling at a minimum distance from the wall so that the load is a couple of centimeters from the floor.The thread with the load should only slightly touch the wall. If necessary, the ceiling mount can be moved a little closer to the wall or a little further from it. The lower part of the plumb line is attached to a nail driven into the floor. Several of these plumb lines placed along the wall will serve as an ideal guide.
Alignment of walls
1. Before starting work, the surface is treated primer. Deep penetration compositions allow you to bind the loose upper layers of the wall, prevent moisture from the solution from being absorbed into the surface and significantly increase the degree of its adhesion to the surface.
Deep penetration primer
2. To equalize large differences use beacons– guides, made in the form of a perforated strip of metal or plastic, attached to the wall using mortar and used to control the leveling of the surface.
3. To place beacons on the wall, draw a horizontal line onto which slats of mortar are applied (“ stamps"). Next, the beacon is pressed into them. The height of the stamps is verified building level.

Beacon placement
4. After the “marks” have completely dried, plaster is laid out between the beacons and spread over the wall using rules– a tool for leveling large layers of mortar.
Important. The distance to the second beacon should be equal to the width rules.

Alignment by rule based on two adjacent beacons

Appearance of the wall when aligned with beacons
5. If the degree of curvature of the walls is high, you should not immediately apply too large a layer of mortar, otherwise it will crack when drying.

Applying part of the solution
Advice. When the total thickness of the layer is more than 2 cm, use it to strengthen it and protect it from cracking. serpyanka(plaster polymer mesh with small cells), which is pressed into the solution.

Laying serpyanka
6. Instead of metal beacons, you can use plumb lines. In this case, small wooden overlays will serve as a guide for the rule.

Arrangement of “marks” using plumb lines
7. In order not to damage the drying solution, leveling is carried out round: first the plaster is applied to the first wall, then plaster is applied to the next wall, etc.
8. You can get a perfectly flat and smooth surface using finishing putty. It is applied in a thin layer (up to 1.5 mm), and after drying it is sanded with sandpaper. Finishing is used to prepare the wall for painting with acrylic paints or gluing thin wallpaper. When facing with ceramic tiles, plastic, cork, etc., such finishing is not required.

Leveling the wall with finishing plaster
Aligning corners
1. After leveling the first wall, a corner adjacent to it is laid plastic corner profile with or without reinforcing mesh attached to the sides. Its fastening is done using a solution, the excess of which is squeezed out with a spatula. The depth of immersion of the profile into the putty is checked building level. After the corner has dried, the profile is smoothed with a solution.
Corner profile with serpyanka

Checking the inside corner
2. External corners(slopes of walls and windows) are also leveled using profiles made of plastic or metal. They not only allow you to create perfectly even corners, but also protect it from damage when moving furniture or equipment.

Aligning outside corners

Installation of metal profiles
3. You can align the corners and corner spatula– a tool with a plate mounted on its handle, bent at an angle of 90. It can also be used to smooth out corners when installing profiles.
Angle spatula
Advice. If it is not possible to align the angle exactly at an angle of 90°, the spatula can be slightly straightened or bent.
Leveling walls with plasterboard
Finishing with this material is a less expensive method of leveling walls. For the work, you should purchase drywall itself, metal guide posts or wooden blocks for fastening it, hangers for attaching them to the wall and self-tapping screws. To save space, you can do without guides and attach the drywall directly to the wall.1. To mount using metal racks on the wall, at a distance of 1 cm from the corner, draw a straight horizontal line, along which screws are screwed with screws every 40-65 cm direct hangers.

Attaching a direct hanger

Fastening profiles
3. The distance between each of them should be equal width drywall. The edges of the sheets should be at the center of the profile. To strengthen the structure, it is better to install intermediate profiles between them.

Fastening profiles
4. Drywall is attached screws for metal in increments of 25 cm. Do not screw them in at the very corners of the sheet. To prevent them from breaking off, it is necessary to retreat 5 cm from the edge. The self-tapping screw should not protrude above the surface - it is deepened into the sheet by a couple of millimeters.

Fastening drywall exactly in the center of the profile
5. Walls are laid at internal and external corners corner profiles.

Installation of corner profiles
6. Joints between sheets, recesses from self-tapping screws and corner profiles are covered with a layer putties. If the wall is being prepared for painting or wallpapering, a plastic mesh is laid at each joint - serpyanka.
Preparing the wall for painting
Important! Drywall is not able to withstand too much load, so when hanging structures that are too heavy (for example, a water heater) on the wall, you should use long metal pins.
Fastening drywall without guides
1. To secure drywall without the help of profiles, self-tapping screws are screwed into the wall (40-50 of them will be required for one sheet).2. The depth of their screwing is determined using plumb line: a weight attached by a string to the ceiling.
3. A fairly thick layer is applied to each screw gypsum with polymer additives, onto which the drywall will be glued. The solution is applied so that it covers the screw by a couple of centimeters.

Fastening drywall without using a profile
4. To prevent the plasterboard from springing in places where the wall bends, it is better to place pieces there foam rubber.
5. To level the sheet horizontally, pads made from drywall scraps are placed under it.

Fastening drywall sheets without using profiles
6. Until the solution sets (35-40 minutes), the sheet will have to be held on the wall with your hands.
Important! With this method of fastening, there should be no horizontal joints, so for work you should take sheets equal to the height of the room.
On uneven walls, even high-quality wallpaper will look cheap and not very attractive. That is why before gluing them it is necessary to carefully level the surface. In addition, smooth walls simplify the process of pasting: it is easier to adjust the pattern, match the edges of the wallpaper, and there will be no waste of materials. In this article we will look at how and with what to prepare the walls in the apartment before starting work.

Drywall: for quick leveling
Material advantages
If the walls have significant curvature, leveling them with wallpaper plaster will cost a decent amount. And this process will take a lot of time. It is much faster and easier to level them with drywall:
- the work is greatly simplified, because its installation is a less labor-intensive process;
- You can use it to level a wall with your own hands in a matter of hours;
- plasterboard is easy to cut and quickly mounted on walls;
- you can easily lay any communications under it;
- The weight of the sheets is small, so you can level the surface with it yourself, without outside help;
- a minimum of dirt and debris is generated, since the work is carried out without plastering;
- the cost of drywall is low.
Stages of work
There are two ways to install this material:
The frame method of installing gypsum boards is considered classic and is used most often. Let us describe the stages of work:
- the wall must be prepared: cleaned of dirt and dust, and also knocked down too large deposits of old plaster;
- if the curvature of the walls is small, it is better to use a ceiling profile of small thickness; when hiding communications and large curvature of the walls, a rack profile is used;
- first, the construction level outlines its location;
- profiles are screwed to the walls and ceiling using dowels in increments of 500 mm;
- unlike the ceiling profile, the rack profile is mounted on special hangers;
- if it is necessary to impart rigidity to the structure, for example, when further gluing tiles, horizontal jumpers must be mounted between the profiles;
- the drywall is screwed to the studs with self-tapping screws in increments of 250 mm; they should come out at a slight angle;
- in order to properly align the walls, you need to move each subsequent sheet of plasterboard so that its angle falls on the center of the previous one, that is, the drywall is placed on the surface in a checkerboard pattern;
- before wallpapering, the joints formed between the sheets are glued with serpyanka (a thin strip of reinforcing mesh) and then puttied; The heads of the self-tapping screws also need to be puttied.
Walls properly leveled with plasterboard turn out perfectly smooth. Hanging wallpaper on this material will not be difficult even for a novice master.
You can watch the video to see how to attach the gypsum board to the profiles and glue yourself:
Using putty
For small wall defects and minor unevenness, the surface can be leveled using putty yourself. For work on small areas, it is much more convenient to use a ready-made mixture, although you can also buy a dry one, which is diluted with ordinary water.
What you can choose: examples of brands
We list the most popular putty manufacturers in Russia:
Work order

Unlike ordinary cement mortar, it is comfortable to work with putty. It is very plastic, fits better on the surface, does not harden so quickly, and most compositions can even be diluted with water as it dries.
- Before starting work, the surface must be prepared: remove old wallpaper and loose plaster, then remove dust; Dust can be removed from the walls and ceiling using a regular vacuum cleaner or the surface can be washed with a damp cloth;
- the dry mixture is diluted with water according to the technology indicated on the packaging;
- the area that needs to be leveled is sprayed with water;
- putty is applied to the required area with a spatula and carefully leveled;
- small cracks can be filled with tile grout or acrylic-based compound;
- large cracks are pre-strengthened with self-adhesive tape, and then filled with mortar flush with the wall and leveled with a spatula;
- after the layer has completely dried, all large irregularities are cleaned off with a spatula and sanded with sandpaper;
- Having completed the work in this order, you can begin wallpapering the room.
Plaster mixtures
How to level: popular brands
Plaster mixtures can be made not only based on cement, but also gypsum (suitable for rooms with low levels of humidity), acrylic resins (mainly finishing compositions), as well as silicone and potassium glass, which do not absorb moisture. This rough finish can be used to level a wide variety of walls: concrete, wood, clay, brick.


Cement-based plaster is suitable for finishing walls in the bathroom and kitchen, gypsum plaster is suitable for the bedroom and living room. Durable silicone compounds can be used in the corridor and loggia.
All types of plasters are divided into:
- starting: for sealing areas up to 50-70 mm thick; if a layer of greater thickness is required, then it is applied in several stages, thoroughly drying each layer;
- finishing: it is used to finally level the walls to give them perfect smoothness.
When you need to level a large area under wallpaper, you can choose dry mixtures:
- “Knauf”: cement “Grunband”, “Adhesive” or gypsum “Rotband”, “Goldband”; compositions of the “Start” type are intended for machine work, but they can also be used for manual application;
- "Volma": fairly economical and relatively inexpensive mixtures with a lightweight recipe; they can be used for interior, exterior and wet rooms;
- "Bergauf": a wide range and good quality have made the products of this company also quite popular;
- “Prospectors”: one of the leaders of Russian manufacturers in this area, special fillers significantly reduce the consumption of solutions; all compositions are quite elastic and have good adhesion to the surface;
- “Hercules”: this Novosibirsk manufacturer also offers good quality products at reasonable prices.
Plastering under wallpaper
Work begins after removing the old crumbling plaster and cleaning the walls from dust:
 To increase the adhesion of smooth concrete surfaces to putty, it is better to pre-coat the plastered surface with a primer.

Beacons are placed on the wall or ceiling - a small amount of plaster; their location is checked with a building level; if necessary, the beacon is either pressed in slightly, or, on the contrary, more solution is added to it. This method allows you to level the walls without profile beacons.
The distance between the beacons must be kept 5-10 cm less than the width of the rule - a construction tool in the form of a steel strip, which is used to level the mortar.
 As beacons for significant unevenness, you can use wooden slats and metal profiles, which are attached to the walls with self-tapping screws. The rest of the putty begins to be laid out after the beacons have completely dried;
Most of the houses in our country were built, as they say, “in haste,” and therefore the builders did not bother much about the quality of their work: the house was built, the deadlines were met - everything was fine. The builders were not interested in the fact that the walls in such a house were, to put it mildly, crooked. And by and large, this didn’t bother the apartment owners too much; they were happy with the new, and especially free, apartment. Now, when beautiful renovations are in fashion, the issue of leveling walls has become the most painful and almost no renovation can be done without this process.
We don’t deny that you can make repairs without leveling the walls, but in this case, be prepared for flaws that can be visible even to the naked eye. If you want to make high-quality repairs in your apartment, then leveling the walls is simply necessary.
The best way to level walls
Today there are two most common ways to level walls:
By installing structures;
Using building mixtures.
Let's look at the advantages and disadvantages of both methods, as well as which method is best used in a given situation.
Leveling walls by installing structures is usually done using plasterboard. Thanks to drywall, you will not need to spend a lot of effort on leveling; you can hide communications, significant unevenness and construction errors, but thereby the usable area will be slightly reduced. You should use drywall when you have very crooked walls or you want to quickly solve this problem.
Mixtures for leveling walls do not take up the usable area of the apartment; they are a better method of leveling, but require a lot of physical effort. Excellent for leveling the walls of living rooms: living room, bedroom, corridor.
We will tell you below how to properly level the walls with your own hands.
Many of us are mistaken in the concept of “wall leveling”, confusing it with surface leveling. Leveling walls is leveling the entire area of the wall, and leveling the surface is getting a smooth plane. These are completely different concepts. Therefore, before preparing the walls for repairs, it is necessary to take this difference into account.

How to level walls with plasterboard
To level the walls with plasterboard we will need:
Drywall;
Metallic profile;
Suspension;
Self-tapping screws for metal;
Self-tapping screws for drywall
Serpyanka;
Sander and sanding mesh;
Putty;
Level.
Before covering the walls with plasterboard, you need to treat the first ones with a primer. This must be done in order to prevent the appearance of fungus on the wall. If you are covering a brick wall with plasterboard that faces the street, be sure to seal the seams between the bricks with cement mortar.
After the wall is prepared, we retreat 5 centimeters from it and, using dowel-nails, attach the guide profile to the floor, then at the same distance from the wall we attach the guide profile at the top. In this case, determine the exact distance from the wall using a level, taking the lower profile as a guide. Using these guides, a further frame will be constructed for attaching drywall.
Next, we attach hangers to the wall at a distance of 50-60cm from each other, with the help of which we will attach the profiles themselves to the wall. Before attaching the profile to the hangers, we check the evenness of its position using a level, and then use self-tapping screws to fix it to the hangers. The wall profile must fit into the top and bottom rails. The distance between the profiles should be exactly 60cm, since the standard width of a plasterboard sheet is 120cm, the joints of the sheets should be in the middle of the profile. As a result of simple calculations, you will probably wonder that there will be an extra profile in the middle of the sheet. Yes, indeed, there will be a profile in the middle of the sheet, but it is far from superfluous, since we need it to fasten the middle of the drywall sheet, for the strength and reliability of the structure. After you have built a structure for drywall, we proceed directly to attaching the sheets.
We fasten the sheets using special self-tapping screws for drywall, so that the cap fits completely into the sheet. The distance between the screws should be no more than 20 cm. The standard length of drywall is 250 cm, but if the ceiling height in your apartment is more than 250 cm, then the sheets must be fastened staggered, that is, we fasten the first sheet from the floor, and the next one from the ceiling and then in the same way We alternate them in this way. For the unsealed areas, we cut out pieces of drywall of the appropriate size and attach them to the structure.
Now let's start finishing the drywall. The first thing we will do is seal the seams of the drywall sheets. First you need to prime the seams well and let them dry. Then we glue self-adhesive sickle tape along all the seams. This must be done to prevent the putty from cracking at the joints of the sheets.
Now we move on to puttying the walls; to do this, dilute the putty in the proportions indicated on the package, with ordinary water at room temperature. Using a large spatula, apply putty to the seams, and using a small spatula, seal the holes from the screws. The putty layer should be very thin. When the puttying work is completed and the putty has dried, it must be sanded using a sander and sanding mesh to smooth out all the unevenness. Upon completion of sanding, apply a thin layer of finishing putty to the seams.
The final stage of work will be the complete priming of the plasterboard wall.

Now let's touch on a more acceptable option for wall insulation - using plaster. First, we need to analyze the curvature of the wall and the presence of a slope. To do this we need a level or plumb line. Find the outermost and deepest points on the wall. Now analyze what layer of plaster you will need to apply to the wall in order to reach the level of the most extreme point. If the outermost point occupies a small area, and the wall itself is flat, then maybe it makes sense to use a hammer drill to knock down the uneven area and then simply putty the wall, thereby saving money and time on leveling. If leveling the wall requires a more serious decision, then there are 2 options: if the wall has minor unevenness, then it must be leveled using putty; if the wall goes in any direction, has significant unevenness, or does not have any finishing at all (“bare” brick wall), then it must be leveled with a cement mixture. Below we will tell you how to level the walls yourself in the first and second cases.
How to level walls with plaster
To level the wall with plaster we will need:
Primer;
Plaster;
Level;
Spatulas.
First of all, we need to prepare the wall for leveling. To do this, we need to get rid of old wallpaper, paint and other finishing materials - we must get a “bare” wall. Dismantle the sockets, while insulating the wires well and hiding them inside the box. When the wall is ready, we move on to priming it.
Priming the walls before leveling is done to ensure that the plaster is securely attached to the wall surface and prevents the appearance of mold and mildew. It is best to apply the primer to the wall using a roller, and in hard-to-reach places, for convenience, use a brush. If the work is carried out in the summer, then it is possible that the primer will dry out quickly, in which case it must be applied in several layers. After the wall has dried, we begin to apply a layer of plaster.
It is worth noting one very important point here. There are 2 ways to apply plaster to the wall:
The first method: you level the unevenness of the wall with one layer;
Second method: apply the plaster in several thin layers, with each subsequent layer separately primed.
The first method is the simplest and does not require unnecessary costs, but the second method is the highest quality and most reliable. We will focus your attention on the second method, which we will describe in detail below.
In order to stir the mixture we need: a bucket, water and a drill with an attachment for stirring the dry mixture. The proportions in which the mixture should be stirred will be written on its packaging.
As a rule, we will have to manage 3 layers of plaster to completely level the wall. If there are irregularities, small holes, grooves, depressions, etc. on the surface of the wall itself, then we apply the so-called zero layer to get rid of these flaws. Before you start applying plaster, you must first check the wall and know its structure: in which places it protrudes and in which it falls. We need this in order to navigate in what places and what layer of plaster to apply.
Using the first layer, we try to spread the plaster in such a way as to raise the level of uneven places as much as possible. To apply plaster to the wall, take a wide spatula and apply an edge to it, with a second spatula, apply the plaster and with smooth, rounded movements apply the mixture to the wall, smearing and rubbing it in. If necessary, add plaster to the deep areas of the wall with a thin spatula, but you need to rub it with a wide spatula.
Thus, after the first application of plaster, we must get rid of irregularities and depressions. When the plaster has dried, apply a layer of primer to the wall. When the wall treated with primer has dried, we apply a second layer of plaster, which should hide the entire wall underneath, eliminating all the unevenness on it. Then we apply a primer to the second layer of plaster and wait until it dries. Next, we cover the wall with a layer of putty, we will tell you how to do this correctly a little lower, but for now we will tell you about the promised leveling of the walls using a cement mixture.

Leveling walls with cement
As we have already said, we use cement screed if our wall goes in any direction or does not have any finishing at all. In the first case, we will build up the wall in such a way as to bring the depression to the level of the convexity and cover it entirely with mortar; in the second case, we will simply apply a layer of screed to the wall.
For this we need:
Guide rails;
Level;
Cement mixture;
Putty knife;
Rule;
Master OK.
As in previous cases, be sure to prime the wall and only then begin to level it.
Before proceeding to the main stage of the robot, use a level to calculate what the layer of mixture should be in order to level the wall. To do this, apply a level to the maximum point and step back 2-3 centimeters - this is exactly the position in which the so-called beacons in the form of guide rails should be installed. Thanks to the beacons, we will control the amount of mixture thrown in to level the surface.
Prepare the mixture strictly according to the instructions. Next, using a trowel, from top to bottom, at a distance of 20 centimeters, we apply cement with slaps on which the beacons will be held. Place other beacons at a distance of one meter from each other. It is very important to set the beacons correctly before the mixture dries, otherwise you will have to do everything again. When you have strengthened all the beacons along the entire wall, check their evenness, both vertically and horizontally. If there are unevennesses, then carefully adjust the slats to the level. If the beacons are installed at a distance of more than three centimeters, the mixture may begin to flow down the wall or crack, so we once again remind you of the need to install the beacons correctly. Then we let the mixture on which the beacons are attached dry (this will take approximately 5 hours).
When the mixture holding the beacons has dried and they are securely fastened, we begin to apply the cement mixture to the wall, after wetting it. Cement must be poured onto the wall in such a way that it fills all the recesses and other irregularities on the wall. The level of the thrown mixture should protrude 2-3 millimeters from the level of the beacons; this is necessary for leveling. When the first row is thrown, we press the rule against the beacons and move it from bottom to top along the beacons, thereby obtaining a flat and smooth surface. We clean off the excess mixture and place it in a bucket with the diluted mixture. If there is not enough mixture on the surface in some places, apply it with a spatula and level it using the rule. When the first strip has dried a little, we begin to apply the mixture to the second row and so on.
Before finishing work with putty, the wall must be completely dry for 7-10 days, depending on the room temperature.
How to level walls in the bathroom and kitchen
Since both the kitchen and the bathroom are often damp, it is best to level them with a cement mixture, and in no case with plasterboard or plaster. The principle of leveling itself is the same as leveling with plaster.
The only thing worth noting is that if the wall is slightly uneven, if you are laying tiles, then perform the leveling immediately at the time of laying the tiles, applying a slightly larger layer of adhesive mixture to the uneven areas.

Leveling and finishing walls using putty
How to level walls for wallpaper and painting
As mentioned earlier, the surface of the wall is leveled and prepared using putty. The thickness of the putty layer should not exceed 2 millimeters, otherwise it may crack. The wall itself is not leveled with plaster, only the surface is leveled. Thanks to its structure, the putty can be easily sanded, bringing it to ideal smoothness and evenness.
How to align wall corners
In order to align the outer corners of the walls, use special metal perforated angles. To do this, apply a thin layer of gypsum mixture along the entire length of the corner, on both sides, and place squares on top of it. Using a spatula, hide the squares under a layer of mixture, achieving a flat and smooth surface.
How to level walls in a wooden house
You can level the surface of the wall of a wooden house using gypsum board, but first consult with a specialist.
If the wall of a wooden house goes to one side or is bent, then to do this we find the point of deviation and, using wooden beams and clamps, direct it in the desired direction.
How to level walls video
To illustrate everything we told you above, below we have added a video that talks about leveling the walls.